Showing posts with label Experiments. Show all posts

Friday, November 14, 2008

Holy Mole Experiment

Perhaps you may think I'm a bit crazy trying to make mole from scratch, and perhaps you are right. If you decide you want to try to make homemade mole you will need: patience, a well ventilated kitchen, your mise en place ready, and a huge stock pot.

Also, mole is one of those sauces that can be adjusted to your taste. If you don't want to add cilantro, you don't have to; you can use toasted cashews if you want; want to add Mexican oregano? Go ahead. It's just one of those recipes that can be customized to your liking, and the one below is basically what I thought up. Make sure you finely grind your spices before you start so that they are ready to go (I used my coffee grinder for this). And soak your dried chiles 10 to 15 minutes before you start so that they soften a little. The measurements below are approximate because mole is definitely an "eye ball it" type of recipe.

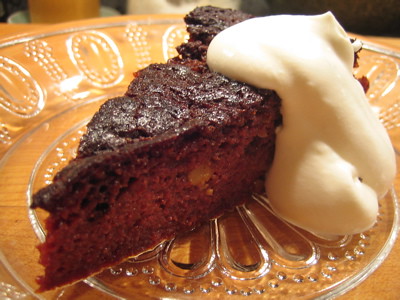
Lastly, if you've never had mole before, I suggest you go to a good Mexican restaurant and try it out first. It's definitely one of those dishes you either hate or you love. There are no in-betweens. The sauce is sweet, spicy, smokey, nutty, chocolatey and somewhat herbally. Serve mole over tortillas filled with refried beans, called enmoladas, or over cooked chicken or turkey or seafood. The recipe below made about 8 cups of mole. I poured most of it into 8oz containers and froze it since I'll be distributing some to my family. Have fun!

INGREDIENTS

  • 1 cup peanuts, toasted and chopped
  • 1/2 cup walnuts, toasted and chopped
  • 1 tablespoon olive oil
  • 2 tortillas, torn apart
  • 5 cloves of garlic, roughly chopped
  • 3 tomatoes, quartered
  • 1 large white onion, roughly chopped
  • 1 large jalapeno pepper, seeded and deveined and roughly chopped
  • 1 cinnamon stick
  • 3 bay leaves
  • 1/4 cup chicken base or bouillon
  • Mole Spices consisting of:
    1. 1 tablesspoon cinnamon
    2. 1 tablespoon corriander
    3. 1 tablespoon Thyme
    4. 1 tablespoon Majoram
    5. 4 cloves
    6. 1/2 Tsp. Allspice
    7. 2 Star anise
    8. 10 peppercorns
    9. 1/2 tablespoon cumin
    10. 1/2 tablespoon Mexican Oregano
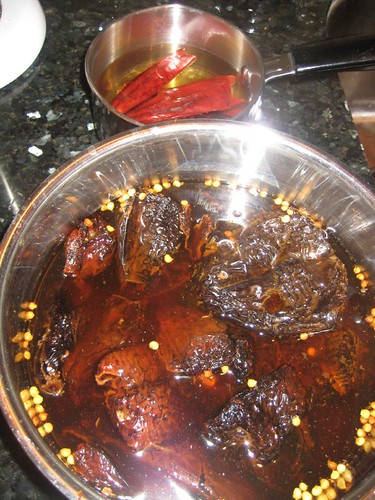
  • 10 dried Pasillas, stemmed and seeded and softened in 6 cups hot water
  • 4 dried Guajillo chiles, stemmed and seeded and softened in 2 cup hot water
  • 1 cup raisins
  • 1 Bunch Cilantro
  • 1 Bunch Epazote (optional)
  • 1 Bunch parsley
  • 1/2 cup packed brown sugar
  • 2 discs of Mexican Chocolate, chopped (La Abuelita brand, if possible)
  • 1/2 cup unsweetened cocoa powder
  • 1/4 cup white vinegar
  • 1/2 teaspoon Hickory smoke liquid
  • Salt to taste
DIRECTIONS

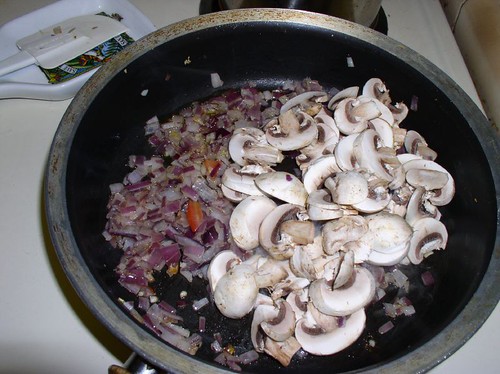
In a large stock pot, heat 1 tablespoon olive oil on medium-high. Add the torn tortillas and lightly fry up to soften. Add the garlic, onion, tomatoes and jalapenos, mole spices and 1 teaspoon salt. Saute for 8 to 10 minutes, or until everything is softened. 
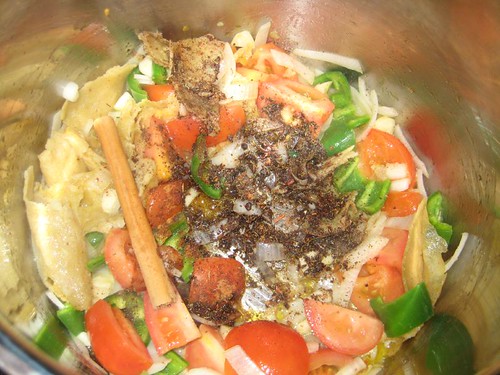
In the meantime, chop up the softened pasilla and guajillo chiles.

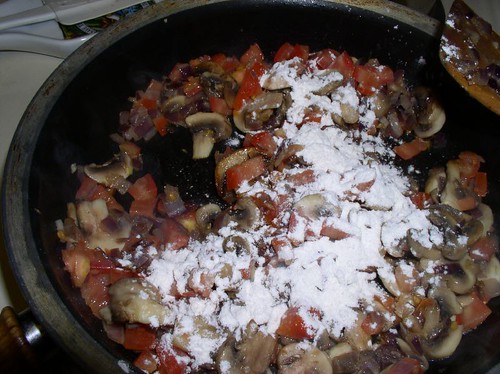
Add the cinnamon stick, bay leaves, and chicken base. Next add the chopped up passillas and guajillo chiles, and also add all the water the chiles were soaking in. Next add the chopped peanuts and walnuts, raisins, cilantro, epazote, parsley, brown sugar, both types of chocolate, hickory smoke and vinegar. Bring to a boil then simmer for 1 hour. Remove cinnamon stick and bay leaves.

With a heavy-duty hand blender, blend all ingredients in the pot, just until everything is broken down into smaller pieces. Taste for seasoning and add more salt, if needed. Simmer another 20 minutes. Turn off heat and let cool for half an hour.

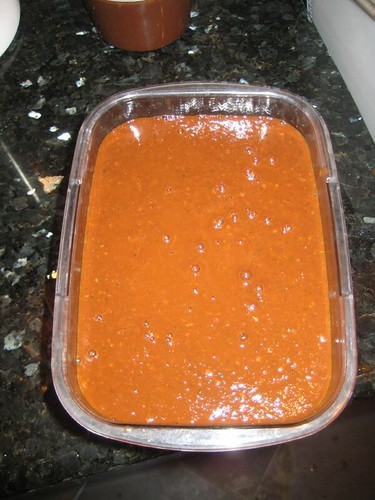
Now, blend the mole in batches in your regular blender. Start on low and slowly move it to high this way you won't get too many spills. Be careful because mole is still warm. Blend until you can get a smooth, thick consistancy. 
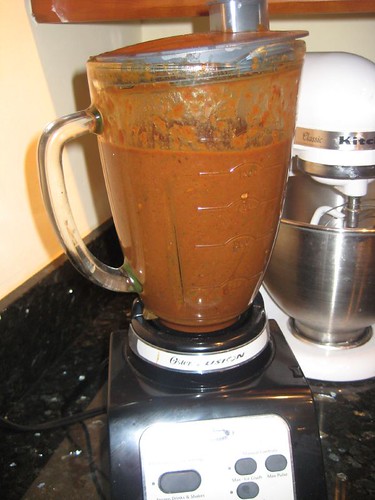
Let cool to room temperature then store in containers and freeze.

To make Enmoladas:

  • 2 tortillas
  • Refried beans
  • Olive oil
  • 1/2 cup mole
  • Queso fresco
DIRECTIONS

Heat up homemade or your favorite refried beans. Set aside.

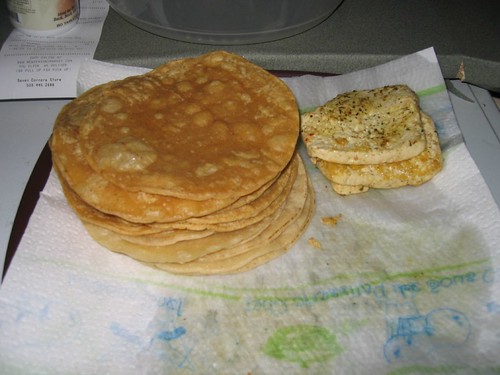
In a skillet, heat up 2 teaspoons olive oil on medium-high. Add 1 tortilla at a time and fry for 40 seconds on each side, or until they turn slightly golden and are pliable.

Place tortillas on serving plate and fill each one with refried beans and fold tortilla, like a taco.

In the same skillet (you should still have some oil left) add the mole and fry it up until it begins to bubble. Pour the mole over the refried bean tacos and then sprinkle queso fresco over it and enjoy.

Thursday, January 10, 2008

"Mock" Huevos Rancheros

Melissa cooking for us!
Last weekend, Matthew and I were in Portland, Oregon visiting my lovely cousins. I 'd forgotten that my cuz, Melissa, was a vegetarian--can you believe a Mexican vegetarian? Anyhoo, she invited us over for Sunday brunch and she made the most delicious mock huevos rancheros. If you're not a vegetarian, just substitute fried, over-easy eggs instead of tofu, and you've got yourself one awesome breakfast. But even with the tofu, this dish is delicioso!

INGREDIENTS (serves 4)

  • 1 Block of firm tofu, drained well and cut into 1/4" or 1/2" cutlets
  • Spike Seasoning (a must!)
  • 8 Corn tortillas
  • Oil for frying
  • 1 can of El Pato tomato sauce (15 oz)--also a must!
  • Cilantro, for garnish
  • Sliced avocados, for garnish
DIRECTIONS

Season the tofu on both sides with Spike seasoning. 
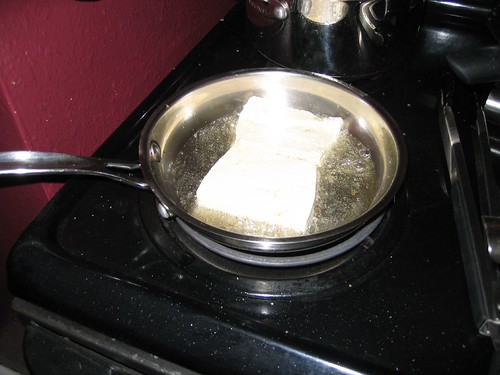
Heat some oil in a skillet over medium heat and pan-fry tofu for a few minutes (you want it nicely browned) then flip tofu and pan-fry on other side. Set aside and keep warm.

In a sauce pan wide enough to fit a tortilla, add the El Pato tomato sauce and heat to a simmer, then keep it on low heat.

Clean out skillet where you fried the tofu and add about 1/2" of oil and heat on medium-high. Once oil is bubbly, add a tortilla and fry for 30 seconds, flip over and fry for 20 more seconds. Them quickly place tortilla into the tomato sauce and dip it in just to coat on both sides, then set aside on another plate. Continue this process with remaining tortillas, working quickly, if possible.

To serve, place two crisp tortillas in each plate, then top with a tofu slice/cutlet. Drizzle a bit of the remaining tomato sauce, and garnish with cilantro and avocados.

Tuesday, November 20, 2007

Pizza Margherita, Sort Of

I just love buying ready-made pizza dough. I really love the pizza dough that Mona Lisa sells in their deli in Little Italy (SD), but Trader Joe's pizza dough comes in a close second. The reason I love to use pizza dough is because I can make it as thin or thick as I want. I personally love thin crusts with crusty edges...yummy. The traditional pizza margherita has tomato sauce, basil, fresh mozzarella and a Parmesan cheese, however since I had a pint of ricotta in the fridge I decided to go with that instead of fresh mozzarella. When making pizza, make sure you take the dough out of the fridge 30 minutes before you shape it because room-temperature dough will be easier to work with.

INGREDIENTS (makes one pizza)

  • Store bough pizza dough,
  • 1/2 cup crushed tomatoes (use San Marzano tomatoes, if possible)
  • 1/2 tablespoon extra-virgin olive oil
  • Salt and freshly, ground black pepper
  • Several fresh basil leaves (about 10), if they are very big you can coarsely chopped them
  • 1/4 cup freshly grated Parmigiano-Reggiano
  • 1/2 cup ricotta cheese
  • 1/3 cup grated mozzarella cheese
DIRECTIONS

Preheat oven to 500 degrees F and, if you have one, place a pizza stone on the bottom rack of the oven.

Form dough into a 12-inch pizza round or rectangle to 1/2" thick or thinner. Place on a pizza peel or sheet pan.

In the bowl of a food processor, combine tomatoes, olive oil, and salt and freshly ground black pepper to taste and process until smooth.

Pour sauce over pizza and smooth to spread evenly, leaving a 1/2-inch border along the edges of the dough. Sprinkle basil leaves on top of sauce and then top with Parmigiano-Reggiano. Finally, drop teaspoonfuls of ricotta then sprinkle mozzarella and bake for about 8 to 10 minutes, or until cheese is bubbling and the edges are golden brown. It's so easy and so good!

    Tuesday, November 13, 2007

    Gnocchi Parisienne

    picture from Food and Wine magazine
    So, as some of you may know, I have a difficult time making gnocchi or dumplings. Actually, anything that involved making a light pastry with mashed potatoes. So, when I saw this ridiculously easy recipe for gnocchi without using mashed potatoes, I just had to try it. And you know what, they were delish! I took this recipe straight of my my Food & Wine magazine and I didn't change a thing...except that I used a combination of different cheeses.

    INGREDIENTS

    • 1 cup water
    • 1 teaspoon salt
    • 1/4 teaspoon freshly grated nutmeg
    • 3 tablespoons unsalted butter, cut into tablespoons
    • 1 cup all-purpose flour
    • 3 large eggs
    • 1/4 cup plus 2 tablespoons freshly grated Parmigiano-Reggiano, Gruyère or Asiago cheese
    DIRECTIONS
    1. In a small saucepan, combine the water, salt and nutmeg with 2 tablespoons of the butter and bring to a boil over high heat. As soon as the water boils, add the flour all at once and beat the dough with a wooden spoon until it is thick and comes away from the side of the pan. Cook, stirring to dry out the dough, about 30 seconds. Transfer the dough to a medium bowl and let cool slightly, about 5 minutes.
    2. Beat 1 egg into the dough until incorporated. Beat in 1/4 cup of the cheese and another egg until blended, then beat in the last egg until the dough is very smooth.
    3. Preheat the oven to 350°. Bring a large pot of salted water to a boil. Set a bowl of ice water near the stove. With a large spatula, transfer the dough to a resealable plastic bag, pressing it into one corner. Cut off the tip of the bag; the opening should be about 1/2 inch long.
    4. Reduce the heat to maintain a gentle simmer. Carefully hold the bag over the water and press out the dough, using a small sharp knife to cut it into 1 1/2-inch lengths before it drops into the pot (see Note). Simmer the gnocchi for 3 minutes. With a slotted spoon, transfer the gnocchi to the ice water bath to stop the cooking. Transfer the gnocchi to paper towels and pat dry.
    5. Grease a 9-by-12-inch baking dish with the remaining 1 tablespoon of butter. Arrange the gnocchi in the dish and sprinkle with the remaining 2 tablespoons of cheese. Bake until puffed, about 25 minutes. Preheat the broiler. Broil the gnocchi 6 inches from the heat for 1 to 2 minutes, or until browned. Serve right away with the meatballs in tomato sauce. Bon appetit!
    6. this is how mine looked!

    Wednesday, September 26, 2007

    Faux-laches

    My husband has been craving poppy-seed kolaches lately, but when I looked up the recipe, it was a bit too much for me. I'm not a big baker, so I shy away from anything that I have to "proof." Anyhoo, I found a simple recipe for a buttery crust and I figured if I fill it with the poppy-seed mixture he likes so much, it'll be a little bit like a kolache. Oh, who am I kidding, but these faux-laches were pretty good.

    INGREDIENTS (makes 1 dozen)

    Dough
    • 3 oz. Cream Cheese, room temperature
    • 1/2 cup unsalted butter, room temperature
    • 1 cup flour
    Poppy Seed Filling
    • 1/4 cup + 2 Tablespoons sugar
    • 1 teaspoon cornstarch
    • 3/4 cups poppy seeds
    • 3 oz. whole milk
    • 1/2 teaspoon almond extract
    DIRECTIONS

    For the dough: cream together cream cheese and butter. Slowly add in flour. Blend and shape into a ball. Cover in plastic wrap and refrigerate 3 hours or overnight.

    For the filling: Stir together the sugar and cornstarch in a small bowl. Set the bowl aside. Grind the poppy seeds in a food processor or blender with about half the milk. Place the poppy seed mixture and the remaining milk in a small, heavy saucepan and bring the mixture to a boil over medium-high heat. Reduce the heat to a simmer and stir in the reserved sugar-and-cornstarch mixture and the almond extract. Simmer, stirring often, until very thick, a matter of 3 - 4 minutes. Set aside to cool.

    Preheat oven to 350 degrees.

    Assembly: Roll dough out 1/8 inch thick on a floured pastry board. Cut into 2 1/2 inch squares and place 1/2 tsp (approx) of poppy-seed filling. Overlap opposite corners and pinch together. Place on ungreased cookie sheets and refrigerate about 10 - 15 minutes.

    Bake for 10 to 12 minutes in the preheated oven. Cool. Sprinkle lightly with confectioner's sugar and enjoy.

    Tuesday, March 27, 2007

    Blood Orange Mimosa

    Here I am enjoying my bomosa.
    To me, Sunday's are bittersweet. They are great because it's usually on a Sunday that you get to eat a big breakfast, or even have crepes for brunch, and/or you're nursing a hangover from the awesome night before. Yet, it's also bitter because you know that Monday is coming and you have to start the daily grind again. But, in order to ease you into your Monday humdrum, having a mimosa on Sunday will do you wonders. Now this particular mimosa is not just your typical OJ and champagne. No, no, darling, this is freshly squeeze blood-orange (or sangüina in Spanish) and slightly more expensive champagne. So buy yourself a bottle or Korbel or Mumm, and serve up the blood-orange mimosas, or Bomosa, as I like to call them.

    INGREDIENTS (serves 8 people--or 4, if I'm there)

    • 1 bottle Korbel champagne
    • 2 cups blood-orange juice, freshly squeezed
    • 8 blood-orange slices
    DIRECTIONS

    Mix the champagne with the blood-orange juice in a large jug. Garnish each glass with a slice of orange. Serve, enjoy and eat your crepes! My cousin Fernanda thankfully didn't like her bomosa, so I got to drink it.

    Friday, January 05, 2007

    Tomato and Avocado Sandwiches A La Blaha

    tomato and avocado sandwich
    Last month, my papa-in-law and my horno-in-law (I mean brother-in-law, Michael) came to visit us down here in San Diego. Matthew and I took them for a quick tour of the Hotel Del Coronado, and, of course, we went wine tasting. We visited Belle Marie winery and Ferrara Winery, both in Escondido. Since this was a quick tour, we decided to stop at a farm stand near the freeway and we bought farm-fresh tomatoes and avocados. Immediately we all decided we were going to make sandwiches, but we didn't have much time nor any utensils or bread. So we decided to make a quick stop at the grocery store and bought the rest of the ingredients. And yes, Michael made these wonderful sandwiches.

    INGREDIENTS (makes 4 sammies)

    • 2 or 3 large, farm fresh tomatoes
    • 3 or 4 ripe avocados (depending on their size)
    • 8 slices of Munster cheese (from the deli counter)
    • packets of Mayo (you can steal, I mean take some from the deli or just buy a small jar)
    • 4 French rolls or your favorite sandwich bread
    • Plastic knife and fork (you can also take a couple from the deli!)
    DIRECTIONS
    1. Slice tomatoes in 1/4" thick slices. michael concentrating on cutting perfect slices
    2. Cut avocados by cutting around then removing the pit. Cut into wedges.
    3. Cut open your bread and spread generously with mayo. Divide the tomatoes, avocado wedges and cheese among the four pieces of bread.
    4. Eat like a maniac!
    arglglglglgl!

    Thursday, December 14, 2006

    Persimmon Pudding

    Persimmon Pudding
    Around Thanksgiving and Christmas time, persimmons go on sale like crazy here in Southern California. If you've never had these delightful fruits, you should give them a try. They look like tomatoes, but taste like apple, pumpkin and kiwi fruit combined...well, that's what I think. Anyhoo, after watching Charles Dickens A Christmas Carol, Matthew and I wanted to make plum pudding for Christmas but after we realized all the steps and ingredients it takes to make it, we decided on a simpler pudding...and this pudding is quite easy; however check the pudding after 55 minutes because some ovens tend to get hotter than others.

    INGREDIENTS (serves 8)

    • Ripe persimmons, Hachiya or Fuyu (enough to make 2 cups of persimmon pulp)
    • 3 cups milk
    • 2 cups sugar
    • 2 eggs
    • 2 cups all-purpose flour
    • 1 teaspoon baking soda
    • 1 teaspoon baking powder
    • 1 teaspoon vanilla extract
    • Dash of cinnamon
    • 1/2 cup chopped nuts (optional)
    • Fresh, whipped cream
    DIRECTIONS

    Heat the oven to 350 degrees.

    Remove the skin and seeds from the persimmons and puree the pulp in a blender or food processor. In a large bowl, combine the pulp, milk, sugar, eggs, flour, baking soda, baking powder, vanilla extract, and cinnamon until well mixed. Stir in the chopped nuts, if desired. Pour the mixture into an ungreased 9- by 13-inch baking pan and bake for 70 minutes or until a knife inserted into the center comes out clean. Serve warm with whipped cream.

    Wednesday, May 17, 2006

    Beermaking with a Brew Kit - Part 3

    Finally, our homemade beer! To view part 1, click here.

    To view part 2, click here.

    Well, my friends, our beer is finally ready. After 40 days and 40 nights, we finally opened up the bottles of our homemade beer, and boy was it good! Since this was our first time making beer, we decided on an American Pale Ale from the Mr. Beer Premium beer kit. The flavor was very crisp and the beer was quite bubbly. It did not have a bitter taste and the finish was very smooth. My friend Leo told us it reminded him of a Miller High Life, the champagne of beers, while my brother said it tasted somewhat like hard cider.

    I have to say that my husband and I had a lot of fun making the beer; waiting for it is the hardest part, but after you taste the goodness, you'll want to make more beer. I think we're going to try an IPA or a stout next. We'll keep you posted.

    Thursday, April 13, 2006

    Beermaking with a Brew Kit - Part 2

    Mmmm, beer....

    Last month we left off after my husband and I began the first part of our beer making process (click here to see part 1). We brewed our wort, added the yeast and we left it alone to ferment. The yeast created a fiesta of foam--I think this was the bacteria feeding. Anyhoo, we placed the brew in a cool, dark place.

    We let the yeast do its thing for 7 days. After all the foam subsided the next step is to bottle our beer! Our kit came with eight 20-ounce PET bottles and screw caps. As always, with beer making, we sanitized the bottles and the caps before bottling.

    Sanitizing the beer bottles

    After each bottle was sanitized, I added 2-1/2 teaspoons of white granulated sugar. I made a quick funnel with aluminum foil, or you can use a plastic funnel--just make sure to sanitize the funnel, too! A precaution here is to not add too much sugar as it will over carbonate the beer resulting in gushing or bursts of bottles. So follow the directions.

    I'm adding the sugar 
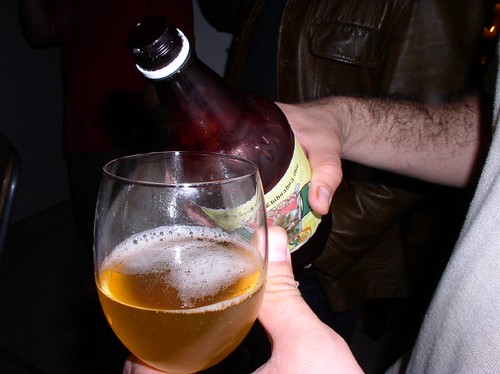
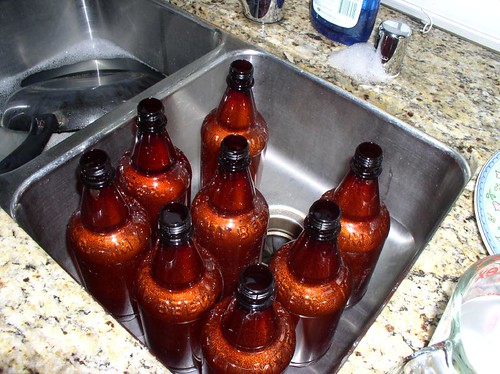
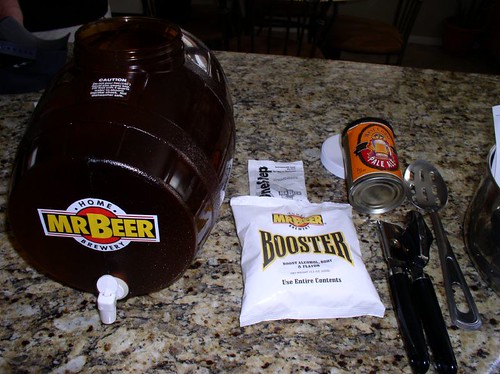
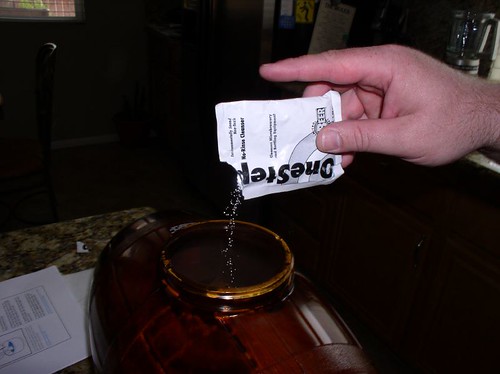
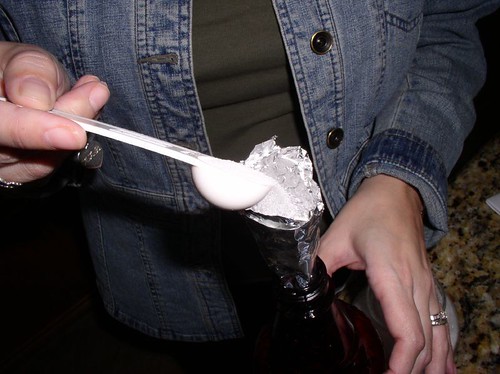
Next, my husband held a bottle at an angle and he used the tap (attached to keg) to fill each bottle about 2 inches from the top. He then placed the caps and hand tightened them. I shook the bottles gently to help dissolve the sugar. at an angle, pour the beer from the tap into the bottle

    The instructions say that we must give the beer a MINIMUM of 7 days to carbonate. So, we have to be patient and wait again. We placed the bottles in my mom's garage because it stays cool in there and it's generally dark. Princess and I can't wait to taste the beer!

    Please check back with us in another week or so to find out how our beer came out. In the meantime, Princess, our old Chihuahua is going to keep an eye on the beer for us!

    Monday, March 27, 2006

    Beermaking with a Brew Kit - Part 1

    The Mr.Beer Kit This may come as a shock to you, but I don't particularly like beer. I've never been a huge fan of beer and if I ever do drink it, it's usually hard cider or a light beer. However, a couple of years ago I had my first taste of home brewed beer and boy was it good! I tasted my friend Leo's brew and, although he makes darker ales, his beer is fabulous.

    Then, a few months ago my father-in-law sent us some of his homemade Blaha brew. sterilizing powderHe has been making his own beer for years and years and he is always coming up with new flavors and recipes. Recently he sent us some of his sage beer and mead beer. His beer is quite tasty and refreshing that we can't get enough of it.

    So, I decided to give beer making a try. Since we live in a small apartment I decided to buy the Mr. Beer Premium Kit. The kit comes with a plastic keg, tap, all of the ingredients, sterilizing powder and six 20 ounce plastic bottles. sterilizing the equipmentThe only equipment I need to provide is a mixing spoon, a plate, can-opener, a measuring cup and a 3-quart pot. The key to great homemade beer is cleanliness. You want all of your equipment to be sterilized because this creates a clean environment to your ingredients and giving you less of a chance to mess up your beer.

    What I like about the Mr. Beer Premium Kit is that the steps are easy to follow and the entire process took about 40 minutes. Dissolve the corn sugar in cold water then bring to a boilThe bad thing is that now we have to wait. Fermentation takes a minimun of 7 days, after that we have to bottle the beer and condition it for another 7 days...so come back in a couple of weeks to check on part 2 of my beermaking progress!

    Adding the malt to the hot water/sugar mixture 
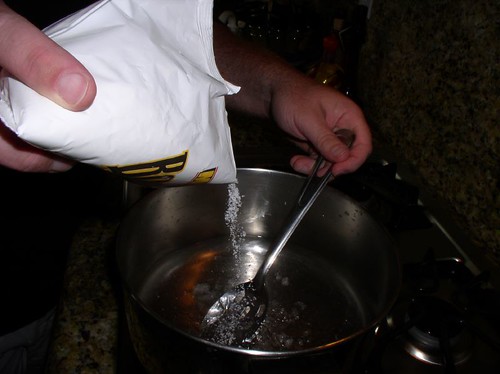
Adding the beer mix (malt) to the hot water and corn sugar mixture.

    Mixing the malt mixture

    Mix the malt and hot water until dissolved.

    Add the hot mixture into the keg filled with 4 quarts of cold water 
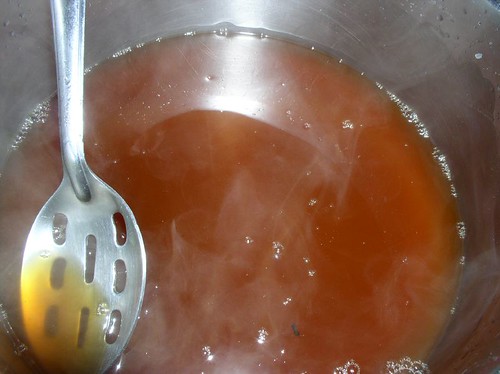
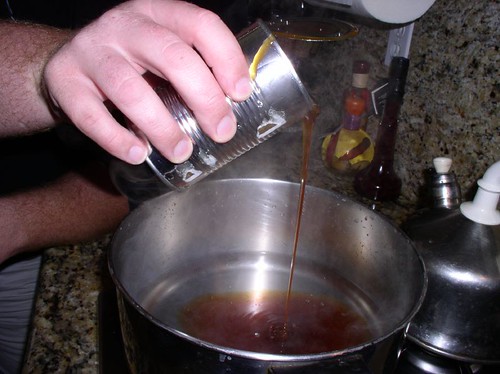
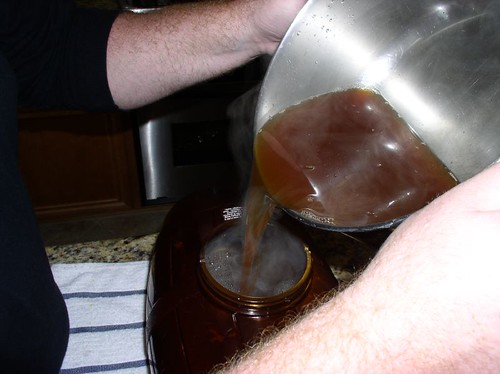
Then add it into the keg which is filled with 4 quarts of cold water...

    Add more cold water to reach 8.5 quarts; add yeast and we now have to wait!Finally, we add more cold water to reach 8.5 quarts and add the yeast. Tightly put on the lid and we have to let it ferment for 7 days in a dark, cool place.

    to be continued...

    Thursday, March 16, 2006

    Vegetarian Shepherd's Pie

    My husband and I are planning a trip to Ireland and the U.K. in the fall and I got inspired to make vegetarian Shepherd's Pie. I know it sounds like an oxymoron, but it was really quite good. Unfortunately, I suck at making mashed potatoes, so I used instant mashed potatoes instead, however homemade mash 'taters or even left over mashed 'taters will make this dish delightful. And I bet your family will have no idea it’s vegetarian if you don’t tell them! I give an A+ to Yves Veggie Cuisine. All their products are top notch and quite flavorful.

    INGREDIENTS (serves 4)

    • 2 Tablespoons olive oil
    • 2 Tablespoons butter, unsalted
    • 1 cup diced onion
    • 1 cup sliced button mushrooms
    • 2 cloves garlic, minced
    • 1/2 cup roasted red bell pepper, diced (you can substitute w/ a 4oz. can of diced green chiles)
    • 2 plum tomatoes, seeded and diced
    • 1 Tablespoon flour
    • 2/3 cup vegetable stock (you can use chicken stock, but it will not be 100% vegetarian)
    • 1 Tablespoon Worcestershire sauce
    • 1 Tablespoon soy sauce
    • 1/2 tsp. kosher salt
    • 1/4 tsp pepper
    • Pinch of Thyme
    • Pinch of dried Rosemary
    • 1 pkg Yves Veggie Cuisine Ground Round Original
    • 1/4 cup low fat milk
    • 2 large russet potatoes, peeled
    • 1/8 tsp paprika
    • Butter
    1. Preheat oven to 400°F.
    2. Cut each potato into thirds and cook in boiling water until tender, about 15 to 20 minutes. Reseve 1/4 cup of boiled potato and dice it.
    3. Meanwhile, in skillet over medium-high heat add 2 tablespoons butter and 2 tablespoons olive oil. Sauté onions for two minutes then add garlic and sauté 2 minutes more. 
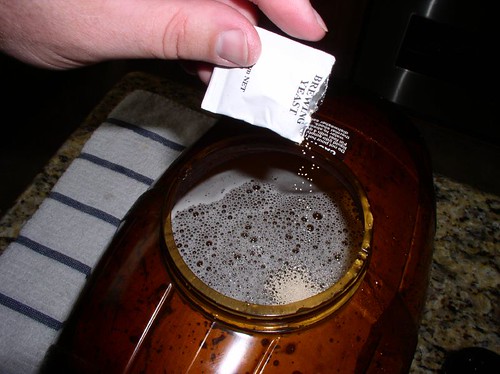
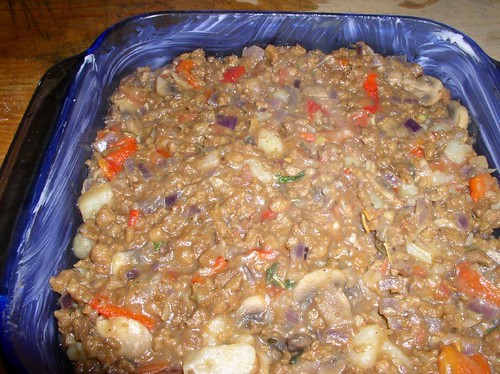
Add the mushrooms and cook and cook over medium-high heat until soft, about 1 minute. 
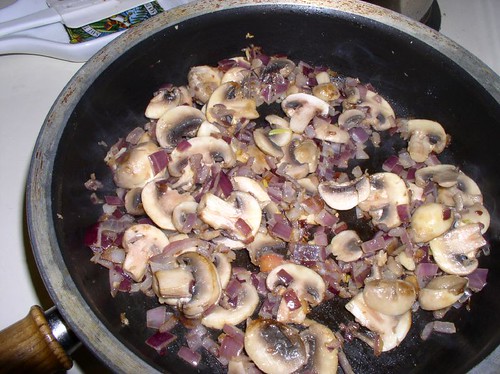
Add the diced tomatoes, the reserved 1/4 cup diced potatoes and the diced red bell pepper.
    4. Sprinkle 1 tablespoon of flour over veggie mixture and make sure all vegetables are coated. Add the vegetable stock and simmer until mixture thickens, about 1 minute. 
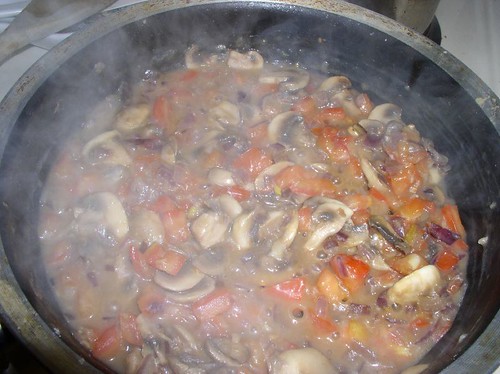
Add the Worcestershire sauce, soy sauce, thyme, rosemary, salt and ground pepper.
    5. Lastly, add the veggie ground round and cook for 2 minutes or just until it heats through. Remove from stove and set aside.
    6. Transfer the veggie mixture to sprayed or lightly oiled 9x9x2" casserole dish. Spread mixture and pack evenly.
    7. Mash the potatoes. Add milk, 2 tablespoons butter, salt, pepper; mash until fluffy. Spread potato over veggie mixture. Sprinkle with paprika and dot with little bits of butter.
    8. Bake for 20 to 30 minutes or until heated through and mashed potatoes brown slightly on top.