Sunday, October 30, 2005

Decorating Sugar Skulls

On Saturday morning, Matthew, my step-mom Elaine and myself attended a Sugar Skull Decorating class at Back from Tomboctou, a store full of unique Mexican Folk Art. At the class, our instructor showed us how to make sugar skulls from sugar, meringue powder and water. Many colored sugar icings were provided to us along with shiny foil papers to use as decorations. As you can see from the pictures below, the three of us went a little crazy with our decorating.

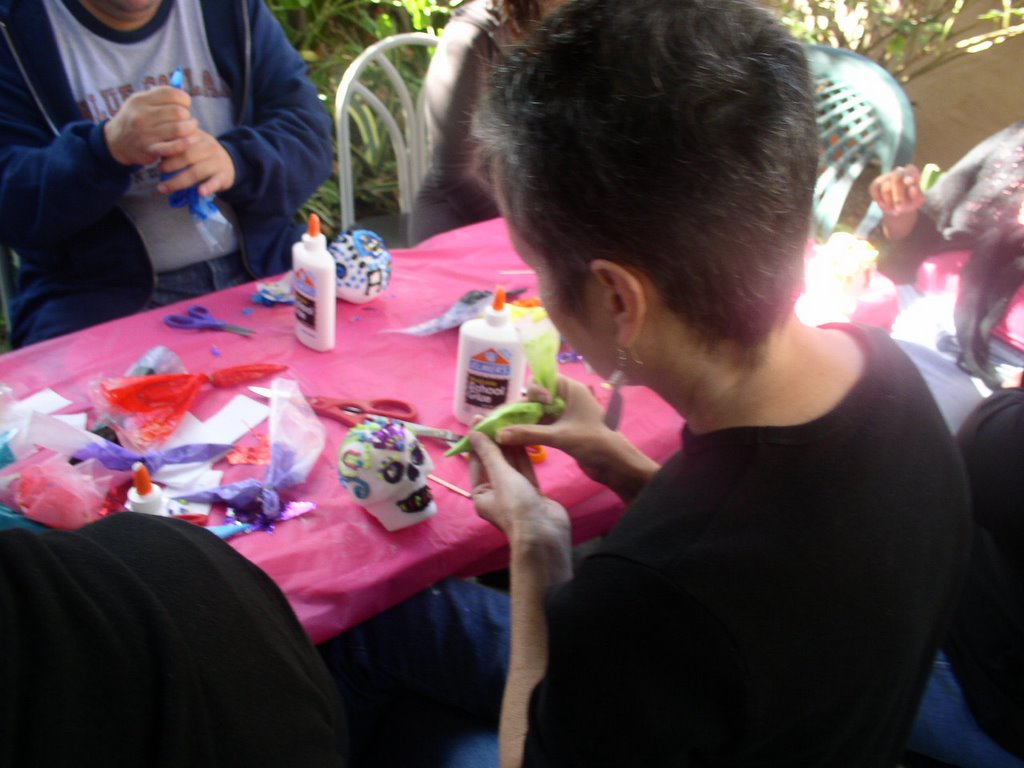
Our instructor giving us tips on decorating the sugar skulls.

The beginnings of my skull. The eyes and teeth have colored foil in them.

The beginnings of Matthew's skull. Note his elaborate use of colors. Most of the decorations on this one are made of sugar icing.

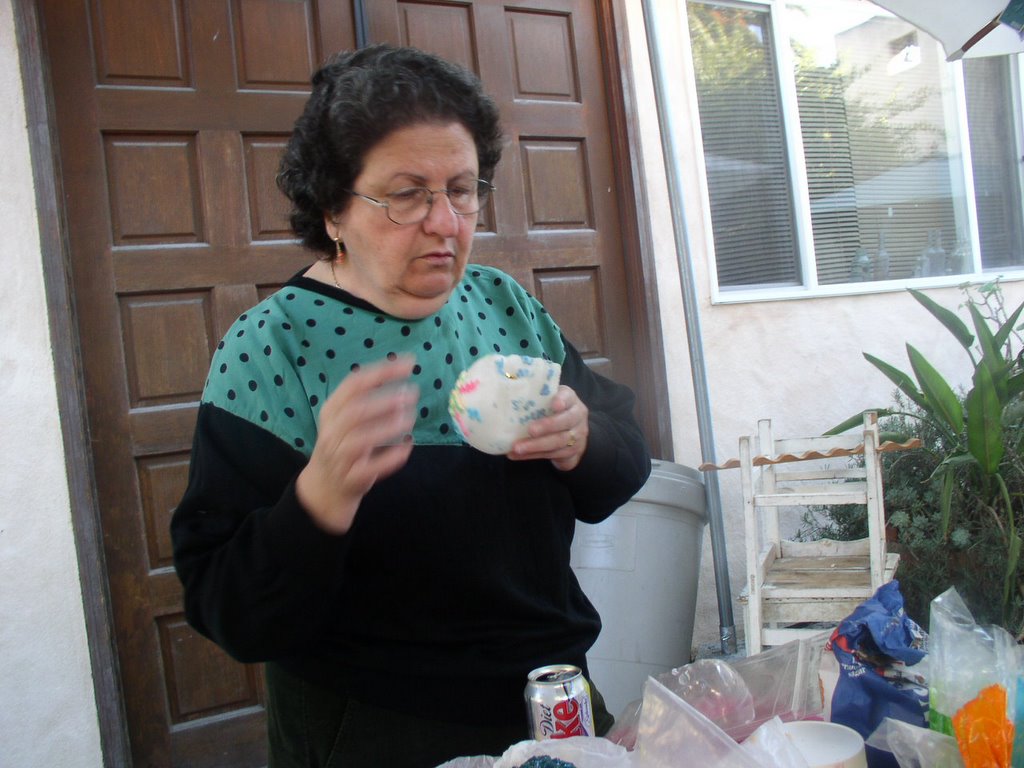
My step-mom Elaine concentrating on her skull.

My skull: I'm adding the finishing touches here.

And here is my finished product. Notice it has a cross made out of foil in the forehead. I also put my brother's name, Robert, in the back of the skull to honor him on the Day of the Dead.

Here is Elaine's finished skull. I really like her use of color here. I think Martha Stewart would be very impressed!

And finally, here is Matthew's skull. His was the most elaborately decorated, I think. Notice the Celtic Cross across the forehead. Matthew put an "M" and "B" in the back of the skull to honor and remember his grandmother, Marguerite Burns.

Thursday, October 27, 2005

Coming Soon: Dia de los Muertos

Stay tuned for some fun sugar skulls I'll be making this weekend and homemade bread we'll be offering to our beloved departed ones.

What is Dia de los Muertos (Day of the Dead)? Día de los Muertos is an important Mexican holiday for families to remember their dead loved ones and to be reminded of the continuity of life. Día de los Muertos is rich in symbolism and traditions evolving since the time of the Aztecs. It is not a somber or morbid occasion, it is a celebration of their departed loved ones’ souls returning for a brief visit. Celebrated during the first two days of November, Día de los Muertos festivities include visiting gravesites of close relatives, decorating gravesites with flowers, enjoying a picnic, and interacting with other family and community members who gather at the cemetery. Families remember the departed by telling stories about them. Ofrendas (blessed altars) erected at the cemetery or at home are decorated with flowers (primarily marigolds) and are adorned with religious amulets, and offerings of food and drink. Also decorating the altars are photos of the deceased as well as candles, gifts, and other items they were fond of during their lifetimes. It is believed that the returning souls enjoy the treats left for them at the ofrendas. Find out more fun facts here at AZCentral.com.

Wednesday, October 26, 2005

Brie en Croute

Earlier this year, my husband and I went on a winery tour of Temecula, California. Temecula is no Napa or Sonoma, but its location and its charm makes is a great place to visit, especially if you fancy yourself a wine connoisseur on a budget. There are 20 Temecula wineries and a handful of them are internationally known. One of the most renowned and visited is Thornton Winery. Thornton is well known for its award-winning champagnes and premium varietals. On our trip there, we ate at Café Champagne (note: try not to go on a busy weekend, otherwise you're looking at a wait time in order to sit down and eat) and we each had a flight of champagnes and wines. With our tasting we ordered a Baked Brie Wrapped in Puff Pastry with Honey Walnut Sauce and, OH MY GAWD it was delicious.

Ever since our trip to Temecula, I've been trying to recreate the recipe. I found that they have their recipe online now, but you can try my version below. They taste very similar and it goes just divine with champagne. Go on now, go make it...

INGREDIENTS

  • 1 sheet frozen puff pastry, pre-packaged
  • 4 tablespoon unsalted butter
  • 1/2 cup Emerald Glazed Walnuts, original flavor
  • 1/8 teaspoon ground cinnamon
  • 1 (8-ounce) wheel Brie
  • 1/4 to 1/3 cup honey
  • 1 egg, beaten
  • Crusty bread, for serving

Preheat oven to 375 degrees F. Defrost puff pastry for approximately 15 to 20 minutes and unfold.

Here are all the ingredients you need: one sheet of puff pastry, 1 wheel of brie (8oz), 4 tablespoons of butter, 1/8 teaspons ground cinnamon, 1/4 -1/3 cup honey and 1/2 cup glazed walnuts (try Emerald Glazed Walnuts).

First, cut the white rind from the sides of the brie then, with a serrated knife, scrape some of the rind from the top and bottom of brie. You do not have to scrape it all off, just enough so there is still a light film of rind left.

Lay the puff pastry out on a flat surface. Place the brie in the center of the pastry. Leave about one inch on each side of the puff pastry (you may need to cut it to make it fit--see above picture). Gather the pastry as if wrapping a gift and gently squeeze together the sides of the dugh and press with your fingertips.

Brush the beaten egg over top and side of Brie. Place Brie on a cookie sheet and bake for 35 minutes until pastry is golden brown.

Once your brie is down, place it on a shallow serving platter or a large dinner plate. Now it's time to make the honey butter.

In a pan, melt the 4 tablespoons of butter and add the honey and cinnamon.

Pour the honey-butter over the baked brie and top with the glazed walnuts.

Serve with toasted bread or crackers and enjoy!

Tuesday, October 25, 2005

Lindsey's Hot Toddy

A couple of years ago my brother Tom and his girlfriend moved in together. His girlfriend (now wife) Lindsey, came by way of Denver, Colorado and she brought with her her family recipes, including her now famous, Hot Toddy. I recall it was the winter of 2002 and there was a wicked flu and cold epidemic going around. One evening my roommate Isabel, Lindsey and myself all found ourselves suffereing from the cold. Lindsey made us a hot toddy and, kid you not, we felt much better right away. This drink is NOT recommeded for anyone under 18 because it does contain a lot of alcohol and also, you shouldn't mix alcohol with medication. But if you ever find yourself under the weather or just feel like having a nice, hot, steamy toddy, try this recipe. It will definitely make you feel better.

INGREDIENTS (1 serving)

  • 2 Shots Brandy
  • The juice of one Lemon
  • The juice of one Lime
  • 2 TBSP or more to taste of Honey
  • A microwaveble safe mug
In the microwaveable safe mug, add all the ingredients. Place it in the microwave on high for 2 minutes, until it starts to bubble. Be careful because it's hot. If you find this drink too strong, you can add a 1/2 cup of hot brewed tea (preferebly chamomile or jasmine) to the toddy. I also found that breathing in the steam from the hot toddy clears out your sinuses.

I used E&J Brandy, and 100% honey from the Jim Blaha beehives in Northfield, MN.

Add two shots of Brandy to the mug.

Next, add the lemon and lime juices and then drizzle in the honey.

Microwave on high for 2 minutes and you're ready to start feeling better!

Monday, October 24, 2005

Grilled Portabella Mushrooms

My husband's motto is: Even if it's a dreary, gloomy Sunday afternoon, we grill, grill, grill! (Just picture him as a big Navy General smoking a large Cuban cigar). Actually, he only recently began to feel the love for the grill and has now become an incredible grill apprentice, soon to be meister of course. Yesterday he grilled his famous Kabobs a la Blaha, along with grilled portabella mushrooms. This was a team effort on both our parts. I made the marinade for the portabellas, and he grilled them. And by golly, they came out good. As you may, or may not, know, portabellas are large and thick, overgrown Crimini mushrooms. Their actual name are portobellos and evidently the usage of the two words "portobello vs. portabella" is simply an issue of a marketing brand. Make sure you buy plump firm and solid mushrooms. Avoid the limp or dried looking ones. They should not be shriveled or slippery (which indicates decomposition) and the mushroom should have a nice earthy smell. Now they sell them sliced and packaged, which are the portabellas we used.

INGREDIENTS

  • 2 TBSP. Balsamic Vinegar
  • 1 TSP. Soy Sauce
  • 1/2 Tsp. Powdered garlic or 1 minched garlic clove
  • 1/2 Tsp. Oregano
  • 1/2 Tsp. Basil
  • 1/2 Tsp. coarse pepper
  • 1 Tsp. Kosher Salt
  • 1/4 Tsp. Thyme
  • 1/4 Cup. Extra Virgin Olive Oil
  • 1 Package pre-cut Portobello Mushrooms
First, turn on the gril to medium-high. Make sure it's clean and well lubricated. In a small glass bowl add the first 8 ingredients and lightly wisk until salt dissolves. Then, in a steady stream, drizzle in the olive oil while still wisking away. With a pastry brush, brush the marinade on both sides of the portobellos. Grill for 5 to 6 minutes on each side until just cooked through. Here we have them next to Spinach Polenta and a Kabob a la Blaha.

Sunday, October 23, 2005

Chicken Stock 101

I was cleaning out my refrigerator the other day and, lo and behold, I found four frozen chicken breasts that were hidding all the way in the back of the freezer. I didn't recall when I placed those breasts there so, instead of risking cooking these into tough, rubbery, no-flavor chicken, I decided to do the honorable thing and turn these frozen chickies into stock. Mind you, I've never made chicken stock, or any type of stock for that matter; this was my first time. I was also surprised that while I cleaned out the fridge, I found a half of an onion, an anahein pepper and garlic cloves. I think I had enough for stock, don't you think? Some other stock recipes call for celery, carrots and even leeks, but I found that even with a few veggies and some really good herbs, your chicken stock will come out fantastic. I used a bouquet garni, which I McGivered out of a tea bag and kitchen string. Pretty good, huh? The outcome? Really good stock that was not greasy at all. I used it for a Ropa Vieja recipe I made and the homemade chicken stock made all the difference in the flavor!

INGREDIENTS

  • 1 Tsp. Olive Oil
  • 4 Chicken Breasts
  • 1/2 Onion, unpeeled
  • 1 Anaheim chile pepper, seeded
  • 2 Garlic cloves
  • 1 qt. Water
  • Kosher Salt, to taste
  • 1 Bouquet Garni with 1 tsp. thyme, oregano, basil, dried parsley, 1/2 tsp. coarse pepper and 1 bay leaf
Place a large pot on the stove and turn the heat to medium-high. Add the olive oil. When it starts to sizzle a little, add the chicken breasts, onion, Anaheim chile and the garlic. Sear them until breasts are lightly brown on all sides, about 5 minutes. Add the water and bring to a boil. Add the bouquet garni and simmer for an hour. Strain stock and pour into containers use within two days or freeze, up to 2 months.

Thursday, October 20, 2005

Roasted Walla Wallas

When I feel like having a side dish besides a salad, I try to find a recipe that I've never tried before. To me, a side dish should be simple and preferably fast to make, but at the same time healthy and delicious. I'm not a big fan of packaged side dishes like mac and cheese or stuffing, etc, so coming up with new, inventive side dish takes a lot of thinking and testing! One vegetable I wanted to try were Walla Walla Onions. I wanted to try them because the name reminds me of a Bugs Bunny cartoon where Bugs is a "Wishie-Washie-White-Washing Machine Salesman from Walla Walla, Washington!" Anyhoo, I found these lovely onions at Ralph's, although they were quite pricey. I made the recipe below with just one large onion, and it still came out superb! INGREDIENTS
  • 2 Walla-Walla onions
  • 2 1/2 tablespoons balsamic vinegar
  • 2 1/2 tablespoons water
  • 2 tablespoons extra virgin olive oil
  • 1/2 teaspoon salt
  • 1 dash pepper, to taste
  • 4 sprigs fresh thyme (optional)
Turn on the oven to 400 degrees. Cut off tops of onions, remove skins keeping root end intact. Slice the onions into 4 even wedges. In a bowl, combine vinegar, water, salt, pepper and oil and whisk until combined. Add the quartered onions to the mixture and toss until they are well covered with the vinaigrette. Place the onions skin side down in a baking pan, lined with aluminum foil. Tuck the thyme sprigs in among the onions. Cover the baking pan with foil and place it in the oven. Roast at 400 degrees for 30 minutes, basting occasionally. Remove cover and roast for an additional 15 minutes, until tender and caramelized. Serve as a side dish to almost any meal.

    Tuesday, October 18, 2005

    Princess' Puerto Rican Burgers

    Matthew woke up with a wicked hamburger craving on Sunday morning. So, instead of going out to a fast food restaurant, we decided to make it a grill day. Usually, in my family, we don't cook on Sundays. It is customary to go out to eat after church but since my parents and sister had already gone to church on Saturday instead--it's one of those Catholic loopholes--we fired up the grill at their place on Sunday afternoon. Now, what makes this a Puerto Rican burger? Well, mainly the Goya seasoning. And I just wanted to give this recipe a clever name. And who is Princess, you ask? She's our twelve year old little Chihuahua or "pinchi Princess" as we affectionately call her. She kept Matthew company the entire time he was grilling. Additionally this little doggie likes to eat cheese, grilled onions, avocados and beans. A true Mexican, if you ask me.

    INGREDIENTS (6 large patties)

    • 2 pounds Ground Beef (85% lean) or Ground Chuck
    • 1 TBSP. Goya Adobo All-Purpose Seasoning without pepper
    • 1 TSP. Salt
    • 1/2 TSP. Ground black pepper
    • 1 TBSP. A-1 Steak Sauce or Worcestershire Sauce
    • 6 Slices of cheddar cheese or pepper-jack
    • 1 package of hamburger buns
    • Ketchup, Mayo, Mustard, Lettuce, Onions or any other fixin's you want.
    DIRECTIONS

    First, make sure your grill is clean. Lubricate the grates with oil (fold a paper towel and dab it in oil then, with your tongs, run it over the grill grates). Turn on your grill on high. Next, in a bowl, mix the first five ingredients together with your hands (make sure you take off your rings). Form 6 hamburger patties. Turn down the heat on the grill to medium high and place the patties on the grill. At this point you can also cut an onion into 1/2" rounds and place it on the grill. Since these patties are thick, grill them about 10 minutes on one side then 8 on the other for medium-well (no pink). During the last 2 minutes of cooking, add a slice of cheese on each patty. Once they are done, let the hamburgers rest on a platter for 5 minutes before serving. Also, remove the onions from the grill.

    Here Matt is grilling the Puerto Rican burgers, turkey burgers, bratwurst and sliced onions.

    The Grill Cam
    VOILA!

    Monday, October 17, 2005

    Ambrosia Salad

    My step-mom, Elaine, makes a very delicious Ambrosia Salad. In Greek and Roman Mythology, Ambrosia was the food of the gods thought to bestow immortality. I don't know if this salad will give you immortality, but it will definitely make your taste buds happy. You can also add nuts to the salad; however I like to stay away from it because there are too many people allergic to nuts. If you're not a coconut lover, you can omit it. The salad will still come out creamy and delightful. INGREDIENTS
    • 1 Small Cantaloupe, seeded and cut into bite size pieces
    • Half of a Watermelon, cut into bite size pieces
    • 1 Cup Honeydew Melon, cut into bite size pieces
    • 1 Cup Seedless Grapes
    • 1 Can (15 oz) Mandarin Oranges, in its own juices
    • 1 Can (20 oz) Pineapple Chunks, in its own juices
    • 1 to 1-1/2 Cup Sour Cream
    • 1 Bag of Mini-Marshmallows
    • 1/2 to 3/4 Cup Flaked Coconut
    • 1 Can Fruit Cocktail, drained (optional, if you want more fruit in the mix).
    In a large bowl add all the ingredients and mix with a wooden spoon until creamy. Keep refrigerated until ready to serve. This is a great salad to take to a picnic or to serve on special occasions.

    Friday, October 14, 2005

    Indulgent Thursday

    It was a very indulgent evening for us last night. My husband and I first attended a wine tasting at Azzura Point Lounge at Loews Coronado Bay Resort. The sommelier, Kurt Kirschenman, served us a tasting flight of three California Cabernets: a 2001 Mason Cabernet from Napa Valley ($28), a 2002 Leal Vineyards Estate Cabernet Sauvignon ($26), and a 1997 Cabernet that I forgot the name of, but it wasn’t really that impressive. The Mason wine was very light and enjoyable. It was soft on the palette and it had lingering aroma of berries and plum with chocolate finish. The 2002 Leal was my favorite. It was soft yet robust (I know, a contradiction) with a strong finish. It had soft flavors of cocoa, expresso coffee and raspberries. This was quite enjoyable. All the wines were paired with appetizers prepared by Chef Martin T. Batis. We each got a plate with large spoons filled with the tasty treats. From L to R: The first spoonful was a soft-boiled quail egg with roasted beets, pomegranate sauce and a shaving of truffles. The second spoon contained a broiled piece of steak, very well seasoned with garlic and a lot of peppercorns, and topped with a shitake mushroom. It was oozing with its own juices. YUM! And the last spoonful was a poached fig in wine, topped with a shaving of a very stinky, musty and woodsy Swiss cheese, but it worked well with the fig.

    Finally, to end our evening of indulgence, we decided to try out Karen Krasne’s Extraordinary Desserts. Her offerings range from cheesecakes, tortes, creme brulees, and mousse cakes to tarts, loaves, and cookies. She also serves coffees imported from Hawaii and Italy and teas from Paris. My husband had a berry filled strudel that was flaky and buttery and delicious. I had a passion fruit meringue tart topped with fresh berries and a scoop of raspberry sorbet (pictured above). All her desserts are wonderful, but a bit too sugary for me. I believe she offers some low-sugar desserts, which I’m thinking of trying next time. BTW, the pictures here were taken by my mobile phone.

    Thursday, October 13, 2005

    Baked Cajun-Style Swordfish

    Sometimes after work I am tired and completely brained out when I get home and I really don't feel like cooking an elaborate meal. This is when the oven is my best friend. Roasting is such a wonderful way to cook, especially in the winter months. Roasting usually will give you a good caramelization on your food and, if prepared right, your food will come out juicy. Surprisingly, my husband and I found swordfish on sale at Albertson's. Since I'm still new at grilling fish, I decided to roast it. I used my trusty Butt Rub on the fillets and a Louisiana Seafood Sauce to finish it off. It was so darn tootin' good...and very spicy.

    INGREDIENTS (for 2 people)

    • 2 Swordfish Steaks
    • 2 TBSP of any rub or Butt Rub
    • 1/4 Cup your favorite BBQ Sauce, preferably for fish. I used Louisiana Cajun Style Seafood Sauce.

    1. Pre-heat oven to 375 degrees 2. Generously coat both sides of the steaks with the rub mixture. 3. Place the steaks on a baking pan lined with aluminum foil 4. Bake for 15 minutes, and then pour BBQ sauce over each steak. Bake for an additional 8 to 10 minutes. Serve with a fresh side salad or with Creamy Arugula Polenta.

    Monday, October 10, 2005

    Creamy Arugula Polenta

    What does one cook when their favorite baseball team looses? Polenta, of course! Yes, it saddens me that my beloved Red Sox didn't make it all the way this year but I still, and always, will believe. Also, now with the fall season upon us, a nice, hearty polenta is always a good companion to almost any dish. The trick to this recipe is to use the pre-cooked polenta (cornmeal), this way your cooking time is shorter and I feel that the polenta comes out creamier. Additionally, if you can't find arugula, use clean and washed spinach. Finally use REAL parmesan cheese, please. It makes a huge difference in the taste. I didn't use the garlic in my polenta because I forgot, but it still came out delicious. INGREDIENTS

    • 8 cups water
    • 1 1/2 teaspoons salt, plus more to taste
    • 1 1/2 cups quick-cooking polenta (I used Valsugana Polenta)
    • 2 garlic cloves, minced(optional)
    • 3 cups arugula, coarsely chopped
    • 1 stick butter
    • 1/2 cup whipping cream or half and half
    • 3/4 cup freshly grated Parmesan

    Combine the water and salt in a heavy large saucepan. Bring the water to a boil over high heat. Gradually whisk in the polenta. Decrease the heat to medium-low. Stir constantly until polenta thickens, about 5 minutes. Add the garlic and arugula, and stir until the arugula is wilted.

    Stir in the butter, cream, and cheese, if using. Season the polenta, to taste, with salt and pepper.

    Recipe courtesy Giada De Laurentiis, FoodNetwork.com

    Friday, October 07, 2005

    Luxe Lox La La

    Sometimes I think I am part Jewish (a Mexican Jew, hmm?) because I just LOVE all the different foods they have in their culuture like bagels, blintzes, matzoh balls and knishes. It could also be that when I lived in Boston I had many Jewish friends and attended several Seders and B'nai Mitzvahs. Nevertheless, one of my favorite foods has to be lox. The English word comes originally from Yiddish, literally meaning "salmon." Lox is usually served with cream cheese on a bagel. Some really fancy places may add red onios and capers, too. I originally got the idea of making my own lox when I saw a Gravlax recipe on CookingforEngineers.com. My recipe is pretty much the same except that I could not find any fresh dill. So I used about three to four sprigs of fresh Rosemary (it grows wild in my parents backyard over here). The taste was quite different than your regular Dillweed. It was much more earthy and it tasted awesome on a bagel spread with goat cheese. INGREDIENTS
    • 1 lb. salmon filet, no skin
    • 3 Tbs. kosher salt
    • 3 Tbs. granulated sugar
    • 4 sprigs of fresh Rosemary
    Wash salmon with cold water and dry with a paper towel. Remove bones (if any). In a small bowl, mix the salt, sugar and the leaves of one Rosemary sprig. Cover the salmon with the mixture on both sides. Then place remaining sprigs on salmon. Double wrap the salmon in plastic wrap and place it on a shallow bowl. Place it in the refrigerator, adding some weight on top (like a can of soup or your mayo jar). Let refrigerate at least 48 hours. When ready, rinse and dry. Slice the salmon on a bias and serve with cream cheese or goat cheese.

    Wednesday, October 05, 2005

    Restaurant Review: Krakatoa

    Krakatoa 1128 25th St. San Diego, CA 92102 Phone: (619) 230-0272 Krakatoa is a volcano near the Indonesian island of Rakata in the Sunda Strait. The best known eruption of this volcano occurred in late August, 1883. The eruption ejected more than six cubic miles of rock, ash, and pumice and generated the loudest sound ever historically recorded by human beings! Krakatoa is also a really hip cafe located in Golden Hill in San Diego. The patrons range from ultra-hip Euro wannabes to grungy, tattooed waifs and your regular girl or boy next-door-type that bring their dogs along. Krakatoa also has really good coffee drinks, frosties, and teas, and a light fare menu that is pretty darn good. My favorite is the #1: The Wonchi ($6.95). It is a toasted telera bread piled high with fluffly scrambled eggs, cheese and ham or bacon (optional). This breakfast sandwich is also served with a side of fresh, seasonal fruit. My family and I have been religiously coming here almost every weekend for breakfast. That's how good it is! And they have a variety of coffee drinks. If you're a tea drinker, they have plenty of loose teas available. So the next time your in the area, make sure you stop by at Krakatoa for breakfast--or lunch. You'll like the atmosphere and the food and if you are looking for a cool place to study or do your work at, this is the place to be: the cafe is Wi-Fi'ed.

    Tuesday, October 04, 2005

    Icelandic Fish Balls

    Last night my husband and I attended the most bewildering, symphonic, loud and eclectic concert ever. We saw Sigur Ros live at Copley Symphony Hall in San Diego. Trying to describe their music is like trying to describe love: it's almost impossible. The music from this Icelandic band sounds like Antonin Dvorák, Radiohead, a bunch of banshees and Animal from the Muppets all got together and decided to make a band. One really needs to buy their CD's in order to understand what I'm talking about. To me, their music is very inspiring and last night I was inspired to take violin lessons. Crazy, huh? They also inspired me to find out more about the Icelandic culture and, more importantly, about Icelandic cuisine. And as Jo, a fellow blogger, put it:
    "There is not a whole lot of food that can be called specifically Icelandic. Most of the recipes we use in Iceland have been adapted from other cuisines, most noticeably from the Danish, but also the French, Italian and American, to name just a few. Modern Icelandic cuisine is based on local ingredients, specifically lamb and seafood, but often with some exotic additions and influences. In many homes the hearty food of the past, like the heavy steaks with cream sauce and caramelized potatoes, is being pushed out in favour of pasta and fresh vegetables. So you see that there is quite a lot that can be presented as Icelandic food, even if it was originally invented by some other nation." Fiskibollur
    • 1 large fillet white fish (cod, haddock or saithe are traditional), skinned and de-boned, chopped
    • 1 medium onion, finely chopped
    • 1/2 cup + 1TBSP flour
    • 1/4 cup potato flour
    • 1 TSP Salt
    • 1/2 TSP Pepper
    • 2 eggs
    • 1/4 cup to 1/2 cup Milk, or as needed
      Finely chop the fish fillet in a food processor. Mix the chopped fish with the finely chopped onions. Add the dry ingredients, mixing well. Add the eggs and then add milk, little by little until the fish-dough is just thick enough to stick together when you form it into balls. Form small balls with two tablespoons or use your hands. Fry in oil or butter over low heat, until done. For you health nuts, you can also bake them in a 400 degree oven for 12 to 15 minutes. Serve with fresh salad and boiled potatoes. I also heard that ketchup also goes well with fish-balls.