Showing posts with label dessert. Show all posts

Saturday, January 05, 2013

Salted Caramel Sauce

This Christmas I decided to make homemade gifts to give out to family and friends. I wanted to create something different than cookies or jams or baking mixes. So, I made salted caramel sauce instead. I saw the recipe on Food and Wine magazine and I couldn't believe how easy it was. I followed the recipe as it was written, but my only change is that I used gray salt instead of fleur de sel. Don't worry if your salt doesn't completely melt. I think that's what I like most about this sauce because small, salt crystal stay suspended in the sauce and they make love to your mouth once you eat it straight out of the jar or warmed up and drizzled over some vanilla ice cream.


INGREDIENTS (makes 2 cups)


  • 2 cups sugar
  • 1/2 cup water
  • 1 vanilla bean, split, seeds scraped
  • 1 cup heavy cream
  • 1/2 teaspoon fleur de sel

DIRECTIONS

Put the sugar in a large saucepan and pour the water all around. Add the vanilla bean and seeds and cook over moderately high heat, stirring, until the sugar is dissolved.


Using a wet pastry brush, wash down any crystals from the side of the pan. Cook without stirring until a deep-amber caramel forms, about 5 minutes. Gently swirl the pan to color the caramel evenly.

Remove the pan from the heat and add the cream. When the bubbling subsides, bring the sauce to a boil and cook over moderate heat, stirring, until the hardened caramel is dissolved. Discard the vanilla bean. Stir in the fleur de sel and let cool.


After it cooled, I poured the sauce into clean, sanitized half pint Ball mason jars and closed the lid very tightly. Then I created a custom labels and gave it out as gifts. I'm such a DIY mom!!!


Tuesday, October 23, 2012

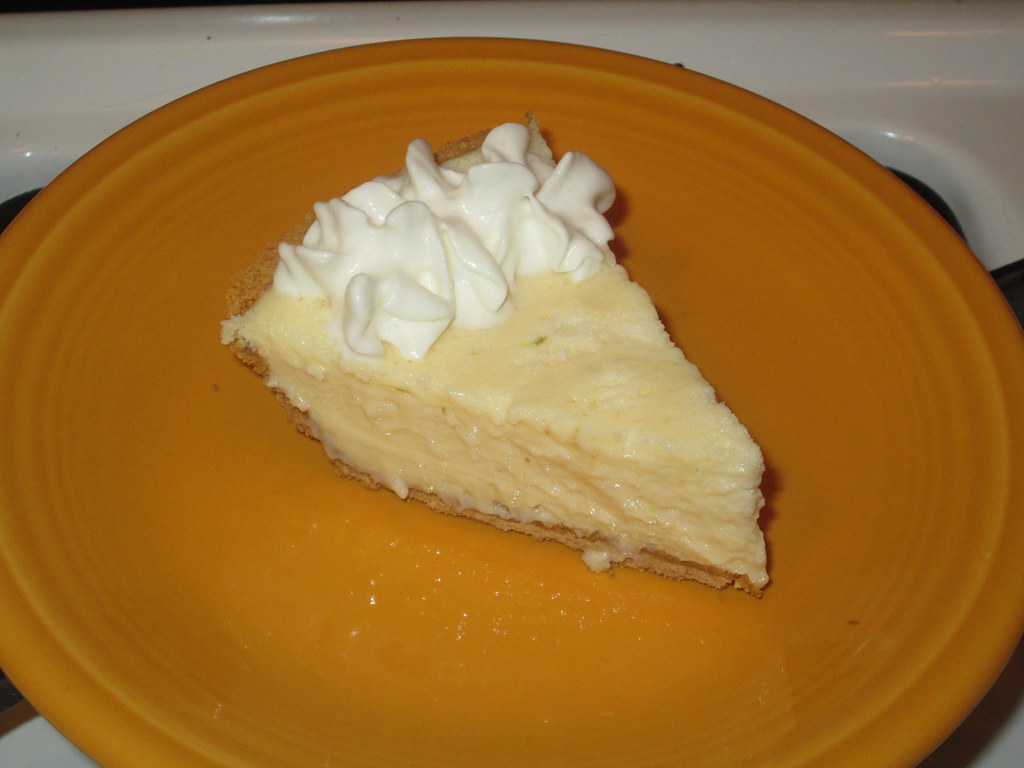
Lime Pie or "Pay de Limón"


I'm into "easy" homemade recipes now. I just don't have the time to prep and cook like I used to and taking care of a rambunctious 3 year old by myself sometimes makes it difficult to plan out a fabulous recipe. But, that is not to say I am not cooking. I actually cook a lot more now, specially since I don't want my child to be eating too much junk or processed food. However, my recipes tend to be your homemade chicken nuggets, fish sticks, a gazillion ways to make macaroni, and other kid-friendly recipes.

Nevertheless, I thought of this recipe only because there was a sale on limes at my store (30 limes for .99 cents). These are your typical, Mexican limes, which look kind of Key Limes--they are very small, but they have the flavor of regular, large green limes. Only difference is that the little Mexican ones are a lot juicier and actually have seeds in them. So, I'm not calling this a Key Lime pie, but a distant, Mexican cousin of an American favorite dessert.

Note: although I only used one can of sweetened condensed milk (other recipes called for two!), this pie is very rich and sweet so just a small slice goes a long way.

INGREDIENTS (makes one 9" pie)
  • 2 large egg whites
  • 4 large egg yolks
  • 1 (14-ounce) can sweetened condensed milk
  • 1/2 cup fresh lime juice (Mexican or regular limes at your store)
  • 1 tsp. lime zest
  • 1 Graham cracker crust or homemade graham cracker crust
  • Whipped cream (optional)

DIRECTIONS

Preheat oven to 375 degrees.


In the bowl of a stand mixer fitted with the whisk attachment, or a large mixing bowl with a whisk or hand mixer, beat the egg whites until they hold stiff peaks.


In a large mixing bowl whisk together the egg yolks, lime zest and sweetened condensed milk. Add the lime juice and whisk until combined. Gently fold in about 1/3 of the egg whites to lighten the mixture then add the remaining egg whites and fold until just evenly combined.

Gently spread the mixture in the prepared crust and bake until just set in the center, about 20 minutes.

Transfer to a wire rack to cool completely then refrigerate at least 2 hours before serving. Before serving, garnish with whipped cream (if using).


Sunday, January 29, 2012

La Mom's Flan


Sometimes I reminisce about my childhood in Tijuana, Mexico, and at times I can't believe the stuff I saw, the things we did, and how traviesos me and my brothers were. But what I remember most of all were the smells coming from the kitchen: the wonderful smells of my abuelita cooking beans on the stove top, or my tios grilling carne asada outside or the smell of burnt sugar. I'll always remember that smell because once my mom was teaching my tia (her younger sister) how to melt sugar (for the flan) and my aunt burnt it. It's a molassesy-burnt-candy smell. Once you smell it you'll never forget.

***
My mom has been making flan forever. I was quite impressed how easy her recipe is. To save time (and not dirty too many dishes) she usually just blends everything in a blender. But blending in a large bowl works just a well. Also let me say that if you've never melt sugar, you may want to start practicing first. In the beginning the sugar first may seem that it's not melting at all and then comes the point where it will melt rather quickly and if you don't keep stirring it will burn. So don't leave the kitchen when doing this step. Lastly, to make this flan even more lovely, decorate with edible flowers.

INGREDIENTS (serves 8)
  • 1 cup white sugar
  • 3 large eggs
  • 1 (14 ounce) can sweetened condensed milk
  • 1 (12 fluid ounce) can evaporated milk
  • 1 tablespoon vanilla extract
DIRECTIONS

Preheat oven to 350 degrees F (175 degrees C).

In a medium saucepan over medium-low heat, melt sugar until liquefied and golden in color. Carefully pour hot syrup into a 9 inch round glass baking dish, turning the dish to evenly coat the bottom and sides. Set aside.

In a large bowl, or in a blender, beat eggs. Beat in condensed milk, evaporated milk and vanilla until smooth. Pour egg mixture into baking dish. Cover with aluminum foil.

Bake in preheated oven 60 minutes. Let cool completely.

When flan has cooled, cover with plastic wrap and place in fridge for 4 hours or overnight. To serve, carefully run a knife around edges of flan and invert onto serving platter with edges (there's going to be syrup running down the sides).

Sunday, December 25, 2011

Fudgy Fudge with Stella


Last Christmas is a bit of a blur to me. I was so focused on my daughter (who was one-year old at the time) and I wanted to avoid my extended family because I didn't want to explain to them why my husband wasn't with us again for Christmas (he was not with us the previous year either when Stella was only 3 months old) and, truthfully, I just wanted to hang out with my daughter and avoid the world and not have to explain anything to anybody about my failed marriage. Yadda yadda yadda...you know the rest.

This Christmas has been quite wonderful, to tell you the truth. Stella is two-years old now and I can now see the world through her eyes...and it's a wonderful world filled with great people and beautiful places. I gasp when she gasps. If she sees a Christmas tree or an inflatable Santa Claus atop someones house her excitment becomes infectious. I love that she understand the concept of Christmas and she knows that it's "Baby Jesus's" birthday. And I love, love the fact that she LOVES to help me in the kitchen. She's a really good beater of anything: eggs, pancake batter, soup, but her forte is in helping me wash the dishes! So she inspired me to make this fudge with her. We made it on Christmas Eve to bring to my sister-in law's house today, Christmas Day. It's a packaged "Fudge Making Kit" from the makers of Carnation evaporated milk that I bought because, as most of you know, I suck at baking or at anything having to do with desserts. It's really a simple kit and it's good to have your toddler help you in smoothing out the fudge (the entire recipe take place on the stove top, so probably not a good place for a toddler to be!).

The recipe below is just in case you want to make the frudge from scratch and not from the kit, like I did. This recipe comes straight from the Carnation Evaporated Milk website, so I'm sure it's going to be delish!


Carnation Famous Fudge

  • 1 1/2 cups granulated sugar
  • 2/3 cup (5 fl.-oz. can) NESTLÉ® CARNATION® Evaporated Milk
  • 2 tablespoons butter or margarine
  • 1/4 teaspoon salt
  • 2 cups miniature marshmallows
  • 1 1/2 cups (9 oz.) NESTLÉ® TOLL HOUSE® Semi-Sweet Chocolate Morsels
  • 1/2 cup chopped pecans or walnuts (optional)
  • 1 teaspoon vanilla extract
DIRECTIONS

LINE 8-inch-square baking pan with foil.

COMBINE sugar, evaporated milk, butter and salt in medium, heavy-duty saucepan. Bring to a full rolling boil over medium heat, stirring constantly. Boil, stirring constantly, for 4 to 5 minutes. Remove from heat.

STIR in marshmallows, morsels, nuts and vanilla extract. Stir vigorously for 1 minute or until marshmallows are melted. Pour into prepared baking pan; refrigerate for 2 hours or until firm. Lift from pan; remove foil. Cut into 48 pieces.

Friday, December 23, 2011

Sweet, Tart and Spicy Tomato Jam


Someone once told me that divorce is like a death in the family and that you need to go through the five stages of loss in order to get over it. Stages such as denial,  anger, bargaining, depression and, finally, acceptance. I think I was over my divorce and "accepted" it a long, long time ago, but I was stuck in a funk with cooking. I didn't divorce cooking, but somehow I felt like I did. And as much as I love cooking I just couldn't (or wouldn't) go to the kitchen and cook something out the blue, or even follow a recipe. I needed a foodie therapist.

This year, during Thanksgiving week, my daughter was in Minnesota for a couple of weeks so I took advantage and took a mini vacation to San Francisco. There I met up with two of my favorite friends from Boston, Gracie and Kerry, who are also major foodies like me. Perhaps it was their company, perhaps it was the crisp San Francisco air, or perhaps it was all that wine we drank, but I began to realize that I needed to start cooking again, not because it was the only way to get my "mojo" back, sort of speak, but because I truly, truly love being in the kitchen and cooking, experimenting, tasting...oh, the tasting!

This little gem of a recipe is from the blog, injennieskitchen, and I stumbled upon it via my friend, Gracie, who made the tomato jam for us to enjoy for Thanksgiving. Once I tasted the jam I knew I had to make it. I took it upon myself to triple the recipe (bad idea) and instead of the 3 hour cooking time, it was actually more like 4 1/2  hours. So take it from me, don't double or triple, just follow the recipe below and it will come out great. I did add a little cayenne pepper (about 1/4 teaspoon) when I made mine, and it gives it just a slight spicy edge. Also, try to use a variety of tomatoes like Roma, Heirloom, yellow and grape tomatoes and don't forget the tart apple. You really need it in order to create a bit of pectin for your jam. Lastly, I did cut down on the sugar by about 1/2 cup for my tripled batch and it still came out sweet and tangy.

The way I love to use this jam is by smearing a little goat cheese on crostini and top with the tomato jam. Also, other ways to use it is as a relish on a burger or just place a dollop of the stuff on top of some cottage cheese. Happy cooking, my friends!

INGREDIENTS (makes 1 1/2 to 2 pints)

  • 3 1/2 lbs tomatoes, coarsely chopped
  • 1 small onion, diced
  • 1/2 cup brown sugar
  • 1 1/2 cups sugar
  • 1 tsp salt
  • 1/2 tsp coriander
  • 1/4 tsp cumin
  • 1/4 cup cider vinegar
  • Juice of 1 lemon
  • 1/2 cup finely diced tart green apple
DIRECTIONS

Put all ingredients in a 2-quart pot. Bring to a gentle boil, then reduce heat to a simmer. Cook until thickened and jam-like consistency, about 3 hours. Transfer to sterilized glass jars and store in refrigerator for up to two weeks, or use a hot-water canning bath for 15 minutes for long-term storage.