Wednesday, February 27, 2008

Ahi Tuna Terrine with Wasabi Foam

ahi tuna terrine with wasabi foam
This past weekend, Matt and I took a wine tour down to the Guadalupe Valley in Mexico. As we drove down the very scenic highway, we noticed many fishing farms on the Pacific Ocean, just south of Puerto Nuevo. We were told that those were Blue Fin tuna farms but that hardly anyone in Mexico or the U.S. ever get to taste any of that fish as the Japanese buy them up even before they go on the market. Sadly, blue fin tuna became overfished in Japan and they now rely on other countries to farm these delicacies. I doubt I'll ever eat real blue fin tuna as the current market price is about $110 a pound! So I'll stick to my Ahi tuna (aka Yellow fin Tuna).

As you all know, Ahi tuna is my favorite fish of all time and one of my favorite restaurants here in San Diego has two of my favorite tuna dishes: tuna sashimi terrine and sesame seared yellow fin. My tuna sashimi terrine attempt is below. I'm still working on the wasabi foam, though. I've been experimenting on the seared yellow fin. Hopefully I'll figure out these recipes soon!

If you're ever in the neighborhood, I highly suggest you check out The Guild Restaurant--it's in the barrio, but it's awsome! Sadly, the restaurant closed in January of 2009, due the economic crisis.

INGREDIENTS (serves 2)

  • 1 Tbsp. chili sesame oil (plus a few drops extra for presentation)
  • 1 tsp. chili garlic paste
  • 1 Tbsp. soy sauce
  • 6 oz of chopped sushi grade raw Ahi tuna
  • 1 avocado
  • Juice of 1 lime, divided
  • 1/4 cup whipping cream
  • 1/2 Tbsp. wasabi paste
  • 1/2 Tbsp. honey
  • 1 teaspoon black sesame seeds
DIRECTIONS

In a bowl combine 1 tablespoon chili sesame oil, 1 teaspoon chili garlic paste, 1 tablespoon soy sauce and the chopped Ahi tuna. Cover with plastic wrap and let it marinate in the fridge for 1 hour. After an hour, chop the avocado and gently fold it in. Squeeze the juice of half of a lime. Let it sit in the fridge another 15 minutes.

Lightly whip the cream and add in the wasabi paste and honey. Whip until stiff peaks form. Season to taste with a sprinkle of kosher or sea salt and a few drops of the leftover lime juice.

When ready to serve, place a round mold (or you can use a PVC pipe mold that is 2" diameter x 3") on top of serving platter. Add the marinated ahi. Pipe the wasabi cream with a make shift zip-loc piping bag or you can dollop the cream. Sprinkle a few black sesame seeds. Then place five drops of chili sesame oil around plate. When ready to eat, remove mold and voilà!

Monday, February 25, 2008

Chicken With Forty Cloves of Garlic

Not too long ago, the Food Network repeated one of Barefoot Contessa's episodes where she made the now infamous Chicken with Forty Cloves of Garlic. I think many of us have watched that episode, and perhaps some of us were afraid to try the recipe because really, how can anything taste good with that much garlic? Well, lo and behold my sister-in-law, Lindsey made the recipe and we all tried it...the verdict: delicious, creamy and not garlicky at all! If you decide to make this recipe, get yourself a large Dutch oven and invite your neighbors for dinner because it definitely feeds a crowd.

INGREDIENTS (Serves 6 to 8 people)

  • 3 whole heads garlic, about 40 cloves
  • 2 (3 1/2-pound) chickens, cut into eighths
  • Kosher salt
  • Freshly ground black pepper
  • 1 tablespoon unsalted butter
  • 2 tablespoons good olive oil
  • 3 tablespoons Cognac, divided
  • 1 1/2 cups dry white wine
  • 1 tablespoon fresh thyme leaves
  • 2 tablespoons all-purpose flour
  • 2 tablespoons heavy cream
DIRECTIONS

Separate the cloves of garlic and drop them into a pot of boiling water for 60 seconds. Drain the garlic and peel. Set aside.

Dry the chicken with paper towels. Season liberally with salt and pepper on both sides. Heat the butter and oil in a large pot or Dutch oven over medium-high heat. In batches, sauté the chicken in the fat, skin side down first, until nicely browned, about 3 to 5 minutes on each side. Turn with tongs or a spatula; you don't want to pierce the skin with a fork. If the fat is burning, turn the heat down to medium. When a batch is done, transfer it to a plate and continue to sauté all the chicken in batches.

Remove the last chicken to the plate and add all of the garlic to the pot. Lower the heat and sauté for 5 to 10 minutes, turning often, until evenly browned. Add 2 tablespoons of the Cognac and the wine return to a boil, and scrape the brown bits from the bottom of the pan. Return the chicken to the pot with the juices and sprinkle with the thyme leaves. Cover and simmer over the lowest heat for about 45 minutes, until all the chicken is done.

Remove the chicken to a platter and cover with aluminum foil to keep warm. In a small bowl, whisk together 1/2 cup of the sauce and the flour and then whisk it back into the sauce in the pot. Raise the heat, add the remaining tablespoon of Cognac and the cream, and boil for 3 minutes. Add salt and pepper, to taste; it should be very flavorful because chicken tends to be bland. Pour the sauce and the garlic over the chicken and serve hot.

Recipe courtesy of Barefeoot Contessa. Copyright 2004, Barefoot in Paris.

Thursday, February 21, 2008

No Knead Bread

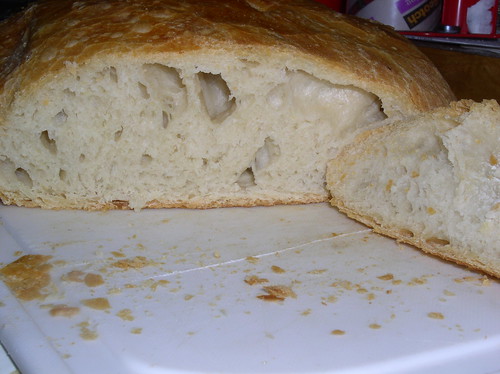
My boo's no knead bread
My hubby, Matt, is the baker of the family and he loves to make rustic breads or likes to try unusual bread recipes. The no knead bread recipe below is definitely different, but Oh So Good! This recipe is an adaptation of an adaptation from Sullivan Street Bakery in New York City. Matt's dad gave him the recipe [link] last Thanksgiving, and Matthew made it for the first time yesterday--we ate it today as this bread does require at least 24 hours--so make sure you prepare.

INGREDIENTS (makes one 1½ lb loaf)

  • 3 cups bread flour (use Harvest King bread flour, if possible)
  • 1/4 teaspoon instant yeast
  • 3/4 tablespoon kosher salt (or 1 teaspoon table salt)
  • 1 1/2 cups warm water
  • Covered pot (five-quart or larger cast iron, Pyrex, ceramic, enamel...something that can go into a 450F oven.)
DIRECTIONS

  1. Mix dough: The night before, combine all ingredients in a big bowl with a wooden spoon until the dough just comes together. It will be a shaggy, doughy mess. Cover with plastic wrap and let sit 12-20 hours on countertop.
  2. Shape & preheat: The dough will now be wet, sticky and bubbly. With a wet spatula, dump the dough on a floured surface. Fold ends of dough over a few times with the spatula and nudge it into a ball shape. You can use your hands if you like, just keep your hands wet so that the dough does not stick. Generously dust a cotton towel (not terrycloth) with flour. Set dough seam side down on top of towel. Fold towel over the dough. Let it nap for 2 hours. When you've got about a half hour left, slip your covered pot into the oven and preheat to 450F.
  3. Bake: Your dough should have doubled in size. Remove pot from oven, being careful as pot will be super hot. Holding towel, dump wobbly dough into pot. Doesn't matter which way it lands. Shake to even dough out. Cover. Bake 30 minutes. Uncover, bake another 15-20 minutes or until the crust is beautifully golden and middle of loaf is 210F. Remove and let cool on wired rack. If not eating right away, you can re-crisp crust in 350F oven for 10 minutes.
The best way to eat it this super delicious bread is to smear a warm slice with some good butter (Kerrygold or whipped Land'O Lakes), or with a slice of good French brie.

    Sunday, February 17, 2008

    Spaghetti & Meatballs a la Baggs

    Spaghetti & Meatballs
    This past Christmas my sister-in-law, Lindsey, made us the most delicious spaghetti and meatballs from an old Baggs family recipe. The recipe is quite easy; it's just the waiting (for the sauce to be perfect and meatballs to simmer) that's excruciating to a hungry crowd. This is one of those recipes you can make the day before and the flavors will only get better the next day. Also, you can use ground turkey, if you prefer, and the meatballs will be just as juicy.

    INGREDIENTS

    Sauce

    • ¼ cup minced onions
    • 1 ½ tsp salt
    • 2 cloves garlic minced
    • ¼ tsp cloves
    • ¼ cup olive oil
    • 1 tsp sage
    • 3 ½ cups canned tomatoes
    • 1 ½ tsp oregano
    • 2 sm. Cans tomato paste
    • ½ tsp basil
    • 3 cups water
    DIRECTIONS

    Sautee onions and garlic in olive oil until opaque. Add remaining ingredients and simmer at least one hour.

    Meatballs

    • 2 lbs ground chuck
    • 4 cloves garlic minced
    • 2 eggs beaten
    • 2 Tbs dried parsley
    • 2 tsp salt
    • 2 cups soft breadcrumbs
    • 1 tsp pepper
    • 1 cup grated American or mild cheddar cheese
    • 2 packages spaghetti
    DIRECTIONS

    Combine all ingredients, except spaghetti, in mixing bowl and mix well. Shape meatballs and brown quickly in olive oil. Add to the sauce about 1 hour before serving. About 12 minutes before serving, cook spaghetti according to package directions. This will serve about 8 people.

    Friday, February 15, 2008

    Cheesy Mac-Topped Casserole

    Cheesy Mac Casserole
    One day I was browsing through Yahoo! Foods to see if I saw anything interesting—I actually prefer Yahoo! Foods to Food Network—and this particular recipe from Kraft Foods caught my eye. The main reason it looked interesting was because I already had all the ingredients at home, but I was also surprised to see a casserole that used Kraft Mac and Cheese. Anyhoo, I followed the recipe directions and it just didn't do it for me or my husband, Matt. It seemed that the dish was missing something, but perhaps others will like it...and I'm pretty sure kids would like it. They like anything with mac and cheese!

    INGREDIENTS (makes 6 servings)

    • 1 (14 ounce) package KRAFT Deluxe Macaroni & Cheese Dinner Made With 2% Milk Cheese
    • 1 pound extra lean ground beef
    • 3 cloves garlic, minced
    • 1 1/2 teaspoons dried oregano leaves
    • 1 (28 ounce) can diced tomatoes, undrained
    • 1 (9 ounce) package frozen green beans, thawed, drained
    • 1 cup KRAFT 2% Milk Shredded Reduced Fat Mild Cheddar Cheese
    DIRECTIONS

    Preheat oven to 375 degrees F.

    Prepare Dinner as directed on package. Meanwhile, brown meat with garlic and oregano in large nonstick skillet; drain. Add tomatoes with their liquid and the beans; mix well. Spoon meat mixture into 13x9-inch baking dish; top evenly with prepared Dinner. Cover with foil.

    Bake 30 min. or until heated through. Remove from oven; uncover. Sprinkle with cheese. Let stand 5 min. or until cheese is melted.

    Cheesy Mac Casserole

    Thursday, February 14, 2008

    Chocolate Covered Strawberries

    Elaine's chox covered strawberries
    Since it's Valentine's Day today, I figured I'll re-post this oldie-but goodie recipe for Chocolate Covered Strawberries. If you want to impress your cutie pie, these strawberries are so easy to make.

    Whenever I go to a fancy Sunday brunch, there are two things that I first look out for: the champagne and the chocolate covered strawberries. The recipe below is fool proof and delicious. Just make sure your strawberries are super dry before you dip them in the chocolate. Oh my gawd, I'm having cravings just writing this!

    INGREDIENTS

    • 2 cups (12-oz. pkg.) semi-sweet chocolate chips
    • 2 tablespoons shortening, such a vegetable Crisco (do not use butter, margarine, spread or oil)*
    • 12 large fresh strawberries, with stems, rinsed and patted dry
    DIRECTIONS
    1. Prepare cookie sheet by placing wax paper on bottom of it.
    2. Place chocolate chips and shortening in medium microwave-safe bowl. Microwave at MEDIUM (50%) 1-1/2 minutes or just until chips are melted and mixture is smooth when stirred; cool slightly.
    3. Holding strawberry by top, dip 2/3 of each berry into chocolate mixture; shake gently to remove excess. Place on prepared tray.
    4. Refrigerate until coating is firm, about 30 minutes. Store, covered, in refrigerator.
    *Butter, margarine and spreads contain water which may prevent chocolate from melting properly; oil may prevent chocolate from forming a coating.

    Beef Stir-Fry

    My husband loves flat iron beef and Iowa Meat Farms here in San Diego sells one of the best cuts of this meat, however it's quite spendy—I believe that they dry age it or something. So, I made this stir fry for him with the half pound he bought and it was quite delish. Usually beef stir-fry contains broccoli, but I was too lazy to go buy it the day I made it, so I omitted it, but you can definitely add about 1/2 cup of broccoli florets if you want.

    INGREDIENTS (serves 2)

    Marinade

    • 1 tsp. McCormick's Montreal Seasoning
    • 1 Tbsp. Soy Sauce
    • 1 Tbsp. olive oil
    • 1 garlic clove, finely chopped
    • 1/2 lb. flat iron steak or flank steak, sliced against the grain into stir fry strips
    Stir Fry
    • 2 Tbsp. vegetable or canola oil
    • Half an onion, sliced into half moons
    • 1 tsp. fresh ginger, finely minced
    • 1 garlic clove, finely chopped
    • 1/4 cup julienned carrots
    • 1 green bell pepper, seeded and sliced into strips
    • 1/4 tsp. dried red pepper flakes
    • 1/2 cup bean sprouts
    • 1 to 1 ½ Tbsp. Soy Sauce
    • 1 tablespoon cornstarch mixed with 2 tablespoons cold water
    • Steamed, white rice
    DIRECTIONS

    In a bowl or large zip-loc bag, mix first 4 marinade ingredients, then add the flat iron steak. Marinate 30 minutes, up to 4 hours in the fridge.

    In a large skillet with 3" sides or higher, or a wok, heat 1 tablespoon Vegetable or canola oil over medium-high heat. Add the marinated beef and the marinade and stir fry for 2 minutes. Quickly remove beef from skillet with a slotted spoon and set aside.

    Add remaining 1 tablespoon oil to skillet and add the onions. Stir fry for 2 minutes. Add ginger, chopped garlic, carrots, green bell pepper and red pepper flakes. Sauté 2 to 3 more minutes or until green bell pepper is tender crisp. Add the beef and its juices back into the skillet and stir fry 3 minutes or until lightly browned.

    Finally, add the bean sprouts, soy sauce and cornstarch mixture and stir constantly. Bring to a boil; reduce heat to medium and cover. Cook for 2 more minutes. Serve beef stir fry over white rice.

    Wednesday, February 13, 2008

    Garlic Shrimp, North Shore Style

    Garlic Shrimp
    I was in Oahu again this past week (no, not for Pro Bowl) and I just had to go back to Romy's for their famous prawns. But little did I know that it wasn't prawn season! What was I to do? Instead, my sister took me to Giovanni's Shrimp Truck in Kahuku in the North Shore. They are famous for their garlic shrimp and of course, I had to try it. It was definitely different than Romy's, but it was still delicious. So, in my quest to try this dish, I looked for the recipe, but of course it's a secret recipe. The recipe below is the closest I could find. Be warned, though, because this dish really has a ton of garlic! Enjoy!

    INGREDIENTS

    • 1/3 cup Olive oil
    • 4 cloves garlic, chopped
    • 1 Tbsp. lemon juice
    • 1 1/2 tsp. kosher salt
    • 1 Tbsp. paprika
    • 1/4 cup dry white wine
    • 1 to 1 1/2 lbs. large raw shrimp, deveined but with shell on (about 14 - 16 count)
    • 1 Tbsp. vegetable oil
    • Half a stick of butter
    • 10 garlic cloves, chopped
    • Steamed, white rice
    DIRECTIONS

    In a large, non-reactive bowl add the first 6 ingredients and mix well. Add the shrimp and let it marinate 4 - 8 hours, or overnight.

    Remove shrimp from marinade and discard marinade. In a large saute pan or skillet, add 1 tablespoon vegetable oil and heat on high. When pan is slightly smoking, saute the shrimp for 2 minutes ONLY. Remove shrimp from pan and set aside.

    Reduce heat to low, and in the same saute pan, add the butter. Then add the 10 cloves of chopped garlic and cook slowly, until it begins to lightly brown, about 5 minutes. Add the shrimp and continue cooking until shrimp cooks through, about 5 more minutes.

    Serve shrimp with a side of steamed, white rice. Drizzle some of the garlic (and browned butter) over shrimp and rice. Serve with a wedge of lemon.The shrimp truck

    Tuesday, February 12, 2008

    Red Velvet Cupcakes with Cream Cheese Frosting

    Matt and I tried the new burger joint in our neighborhood called the Burger Lounge, yesterday. It was so-so...nothing to write home about; I personally still love Hodads in OB, which I think is the best burger joint in SD.

    Anyhoo, they did have red velvet cupcakes with cream cheese frosting at the Burger Lounge and, of course, we bought one to share and it was just divine. I looked for recipes for red velvet cupcakes--and I had no idea that this is an old time cake recipe, very popular in the South. I did find a recipe on Noshwithme.com. Personally, I think this would be a great treat for your loved one (and family) for Valentine's Day.

    INGREDIENTS (makes about 3 dozen cupcakes)

    • 3 cups cake flour (not self-rising)
    • ¾ cup (1 ½ sticks) unsalted butter, softened
    • 2 ¼ cups sugar
    • 3 large eggs, at room temperature
    • 6 tablespoons red food coloring
    • 3 tablespoons unsweetened cocoa
    • 1 ½ teaspoons vanilla extract
    • 1 ½ teaspoons salt
    • 1 ½ cups buttermilk
    • 1 ½ teaspoons cider vinegar
    • 1 ½ teaspoons baking soda
    DIRECTIONS

    Preheat oven to 350 degrees.

    Line 3 (12-cup) muffin pans with cupcake papers.

    To make the batter: In a small bowl, sift the cake flour and set aside. In a large bowl, on the medium speed of an electric mixer, cream the butter and sugar until very light and fluffy, about 5 minutes. Add the eggs, one at a time, beating well after each addition.

    In a small bowl, whisk together the red food coloring, cocoa, and vanilla. Add to the batter and beat well.

    In a measuring cup, stir the salt into the buttermilk. Add to the batter in three parts, alternating with the flour. With each addition, beat until the ingredients are incorporated, but do not overbeat.

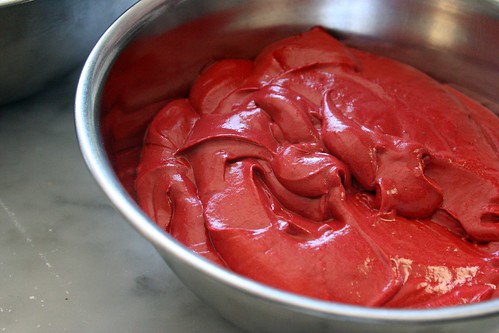
    In a small bowl, stir together the cider vinegar and baking soda. Add to the batter and mix well. Using a rubber spatula, scrape down the batter in the bowl, making sure the ingredients are well blended and the batter is smooth.

    red velvet cupcake batter, originally uploaded by chockylit.

    Divide the batter among the cupcake pans. Bake each pan for 20-22 minutes, turning the pans once, half way through. Test the cupcakes with a toothpick for doneness. Remove from oven and cool completely (about 1 hour) before frosting.

    red velvet cupcakes originally uploaded by Sucheela's In My Tiny Kitchen.

    FROSTING

    • 1 pound (two 8-ounce packages) cream cheese, softened and cut into small pieces
    • 6 tablespoons unsalted butter, softened and cut into small pieces
    • 1 ½ teaspoons vanilla extract
    • 5 cups sifted confectioners’ sugar
    • 1 red velvet cupcake, crumbled for sacrificial purposes
    DIRECTIONS

    In a large bowl, on the medium speed of an electric mixer, beat the cream cheese and butter until smooth, about 3 minutes. Add the vanilla and beat well. Gradually add the sugar, 1 cup at a time, beating continuously until smooth and creamy. Cover and refrigerate icing for 2 to 3 hours, but no longer, to thicken before using.

    When the cupcakes have cooled, spread the frosting on top of each cupcake and sprinkle a bit of crubmled red velvet cake over all. Yay!

    Tuesday, February 05, 2008

    Ahi Poke, San Diego Style

    Well my friends, I'm off to Oahu, Hawaii. I figured I would leave you with what probably is my favorite dish/fish/food of all time: Ahi tuna. I love ahi so much that I order it just about every time Matt and I go out to eat. If you make this (or a version of ahi poke) make sure you buy sashimi grade tuna since this is basically a raw dish. Also, you can buy wonton wrappers and lightly fry them in vegetable oil. By the way, a true ahi poke doesn't have avocado, however since I'm Mexican, I gotta put avocado and lime in everything. Enjoy and aloha!

    INGREDIENTS (4 servings)

    • 1 to 1 -1/4 lbs. ahi (yellowfin tuna, sashimi grade) diced to 1/4" (you want 2 cups total)
    • 1 tablespoon onion, minced
    • 1 green onion, minced (white and green parts)
    • 1 teaspoon garlic, finely chopped
    • 1/4 cup soy sauce
    • 2 tablespoons sesame chili oil (use regular sesame oil if you can't find sesame chili oil)
    • 1/8 tsp. Hawaiian salt or kosher salt
    • Pinch of chili flakes
    • 1/2 tsp. toasted sesame seeds
    • 1 small avocado (optional)
    • A little bit of lime juice (optional)
    DIRECTIONS

    Combine all ingredients, except avocado and lime juice, in a stainless steel bowl and gently mix. Refrigerate well (2 to 4 hours). Make this on the day of use.

    When ready to serve, squirt a little lime juice over 1 small diced avocado, if using, and add to the ahi poke and serve in martini glasses and with a side of fried wontons.

    Monday, February 04, 2008

    Spam Musubi

    I am flying to Oahu, Hawaii, again this Wednesday to visit my sister and to help her move back to San Diego. If you've never been to Oahu, it really is a beautiful island to visit, but what I love the most about the island is the food. Yes, most of the food is expensive there, but if you can afford it, you gotta try the shrimp from the shrimp trucks in the North Shore, some authentic Ahi poke, or Kalua pig, and of course, Spam musubi. Why Spam? Well, back in WWII meat was scarce in the islands, so civilians loaded up on this canned meat. Before long, it became a Hawaiian staple and now almost every household has one or two cans of Spam in their pantry!

    Anyhoo, here's a recipe for Spam Musubi. You will need a musubi rice press, but you can also use the Spam can to make the musubi. I bet that this would be an interesting party appetizer at any party in Minnesota, eh?

    INGREDIENTS (makes 32 musubi)

    • 3 cups uncooked short- or medium-grain rice
    • 4 cups water
    • 5 sheets of sushi nori (seaweed in big squares)
    • 1 (12-ounce) can Spam luncheon meat (you can also use Spam Lite)
    • 1/4 cup soy sauce
    • 1/4 cup sugar
    • 1/4 cup rice wine (mirin)
    • Water
    DIRECTIONS

    Wash rice, stirring with your hand, until water runs clear. Place rice in a saucepan with water; soak 30 minutes. Drain rice in colander and transfer to a heavy pot or rice cooker; add 4 cups water. If you don't have a rice cooker, place rice and water into a large heavy saucepan over medium-high heat; bring just to a boil, reduce heat to low and simmer, covered, for 15 minutes. Turn off heat and leave pan, covered, for 15 additional minutes.

    Cut nori in half widthwise. Place cut nori in a resealable plastic bag to keep from exposing the nori to air (exposing the nori to air will make it tough and hard to eat).

    Cut Spam into 8 rectangular slices approximately 1/4-inch thick. In a large ungreased frying pan over medium heat (Spam has plenty of grease to keep it from sticking), fry slices until brown and slightly crispy. remove from heat, drain on paper towels, and set aside.

    In a small saucepan over high heat, add soy sauce, sugar, and rice wine; bring just to a boil, then remove from heat. Add fried Spam slices to soy sauce mixture, turning them to coat with the sauce; let spam slices sit in marinade until ready to use.

    In a small bowl, add some water to use as a sealer for the ends of the nori wrapper; set aside.

    Using a Spam Musubi press, place a piece of nori on a plate. Position press on top of the nori so the length of the press is in the middle of the nori (widthwise). The press and the width of the nori should fit exactly the length of a slice of Spam. (Note: If you don't have a musubi maker, you can use the empty Spam can by opening both sides, creating a musubi mold.)

    Spread approximately 1/4 cup cooked rice across the bottom of the musubi maker, on top of the nori; press rice down with flat part of the press to compact the rice until it is 1/4-inch thick (add more rice if necessary). Place a slice of Spam on top of the rice (it should cover most of the length of the musubi maker). Cover with an additional 1/4 cup cooked rice; press until 1/4-inch thick. remove the musubi from the press by pushing the whole stack down (with the flat part of the press) while lifting off the press. Fold one end of nori over the musubi and press lightly onto the rice. Wet the remaining end slightly with water, then wrap over musubi and other piece of nori; press down on the other end. cut log into 4 pieces. Repeat with the other 7 Spam slices, making sure to rinse off musubi maker after each use to prevent if from getting too sticky.

    Cut each musubi in quarters. Do not refrigerate musubi, as they will get dry and rubbery. Serve immediately.