Tuesday, August 28, 2007

Bacon-Wrapped Jalapeño Poppers

Grilled Jalapeño Poppers
My sister-in-law Lindsey, or SILLi as I like to call her, made some fabulous jalapeño poppers last week. Her dad, Dave Baggs, came up with the idea of stuffing cream cheese into jalapeños, wrapping them with bacon, then grilling them. Now, anyone that comes up with recipes where bacon is a key ingredient is my personal hero. So, I copied the Baggs recipe, although I did embellish it a little with shredded cheese and cilantro. But you can leave that out and just use cream cheese. Either way you do it, these poppers will blow you head away...or just make you hot for a little while.

INGREDIENTS

  • 12 jalapeño peppers
  • 1 package (8 oz.) cream cheese
  • 1/2 cup shredded cheddar cheese
  • 1 tsp. fresh cilantro, minced
  • Pinch Salt and pepper
  • 1 lb. sliced bacon
  • 24 toothpicks
DIRECTIONS

Soak toothpicks in cold water. The longer the better but at least 1 hour.

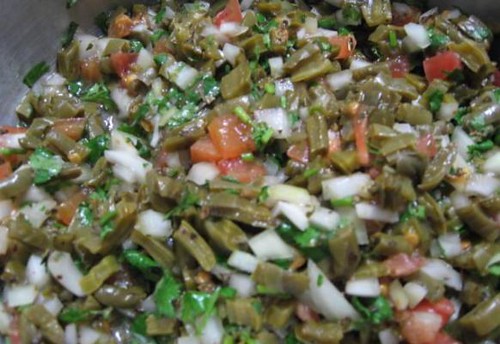
Cut a slice lengthwise in the jalapeño to make enough space to remove seeds. Make sure not to split the pepper all the way through when you do this. Remove seeds and ribs and wash jalapeño with cold water. It's a good idea to wear gloves during this step, especially if you have sensitive skin.

Mix cream cheese, shredded cheddar, cilantro and salt and pepper in a separate bowl. Put cream cheese mixture inside a plastic baggie and cut a small slit on one corner of baggie (you're making a MacGyvered pastry bag). Squeeze mixture from baggie into jalapenos.

Wrap bacon in a spiral fashion around stuffed pepper and secure with a couple of toothpicks. Grill the popper until the bacon is cooked, about 20 to 30 minutes. Let rest 5 minutes before serving. I'm pretty sure MacGyver would love these!

Friday, August 17, 2007

Thai Iced Tea Latte

I was addicted to iced coffee for a while, until I had a Thai iced tea latte several years ago. The tea flavor is fabulous, especially that cardamon flavor, and the sweetened condensed milk just totally works for me! Anyhoo, the first thing you have to do is purchase Thai tea. I'm very lucky that I live near a store that sells Thai tea, but if you don't have that luxury, you can purchase it at importfood.com or templeofthai.com. If you're too lazy to make it, go to your favorite Thai restaurant and order this refreshing drink. You'll probably get addicted to it, too!

INGREDIENTS

  • Thai tea
  • Sweetened condensed milk
  • Ice
DIRECTIONS

Bring 6 cups of water to boil. Add 1-1/2 cups Thai tea to a large pitcher and pour over the hot water. Stir well for about half a minute until the liquid is dark brown. Stain the tea into another pitcher using either a traditional Thai cloth tea strainer or a fine sieve. A large coffee filter would work also. Cool at room temperature.

To serve, pour tea over a full glass of ice. Top with sweetened condensed milk (if you want just regular iced-tea, you can skip this) and serve with a straw. Oh ma gawd, it's sooo good....

Thursday, August 16, 2007

Garlic Pommes Frites

I always know when I'm PMSing because I get an insatiable craving for garlic fries and I cry at tiny, cute things, like puppies or kittens--but not babies...they're not that cute! So, yesterday I introduced Matt to garlic fries. I mean fries so garlicky that we didn't kiss for hours. I love these fries and I found that the Lei Back Cafe in South Park has one of the best garlic pommes frites. The second best garlic fries are at The Guild Restaurant in the barrio, so go check them out or make them at home and it's getting more difficult in finding a restaurant here in San Diego that has good garlic fries since the Lei Back Cafe and The Guild restaurant have both closed.

INGREDIENTS (serves 4 guys or 1 girl on her period)

  • 1 (28-ounce) bag frozen shoestring potatoes, such as Ore-Ida® Shoestrings (about 2 cups)
  • Oil for deep frying (Vegetable or Peanut)
  • 4 large garlic cloves, minced or passed through a garlic press
  • 1 Tablespoon olive oil
  • 1 Tablespoon finely minced Italian parsley
  • 1 to 2 Tablespoons freshly grated Parmesan cheese
DIRECTIONS

Over medium heat, lightly sauté the minced garlic in the olive oil. When it gets to a light, golden color, remove from heat and set aside.

In a frying pan or deep fryer, heat the oil to 350°. Fry small batches of the fries for about 2 1/2 - 3 minutes or according to package directions. Transfer fries to a serving dish, then drizzle the garlic mixture over warm French fries and toss. Add salt and pepper to taste and sprinkle with parsley and grated Parmesan cheese and toss again. Delicious.

Tuesday, August 14, 2007

Basil Fried Rice

Thai Basil Fried Rice
I was craving Thai food today and I was not disappointed. I usually go to Thai Chada down the street from my work or to Spices Thai restaurant. Both are really good Thai places here in San Diego, but nothing will ever compare to Basil, which was my favorite restaurant back in Boston. I'm not sure if it still exists, but their basil fried rice was my absolute fav! Here's a simple yet delicious recipe for basil fried rice. This is a great dish to make with your leftover cooked white rice. Try to use Thai basil for this dish, if you can.

INGREDIENTS (serves 2)

  • 2 tablespoons vegetable oil
  • 1 large garlic clove, minced
  • 1 green onion (both the green and white part), thinly sliced
  • 2 cups cooked white rice
  • 2 eggs, lightly beaten
  • 1/2 cup fresh Thai basil leaves, thinly sliced
  • 2 tablespoons soy sauce
  • salt and pepper
DIRECTIONS
  1. In a large non-stick frying pan, heat oil over medium-high heat.
  2. When the oil is hot, add in the garlic and green onion. Stir-fry for 30 seconds.
  3. Add in the rice and stir fry for about 2 minutes. Make sure to break up any clumps of rice and that the rice is well coated in oil.
  4. Push the rice to one side of the pan. Add the 2 eggs into the empty side of the pan. As the eggs cook, use your spatula to break them up into small pieces and mix the eggs with the rice.
  5. Add in the basil and soy sauce. Continue to stir-fry until the basil is wilted. Add additional salt and pepper, if needed, and serve right away.

    Sunday, August 05, 2007

    Thai Basil Mimosa

    Thai Basil Mimosa
    It is a lovely Sunday afternoon. The temperature in San Diego is in the mid 70s with a slight breeze...so what is a girl to do? Well, of course, sit out by the beach and have herself a mimosa, you silly goose! But not just any mimosa, my friend, this refreshing basil mimosa came about after I found some lovely Thai basil for 69 cents at the North Park Market. I had tons of limes, and as always I keep sugar cubes in stock in case I get a mojito craving. I have to say, this was quite a refreshing drink. I'm pretty sure you can try it with seltzer water instead of champagne and make it non-alcoholic...but what fun is that?

    INGREDIENTS (makes 2 mimosas)

    • 8 Thai Basil leaves
    • 3 sugar cubes
    • Juice of 1 lime
    • Handful of crushed ice
    • Simple syrup
    • Sparkling wine or champagne, preferably Brut
    DIRECTIONS

    In a martini shaker, add the Thai basil, sugar cubes, the lime juice and a small amount of crushed ice. Muddle the heck out of it. 
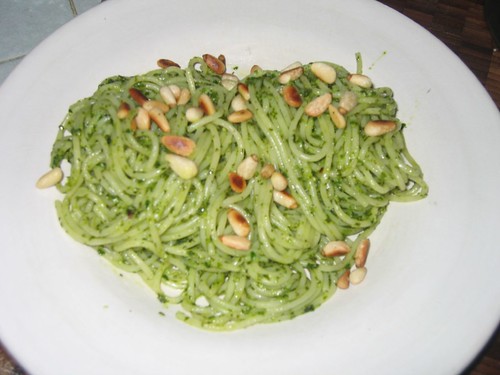
Add 1 tablespoon of simple syrup (or more, if you prefer), the rest of the crushed ice and cover tightly. Shake. Shake. Shake. Strain the green goodness and pour into two champagne glasses, then slowly top each glass with champagne or sparkling wine.

    Saturday, August 04, 2007

    Marinated Grilled Peaches

    Some of you probably have balsamic vinegar in your cupboard and only use it for salads, or maybe you don't use it at all. But did you know that balsamic vinegar also makes a great accompaniment to fruit, especially strawberries and stone fruits, like peaches, nectarines or plums? If you don't have balsamic vinegar on hand, then buy the most inexpensive one. The grilled peaches will still be delicious. You can do this recipe on an indoor grill, too...but what fun is that?

    INGREDIENTS (serves 4)

    • 4 ripe but not mushy white peaches (you can also use nectaries or plums, if you prefer)
    • Juice of one lemon
    • Walnut, hazelnut or other non-toasted nut oil (if you can't find this type of oil, you can use regular canola oil)
    • 1 cup balsamic vinegar
    • 1 cup water
    • ½ cup white sugar
    • Zest of an orange
    • Pinch of sea salt
    DIRECTIONS

    Pre-heat your grill to medium and set it for direct grilling.

    Cut fruit in half and remove pits. Brush with the juice of the lemon and the nut oil and set aside.

    Mix vinegar, water, sugar and orange zest in a small saucepan. Simmer over low heat, stirring occasionally until the sugar is dissolved. Add a pinch of salt and remove from heat. Let cool to room temperature.

    Pour vinegar-sugar liquid over peaches and let sit for 10 minutes, turning occasionally to submerge all cut sides to the marinade. Remove fruit from liquid and set aside. Reserve the marinade and put in a small saucepan and simmer over a medium low heat until liquid is reduced by half. Set aside.

    Place fruit skin-side down on a very clean cooking grate and grill for 5-7 minutes or until warmed through and slightly soft. If you prefer, you can raise the heat until you get some nice grill marks. Alternatively, you can use your indoor grill if you prefer.

    Remove peaches from grill and place back into marinade, and let it sit for at least 5 minutes. Serve warm or cold with a drizzle of the reduced marinade and perhaps a scoop of vanilla ice cream.

    Friday, August 03, 2007

    Jumbo Lump Crab Cakes

    jumbo lump crab cakes
    Oh boy, eating healthy is really hard. I've been on a healthy food kick recently because I noticed there was way too much starch and bad carbs in our diet rather than healthy, high-protein foods. So, in an effort to be healthy, I made these crab cakes...yes, there is a little mayo (not too much), and a small amount of breadcrumbs. All in all, it was okay, although this is a type of dish that I'd rather eat a good seafood restaurant, like Peohe's.

    INGREDIENTS (makes 8 crab cakes)

    • 1 egg
    • 1 teaspoon Old Bay Seasoning
    • 1/4 teaspoons salt
    • 1/2 teaspoon pepper
    • 1 tablespoon baking powder
    • 1 tablespoon Worcestershire sauce
    • 1 tablespoon mayonnaise
    • 1 tablespoon chopped fresh parsley
    • 1/4 cup Panko breadcrumbs
    • 1 pound fresh jumbo lump crab meat
    DIRECTIONS

    Preheat the broiler.

    In a large bowl, combine the egg, Old Bay seasoning, salt, pepper, Worcestershire, baking powder, mayonnaise, breadcrumbs and parsley. Then, gently fold in crabmeat (be careful not to break up the lumps). Shape into cakes and broil for 5 minutes.

    Thursday, August 02, 2007

    Beet Salad with Pomegranate Dressing

    I've been in a cooking funk lately, most likely because I've been putting in many hours at work and because Matthew is spoiling me everyday! Anyhoo, I wanted to try something totally new with beets. Yes, my darlings, lovely, crimson colored root beets. I really love the flavor of these herbaceous biennials especially after you roast them and all their natural sugars caramelize. But another reason I wanted to try beets, was because I also had recently bought pomegranate molasses and I had no idea what to do with it. Then, by pure luck I watched a food tv show where pomegranate molasses was used on beets, so I said, what the heck, I'll give it a try!

    The first thing you do is get yourself two or three large beets, scrub them clean and peel their outer skin. Place them in a foil packet with a little olive oil and salt and pepper and roast on 400 degrees for 40 minutes.

    Once they are done, let them cool completely. Slice them into 1/8" slices (be careful because their intense beet juice can stain your clothes) and place them in the fridge to cool down more.

    In the meantime, gather the rest of your ingredients:

    • Pomegranate molasses
    • Microgreens, such as alfalfa or bean sprouts (or for a spicy kick, try radish sprouts)
    • Olive oil
    • Ricotta cheese
    • toasted pistachios
    To assemble: Place 3 or 4 slices of beets, slightly overlapping each other, on a plate. Drizzle a little olive oil and pomegranate molasses over them. In a small bowl, mix the microgreens with a tiny bit of salt and pepper and a little olive oil. Toss lightly. Place a small mound of the microgreens over the beets. Then add a few balls of ricotta cheese (you can easily form them with your hands). Lastly, add a few pistachios, drizzle a little more pomegranate molasses over salad and serve.

    Friday, July 27, 2007

    Grilled Corn with Chipotle Butter

    It has been so hot here lately, that I rather grill outdoors than cook inside a hot kitchen. Grilled corn, along with grilled veggies, is probably one of my favorite summer dishes. Usually, us Mexicans tend to slather our grilled corn with mayonnaise, cotija cheese, chili powder and fresh lime juice (oh, believe me it's delicious!). But this recipe is a slight variation on our Mexican grilled corn--and probably more healthy than mayo! An ice cold Tecate beer goes quite smoothly with this grilled corn. Buen provecho!

    INGREDIENTS

    • 1/2 cup (1 stick) unsalted butter
    • 1 1/2 tablespoons minced seeded canned chipotle chilies in adobo
    • 2 teaspoons fresh lime juice
    • 1/4 teaspoon salt
    • 8 ears of corn, husked
    • Olive oil
    DIRECTIONS

    In a small mixing bowl, mash together the butter, chipotles, lime juice and salt. Form into a log and chill for cutting into coin-shaped pieces.

    Brush the ears of corn lightly all over with olive oil. Place on cooking grate over direct medium heat. Cook, turning occasionally, until the kernels are lightly browned and blistered all over, 8 to 10 minutes for grocery store corn and 4-5 minutes for farm-fresh corn.

    Spread the chipotle butter evenly over all ears of corn and sprinkle with salt to taste. Serve immediately.

    Wednesday, July 25, 2007

    Diva's Lasagna

    So why is this lasagna different than other lasagnas, you may ask yourself? What makes this a Diva Lasagna? Well, first of all, I use a poblano pepper in my meat sauce to give it that spicy kick that we all need once in a while, and I combine sirloin with turkey just so that I feel it's slightly healthy. The biggest difference is that the meat sauce is not entirely tomato-ey in flavor and I just love the combination of ricotta and cottage cheese; so when you bite into the lasagna, you can taste the meat but especially the cheesiness of it all!

    INGREDIENTS (serves 8 to 10)

    • 1 teaspoon olive oil
    • 1 pound ground sirloin
    • 1/4 pound ground turkey
    • 1 cup finely chopped red onion
    • 1 poblano pepper, seeded and diced
    • 1 large garlic clove, finely minced
    • 1 teaspoon salt
    • 1/4 teaspoon pepper
    • 2 cups (16 ounces) your favorite marinara sauce
    • 1 cup (8 ounces) canned diced tomatoes with juice
    • Lasagna noodles (about 9 noodles)
    • 1 egg
    • 1 (16-ounce) carton cottage cheese
    • 1 (15-ounce) carton ricotta cheese
    • 1/2 cup cup fresh parsley, divided
    • 1 bag (2 cups) shredded cheese, such as Italian or pizza blend
    • Salt and pepper to taste
    • 1/4 cup freshly grated Parmesan cheese, divided
    DIRECTIONS

    In large skillet, add olive oil and saute onions over medium heat for two minutes. Add the diced poblano pepper and saute another minute. Add garlic and cook until fragrant, about another minute. 
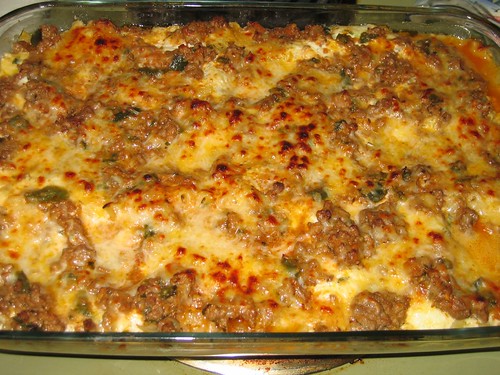
Add ground beef and ground turkey and brown until beef is no longer pink (about 10 minutes); drain well. Add marinara sauce, diced tomatoes, 1/4 cup chopped parsley, salt, and pepper and bring to a boil; reduce heat and simmer for 10 minutes. Set aside.

    Meanwhile, cook noodles according to package directions; drain (I cook my noodles very al dente).

    Preheat oven to 350*F (175*C). Lightly grease a 13 x 9 x 2-inch baking pan; set aside.

    In a large bowl, combine egg, cottage and ricotta cheeses, and remaining parsley; season to taste with salt and pepper.

    Spread a very thin layer of meat sauce at bottom of baking pan. Then add a layer of 3 noodles in prepared baking pan. Spread with 1/3 of cottage cheese mixture, then 1/3 layer of meat sauce, then 1/3 layer of shredded cheese. Repeat with second layer. Third layer end with remaining cottage cheese mixture, meat sauce and remaining shredded cheese. Sprinkle with 1/4 cup Parmesan cheese. Bake for 25 minutes covered with foil; then for another 15 minutes, uncovered. Let stand 10 minutes before serving. Divalicious!

    Monday, July 23, 2007

    Spaghetti with Mint and Parsley Pesto

    This is the most delicious pasta I've made in a while. Perhaps I think this because I just love the taste of fresh mint. This particular recipe is from Dave Lieberman, who has a show on the Food Network. This is probably the only time I haven't "tweaked" a recipe. Anyhoo, I ate this just as a regular meal, but it also makes a super side-dish to fish or chicken.

    INGREDIENTS (serves 4)

    • 1 bunch large mint
    • 1 large bunch parsley
    • Juice of 1 lemon
    • 2 large garlic cloves
    • 1 teaspoon salt
    • 3/4 cup extra virgin olive oil
    • 1/2 cup grated Parmesan, pecorino, or grana padano cheese
    • 1 pound of spaghetti
    • A handful of toasted pine nuts (about a heaping tablespoon)
    DIRECTIONS

    In a food processor, add the mint, parsley, lemon juice, garlic cloves, and salt. Process the ingredients while slowly adding the olive oil in a steady stream. Add the grated cheese and blend for a few seconds more. Set aside.

    Meanwhile, in a large pot, cook the spaghetti until al dente. Drain the pasta and toss with the pesto. Finally, toss in a handful of toasted pine nuts and serve.

    Saturday, July 21, 2007

    Cheese Blintzes

    One of the few things I miss about living in the East Coast is all the wonderful Jewish delis I used to frequent. Not only did I become a big fan of matzo ball soup and chopped liver, but my all-time favorite deli indulgences were cheese blintzes. In an attempt to bring back my fond memories of the Jewish delis, I made these blintzes. I was fortunate enough to find farmer's cheese here in San Diego, but if you can't find it, you can do a mixture of cottage cheese and ricotta. Mmmmm.

    INGREDIENTS (makes about 10 blintzes)

    For crepe batter

    • 3 large eggs
    • 1/4 cup water
    • 1/4 cup milk
    • 1/2 teaspoon baking powder
    • 1/2 cup all-purpose flour
    • 1 1/2 teaspoons sugar
    • 1 tablespoon unsalted butter
    For filling
    • 1 1/2 cups farmer cheese
    • 2 cups cottage cheese
    • 1/4 cup sugar
    • 1 1/2 teaspoons cinnamon
    • 1 tablespoon all-purpose flour
    • fruit filling or fresh fruit for topping (optional)
    DIRECTIONS

    Make wrapper batter:

    • In a blender blend crepe batter ingredients and let stand 30 minutes. In an 8-inch skillet, preferable non-stick, melt half of butter over moderately high heat. Pour in enough batter to just coat the bottom of skillet, swirling, and cook, undisturbed, until top is set and bottom in golden (do not turn wrapper over). Transfer wrapper to paper towels in one layer, golden side down. Make more wrappers with remaining butter and batter.
    Make filling:
    • In a food processor, blend cheeses, sugar, and cinnamon until smooth. If necessary, add flour to thicken filling.
    • Preheat oven to 250°F. and line a baking sheet with parchment paper.
    • Put 3 tablespoons filling in center of each wrapper and fold opposite sides of wrapper over filling until sides barely touch. Fold in ends to completely enclose filling, forming packets, and arrange, seams sides down, on baking sheet.
    • Make more blintzes with remaining filling and wrappers.
    • Bake blintzes, covered loosely with foil, until heated through, 10 - 15 minutes. Serve with sour cream and either cherry or blueberry pie filling.

    Tuesday, July 17, 2007

    Pan Seared Rib Eye Steaks with Mushroom Sauce

    Okay, okay, I know I'm probably over doing the who cast iron skillet thingy, but dang do I love cooking in it. What I love the most is the fact that if you keep your skillets seasoned, they basically become non-stick and you have to use very little oil to cook in them. Anyhoo, this recipe is great, but then again how can anyone ever go wrong with rib eye steaks? NUMMY.

    INGREDIENTS (Serves 4)

    • 2 rib eye steaks, about 1" thick and 1/2 lb. each
    • 2 tablespoons olive oil
    • 1 tablespoon soy sauce
    • 1 teaspoon Montréal Steak seasoning by McCormick
    • 1 shallot, minced or 1/4 cup finely diced red onion
    • 1/2 pint pre-sliced baby bella mushrooms
    • 1 tablespoon dry white wine or chicken stock
    • 3 - 4 Tbsp sour cream
    DIRECTIONS
    1. In a small bowl, mix 2 tablespoons olive oil, 1 tablespoon soy sauce and 1 teaspoon Montreal steak seasoning. Evenly distribute marinade over both steaks and tightly wrap with plastic wrap or place them in a zip-loc bag; marinate 30 minutes, or longer, in the refrigerator.
    2. Take the steaks out of the fridge and bring to room temperature, about another 30 minutes.
    3. Preheat oven to 500ºF and place a 12" cast iron skillet that has been slightly wiped with canola oil in the oven as it preheats.
    4. Unwrap the steaks. When the oven is finished preheating, take the skillet out and place on the stovetop over high heat for another few minutes. Be very careful because the pan is very, very hot. Use your oven mitt!
    5. Add the steaks to the hot skillet and cook for 30 seconds on one side. DO NOT MOVE THE STEAKS! This is essential to developing the seared crust.
    6. After 30 seconds, flip the steaks and cook for another 30 seconds on the second side.
    7. With an oven mitt on, put the pan with steaks into the 500ºF oven for 3 minutes. Flip the steak then back in the oven for another 3 minutes on the second side (4 minutes for medium well).
    8. Take the pan out of the oven and remove the steaks; tent with foil and let it rest while preparing the mushroom sauce.
    9. Return the pan to the stovetop on medium high heat; the pan should still be very hot. Add the shallot and mushrooms to the pan and sauté for one minute. Add the wine (or stock) and bring to a boil and scrape up any bits stuck to the bottom of skillet. Simmer for another minute.
    10. Remove pan from heat and add sour cream, any juices from the seared steaks, and season with salt and pepper, and cook for a minute. Serve immediately mushroom sauce with steak. Delish!
    Adapted from Alton Brown's recipe for pan seared rib eye recipe on FoodNetwork.com.

    Monday, July 16, 2007

    Raspberry-Rhubarb Tart

    Okay, I am in a cast iron skillet kick this week. I can't believe I lived so long without one. I'm so grateful to my mom that bought me three different sizes of the cast iron skillets. For this particular recipe, a 10-inch cast iron skillet will work well. If raspberries are not your favorite, you can substitute strawberries instead. The best part about this tart is the crust. It's really yummy.

    INGREDIENTS (Serves 6)

    • 2 cups all-purpose flour, plus more for the work surface
    • 1/4 teaspoon kosher salt
    • 1 cup plus 2 tablespoons granulated sugar
    • 14 tablespoons unsalted butter, chilled and cut into small pieces 3/4 pound fresh rhubarb, trimmed and cut into 1-inch pieces
    • 12 ounces fresh raspberries
    • Whipped cream or vanilla ice cream, for serving (optional)
    DIRECTIONS

    Heat oven to 400° F.

    In a food processor, combine the flour, salt, and 1 tablespoon of the sugar. Add the butter and pulse until the mixture resembles coarse meal. Add cold water, 1 tablespoon at a time, and pulse until the dough comes together but is still slightly crumbly (you should use 3 to 4 tablespoons total). Turn the dough onto a lightly floured surface and knead gently. Shape the dough into a disk, wrap it in plastic, and refrigerate for 20 minutes.

    Meanwhile, in a large bowl, combine the rhubarb, raspberries, and 1 cup of the remaining sugar; set aside.

    On a lightly floured surface, roll the dough into a 14-inch circle. Place it in a large cast-iron skillet, allowing the dough to hang over the edge. Top with the rhubarb mixture. Fold the edge of the dough over the fruit (to create pleats). Lightly brush the top of the dough with milk and sprinkle with the remaining sugar. Bake until golden brown, 50 to 55 minutes. Let cool for 5 to 10 minutes. Slice into wedges and serve with the whipped cream or ice cream.

    Recipe courtesy of RealSimple.com

    Sunday, July 15, 2007

    Chipotle Turkey Cornbread Pie

    This recipe is a variation of the chicken taco cornbread pie. I saw this recipe being made on Food Network, but it was done in a baking dish. I really like making these types of recipes on the cast iron skillet because you have fewer pots to dirty and your cast iron skillet also serves as your serving platter. Since the chipotle gives this pie a spicier and smoky taste, a cool, not-too-sweet dry rose will pair up nicely with this dish.

    INGREDIENTS

    • 1 tablespoon olive oil
    • 1 pound, lean ground turkey
    • 1 medium yellow onion, chopped
    • 1 green bell pepper, diced
    • 2 garlic cloves, finely minced
    • 2 teaspoons ground cumin
    • 1 (15-ounce) can pinto beans, drained and rinsed
    • 1 (8-ounce) can diced tomatoes
    • 2 chipotle chiles, finely diced, plus 1 teaspoon of adobo sauce, from can chipotle in adobo
    • 1 cup grated Cheddar
    • 1/2 cup chopped fresh cilantro leaves
    • 1 (8.5-ounce) package cornbread mix
    • 1 egg
    • 1/3 cup milk
    DIRECTIONS

    Preheat oven to 400 degrees F.

    Heat the olive oil in a 12-inch cast iron skillet over medium heat. Add the ground turkey, the onions, green peppers, and garlic and cook until the turkey is no longer pink and is cooked through, about 8 minutes. Drain off any excess fat and sprinkle the meat mixture with the cumin.

    Add the beans, tomatoes, chiles and adobo sauce to the skillet and bring to a boil over high heat. Reduce the heat to medium and simmer until heated through and slightly thickened, about 5 minutes. Remove skillet from the heat and stir in the cheese and cilantro. Press down mixture with back of spoon to make an even, compact layer. Set aside.

    Combine corn bread mix, milk and egg in medium bowl; mix just until dry ingredients are moistened. Spoon batter evenly over turkey mixture to cover completely.

    Bake 20 to 22 minutes or until corn bread is golden brown. Let the tamale pie stand for 5 minutes before cutting into wedges and serving.

    Thursday, July 12, 2007

    Nopalitos (Cactus) Salad

    Ensalada de Nopalitos
    My mom makes this amazing nopalitos, a.k.a cactus, salad. She usually buys the fresh nopales at the farmer's market in Tijuana and cooks them herself. But if you don't have fresh nopales in your area--or you just don't want to cook them because I sure don't--you can use the jarred nopales (like I did). You can usually find the jarred cactus in the Mexican aisle of the grocery store. Also, try to use the real Mexican queso fresco. This is definitely one of my favorite summer dishes.

    INGREDIENTS (Serves 4)

    Salad

    • 1 jar (15 oz.) doña Maria nopalitos, drained
    • 2-3 Roma tomatoes, diced
    • 1/2 med. sweet onion, diced
    • 1/3 cup chopped cilantro
    • 1 Serrano or jalapeno chiles, seeded and finely diced
    • 1/4 cup crumbled Mexican queso fresco cheese or feta cheese
    Dressing
    • 1 tablespoon fresh lime juice
    • 1 tablespoon red wine vinegar
    • 1 tablespoon olive oil
    • 1/2 teaspoon dried oregano
    • salt and pepper to taste
    DIRECTIONS

    In a glass bowl, mix the first five ingredients together.

    In a separate bowl, whisk together dressing ingredients and pour over salad, toss well to coat. Refrigerate salad 2 to 4 hours. Before serving, add the crumbled Mexican queso or feta cheese. This makes a great side dish, or serve it with tortilla chips and serve as an appetizer. Fresh nopales for sale in Mexican market

    Tuesday, July 10, 2007

    California Avocado Pie

    Avocado Pie
    First my sister-in-law invented strawberry-avocado smoothies, and now I found the most amazing recipe for avocado pie. It's so good I can't explain it. This is a truly unique California dish apparently invented by an avocado grower. You must give this a try, specially now during the summer while aguacates are still cheap!

    INGREDIENTS (Makes 8 servings)

    • 1 (9-inch) prepared Graham Cracker Pie Crust
    • 1/4 cup fresh lime juice
    • 1/4 cup fresh lemon juice
    • 1 envelope unflavored gelatin
    • 3 medium-size very ripe Hass avocados*
    • 1 (14 ounce) can sweetened condensed milk
    • 1/2 cup heavy cream
    DIRECTIONS

    Place the graham cracker crust in the refrigerator until well chilled.

    In a small bowl, combine lime juice, lemon juice, and unflavored gelatin; let stand 4 to 5 minutes or until softened.

    In a large bowl or the food processor, combine gelatin mixture, avocado pulp, and sweetened condensed milk. Pour mixture into prepared graham cracker pie crust. Refrigerate at least 2 hours or until the filling is firm.

    In a small bowl, whip heavy cream until stiff peaks form. Serve pie topped with prepared whipped cream mixture.

    * If an avocado is ripe, it will yield to a gentle pressure.

    Sunday, July 08, 2007

    Sticky Rice With Mango

    I first had sticky rice with mango at Spices Thai restaurant in San Diego. I was very pleasantly surprised. I'm not a big rice pudding type of person, but this dessert was perfect. It's not too overly sweet and the sweet, ripe mangos make a great accompaniment to this recipe. This is definitely a summer dessert when wonderful mangoes are in season.

    INGREDIENTS (serves 4)

    • 1 cup uncooked Jasmine Rice
    • 1 can Coconut Milk
    • 2/3 cup sugar
    • 1/2 teaspoon salt
    • 2 ripe mangoes
    DIRECTIONS
    1. In a medium saucepan bring 1 - 3/4 cups of water to a boil. Add the rice and briefly stir. Reduce heat to low and cover. Simmer 20 minutes or until water is just absorbed.
    2. Meanwhile in a small saucepan, combine coconut milk, sugar and salt. Boil for 3 minutes, stirring frequently. Remove from heat.
    3. Add the hot coconut milk sauce to the cooked rice. Stir until mixed.
    4. Lightly press plastic wrap onto mixture in saucepan to cover. Let rest 30 minutes at room temperature.
    5. Peel and slice the mangoes. With large spoon or ice cream scoop, spoon the sticky rice onto plates and garnish with mango slices.

    Wednesday, July 04, 2007

    Hamburger Sliders

    White Castle Slider
    What exactly is a slider? Basically, it's a mini hamburger that can usually be eating in one or two bites. Sliders became quite popular after White Castle started serving them back in 1923! And now, they are even more popular with stoners around the world after the movie, Harold and Kumar go to White Castle. I actually prefer these type of mini-burgers because I feel like I'm not overeating and I don't particularly like lettuce and tomato on my burgers. Anyhoo, happy 4th of July!

    INGREDIENTS (makes 12 sliders)

    • 12 dinner rolls (Parker House shape, 2 1/2 inches)
    • 1 pound lean ground beef
    • 1/2 teaspoon salt
    • About 1 1/2 cup water, divided
    • 3/4 cup diced white onions
    • 1 beef bouillon cube
    • 1/2 to 1 cup water
    • 12 round pickle slices
    • American cheese, optional
    DIRECTIONS

    Place ground beef, salt and 1/2 cup of the water in a food process, and process for a few seconds to ensure that water and salt are blended through the beef.

    Place plastic wrap on the counter. Place hamburger in the middle, then place another pieces of plastic wrap on top of the meat. Roll the hamburger out to 1/4-inch thick. Remove plastic wrap; cut meat into 3-inch squares. Perforate each piece five times with a plastic straw (this forms the steam holes). Cover hamburger squares with plastic wrap. Freeze until partially frozen, but no frozen solid.

    Meanwhile, place onions, beef bouillon and 1/2 cup water in a frying pan. Sauté over medium-low heat, stirring until the onions are translucent, adding more water as needed. Remove from heat until ready to cook hamburger patties.

    To prepare patties, heat frying pan with the onions over medium-low heat; add water to onions just until the bottom of the frying pan is covered. Place patties in pan; cover with lid. It will only take a short time for the patties to cook on one side. Flip, place a bun bottom on top of the patty and cook on the other side for a very short time. The patties should be juicy and your buns steamy!

    Add a pickle, a few of the sautéed onions then cover hamburgers and serve immediately. YUMMERS!

    Sunday, July 01, 2007

    Mofongo

    One of my favorite comfort foods is mofongo. It's a dish made of mashed plantains, garlic, and pork cracklings. This is a very popular dish for Puerto Ricans, Cubans and Dominicans and it's definitely not a typical Mexican dish. However, after my mom married a Puerto Rican, she learned how to make mofongo, and once I had it I totally fell for it. It has been a while since mom has made it because it's messy, it contains a lot of fat, but I had a craving and I just had to make it! I typically buy the jarred Goya sofrito and use a little of that to top the mofongo.

    INGREDIENTS

    • 3 plantains, green
    • 1/3 cup salt pork, diced
    • ½ tablespoon garlic, fresh, mashed
    • Canola oil for frying
    DIRECTIONS

    Using a sharp knife, slice open each plantain lengthwise just deep enough as the peel, and peel them. Cut each plantain into 1" pieces on a bias. Add the pieces into a bowl filled with cold water.

    In a large frying pan, pour in about an inch of oil. When the oil is hot, add some of the plantain pieces, lower the heat to medium-low, and cook for 3 minutes on each side. You want the plantains to be fork-tender but not too browned. (Be careful because there will be a lot of splatter).

    Remove the tender pieces one at a time from the pan, and place paper towels to drain. On a cutting board, place one piece of plantain at a time and flatten it with a wide wooden spatula or the bottom of a small plate. Continue with the rest of the plantains.

    Add the salt pork to the oil and cook for about 5 minutes. You want the salt pork cooked and the fat rendered. Drain the pieces out with a spoon and place in a medium sized metal bowl. Add the garlic to the bowl.

    When the oil is hot again, raise the heat to medium-high and add the plantains back to the pan. Cook for 1 minute, turn, and then cook for another minute. You want them browned and crispy. Remove the pieces to a paper-towel lined plate.

    Working in batches, place a bit of the salted pork and garlic, and several fried plantains in the molcajete**; smash with the pestle. When it's in a nice crumbly paste consistency, add it to a glass bowl and keep warm. Continue smashing until you're done.

    Shape the mofongo into 2 inch balls and spoon some sofrito sauce over them and serve as a side dish to a salad; or place mofongo balls in soup bowls and douse with broth, garnish with cilantro and serve immediately.

    **You can also use a food processor – add the plantains to food processor with salt pork bits, and garlic. Process to consistency of mashed—not whipped—potatoes. Do not over process!