Tuesday, July 20, 2010

Scottish Eggs


Okay, so I know I haven't been cooking for a while or posting any recipes. Yes, I at first blamed having to cook for myself as the reason; then when my baby came around, I complained that I didn't have enough time because I was taking care of a newborn. Well, now that Stella is 9 months and pretty much mobile, I have more time to do the things I love to do as hobbies, mainly cooking and blogging (and rowing).

Stella and I were in Minnesota this past week to visit her grandparents, MaMare and Jimmy Jam, and they have some very interesting cooking shows in that state! One evening in Minnesota I saw a show about breakfast and this lovely little recipe came up: Scotch Eggs. I had seen this dish here in San Diego before, but I just didn't think an egg surrounded by a sausage patty then deep fried would be good. Boy, was I wrong! I got this recipe from Allrecipes.com, but I did change it up a bit because I didn't have pork sausage. I had been on a bratwurst kick lately, so that's what I used. In most recipes I found they say pair up the Scotch egg with "good" mustard, however I found that a really good chutney will be just a great. And you are supposed to fry the "egg" but I decided to pan fry then bake the rest of the way because even I have limits! :)

INGREDIENTS (makes 3 servings because I only had 3 eggs left!)

  • 3 large eggs
  • 3 Johnsonville Bratwurst Links, removed from their casings
  • 3/4 tsp. smoked paprika
  • 1/4 tsp. ground coriander
  • 1/8 tsp. fennel seeds
  • 1 egg, beaten
  • 1 cup flour
  • 1/3 cup seasoned breadcrumbs
  • 1/3 cup Panko breadcrumbs
  • Vegetable oil
  • salt and pepper
  • Really good chutney
  • Really good mustard
DIRECTIONS 

Remove bratwurst from casings and add the smoked paprika, coriander and fennel seeds and mix with your hands very well to combine. Let cool slightly in fridge. In the meantime, preheat oven to 350 degrees F (175 degrees C).

Place eggs in saucepan and cover with water. Bring to boil. Cover, remove from heat, and let eggs sit in hot water for 10 to 12 minutes. Remove from hot water, cool and peel.

Setup a breading station: beaten egg in one bowl; place flour in a plate; and combine the seasoned breadcrumbs and Panko together in another plate.

Heat a large skillet with a little vegetable oil on medium-high.

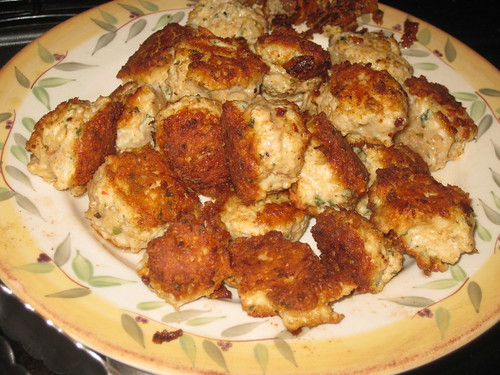
Divide the bratwurst sausage into three equal parts. Flatten each part and make a patty to surround each egg.


Very lightly flour the sausage and coat with beaten egg. Roll in bread crumbs to cover evenly.

Pan fry until golden brown all over, about 3 minutes per side. Bake in the preheated oven for 20 to 30 minutes, or until bratwurst is cooked through.

Cut in half and serve over a bed of lettuce and sliced tomatoes for garnish or serve with a side of tomato or mango chutney and mustard.

Thursday, June 24, 2010

Martini Scallops

I am a sucker for seafood, we all know that, but it's not very often I get wowed by sea scallops. I enjoy eating these mollusks, but sometimes I feel they are over priced, at the grocery store and restaurants, and oftentimes people tend to overcook them. But when I went to the Balboa Park Food and Wine ooking school last week, the chef showed us how to make this dish and it blew me away. He did not use any salt or pepper whatsoever, and they were wonderful. You want to use large sea scallops (8 to 12 per pound) and don't go buy fancy diver scallops. Just good quality, fresh sea scallops will do. This serves 4 to 6 people, depending on how many scallops you get on the pound and this makes a fabulous first course or pair it with a salad and it makes a pretty good darn meal.

INGREDIENTS
  • 8 ounces large sea scallops
  • 3 ounces clarified butter (you have to use clarified butter or ghee. Don't use regular butter or olive oil)
  • 1 chopped shallot
  • 1/2 cup gin
  • 2 tablespoons dry vermouth
  • Garnish of lemon twists or lemon zest

DIRECTIONS

Heat the clarified butter in a saute pan. When hot, add the shallots and saute until golden brown. Add the scallops and saute until firm, about 3 to 5 minutes. Deglaze the pan with the gin and dry vermouth (be careful with the open flame) for another minute. Serve immediately with some of the sauce and garnish with lemon twists or lemon zest.

Tuesday, June 22, 2010

Gin and Tonic Wilted Spinach Salad

I finally was able to get out of the house and go to a cooking class. Not that I don't love being home with my baby, but since I'm solo parenting it's tough leaving my girl without me not feeling guilty. I went to the Balboa Park Food and Wine school and this was a "cocktail cuisine" class; all our dishes had a cocktail theme to them and were even made with the hard liquor. A note about this recipe is to add the gin to the pan AWAY from the stove and open flame. The chef in our class did it right over the flame to give us a show, but he's a professional. This salad was so delicious, and you don't want to wilt the spinach too much. It's a great starter to any meal.

INGREDIENTS (serves 6)
  • 4 cups fresh, cleaned spinach
  • 3 strips thick cut bacon
  • 1/2 cup sliced mushrooms
  • 3 tablespoons fresh lime juice
  • 1/2 cup gin
  • 3 tablespoons tonic water
DIRECTIONS

Cook the bacon in a large saute pan with high sides (3 to 4 inches). When bacon gets to your crispy likeness, remove from pan.  Cut bacon into 2" pieces. Leave bacon grease in the pan.

Heat bacon grease on high and add the mushrooms and sautee for 2 minutes. Lightly season with salt and pepper.  Add lime juice, gin (away from open flame)  and tonic water and reduce by half.

Finally, add the spinach and wilt. Spin the spinach around the sauce for a minute, then plate immediately and top with crispy bacon and serve.


Sunday, June 13, 2010

Chunky Crab Cakes

Back in the day when Matthew was stationed on the USNS Arctic in New Jersey, I would make frequent trips from San Diego to visit him. The flight I took always had a layover in Atlanta before going onto Newark. I looked forward to arriving into the Atlanta airport because that was the only place that I was able to go to a pretty good restaurant with pretty good crab cakes: Phillips Seafood. And I always ordered the same order of crab cakes with the hush puppies and an iced tea. I know that there are probably better places in Maryland or Baltimore with incredible crab cakes, but the Phillips Seafood restaurant in ATL is the closes I've gotten to authentic style crab cakes. 

I have tried making crab cakes before but either there was too much of a mayonnaise flavor or too much of a fishy flavor because I wasn't using fresh crab meat. So after doing some experiments I've found that this recipe (which came by way of kevinsbrady.net) is probably my favorite. I did slightly alter it and I like to fry my crab cakes in ghee. I also I really like to serve them over a simple salad a little bit of a chipotle aioli on the side with them (I have to have a little bit of mayo somewhere, right?)

INGREDIENTS (makes 6 cakes)

  • 1 lb. fresh lump crab meat, drained
  • 1 large egg, beaten
  • 1 tsp. onion powder
  • 1/2 tsp. garlic powder
  • 1 tbsp. lemon juice
  • 1 tbsp. Worcestershire
  • 1/2 tsp. Old Bay seasoning
  • 1/2 tsp. dill weed
  • 1/2 tsp. kosher salt
  • 1/8 tsp. black pepper
  • 1 cup panko breadcrumbs
DIRECTIONS
 
In a large bowl, combine the egg, onion powder, garlic powder, lemon juice, Worcestershire sauce, Old Bay seasoning, dill weed, salt and black pepper and mix well. Mix in 1/4 cup of the panko breadcrumbs, saving the remainder of the crumbs on a plate for coating the crab cakes. Add in the crab meat, and gently mix it in using a fork or spatula -- or better yet, your hands, coating the lumps with the mixture. Be careful not to pulverize the lumps when mixing - the idea is to keep the mixture chunky.

Place the mixing bowl with crab cake mixture in the refrigerator for about 15-20 minutes to firm it up. After refrigeration, drain off any excess liquid.

Gently press mixture into thick patties (slightly smaller than hamburgers) and lightly coat them using the remaining panko breadcrumbs. Don't compact the cakes; keep them a bit loose. Use just enough pressure to make the mixture hold together. Fry the cakes in butter or ghee at low to medium-low heat in an uncovered fry pan or griddle, turning when the first side is brown, about 5 minutes per side.

Serve immediately with slices of lemon, chipotle aioli or good tartar sauce. Mmmm..

Thursday, May 13, 2010

Nutella Caramel Hazelnut Brownies


Source: bell alimento


I was looking for recipes that had Nutella as an ingredient and look at what I found? Nutella Caramel Hazelnut Brownies! Don't these look divine? The recipe is from bellalimento.com. My mouth is watering already. 

INGREDIENTS
  • 2 large fresh eggs
  • 1/2 stick unsalted butter - room temp.
  • 1 cup sugar
  • 1 tsp pure vanilla extract
  • 1/2 cup all purpose flour
  • 1/3 cup cocoa powder
  • 1/4 tsp baking powder
  • pinch salt
  • 1/4 cup Nutella - melted
  • 1/4 cup Caramel Sauce- melted
  • Hazelnuts
DIRECTIONS 

Preheat your oven to 350 degrees. Into a mixing bowl add your flour, baking powder, salt & cocoa powder. Using a whisk, mix together & set aside. Into your stand mixer add the sugar & butter & mix together until creamy. Add in eggs one at a time and mix well. Add in your vanilla. GRADUALLY add in your flour mixture until it’s well combined. Batter should be thick and sticky.

Spray an ovenproof 8 x 8 dish with cooking spray. Place a piece of parchment paper (slightly larger than your dish to allow for handles) inside. It will adhere to bottom of dish. Take HALF of your brownie batter & smooth it on top of the parchment paper. Take your caramel sauce and spoon it on top of brownie mixture covering entire layer of brownie. Place the remaining brownie batter on top smoothing it out. Place in oven and bake for 30-40 minutes until sides are firm and center is no longer giggly.

Allow brownies to cool completely before removing. Cut your brownies to your desired size using a serrated knife. Make a small indentation with your finger into each brownie. Take your melted Nutella and drizzle over the tops of the brownies. Garnish with the hazelnuts.


Monday, May 03, 2010

Stella Beer Cheese Soup

The last time my husband was home I tried to make him beer cheese soup. It was a disaster! I had to toss the entire thing out. My issue was with making the roux for the soup. I do not know what I did wrong, but the soup ended up with a texture of soaked newspaper. Anyway, this evening I found myself, yet again, with an almost empty fridge. I had: 1 Stella Artois® beer, 2 spicy, smoked-type sausages, veggies, and in my cupboard a can of Campbell's Cheddar Cheese Soup. Can you tell where I'm going with this? Not only did these ingredients inspire me to try to make beer cheese soup again, but also the fact that I named the recipe after my baby girl, Stella.

INGREDIENTS (serves maybe 4 people)
  • 1 celery stalk, small dice
  • 1 carrot, peeled and cut into small dice
  • 1/2 cup diced onion
  • 1 sprig of thyme
  • 1 garlic clove, finely chopped
  • 1 tablespoon butter
  • 2 smoked-sausages (your favorite kind), diced
  • 1 bottle of Stella Artois® beer
  • 1 (10 oz) can of Campbell's Cheddar Cheese Soup
  • 1/2 cup low-sodium beef broth or chicken stock or water (optional)
  • Salt and pepper
DIRECTIONS 

In a medium stock pan melt the butter. Add the celery, carrot, onion and thyme sprig and a pinch of kosher salt and sweat over medium-high heat until vegetables are slightly tender, about 8 minutes. Add the garlic and saute until fragrant, about 30 seconds. Add the diced sausage and mix to combine and to heat through.
Next, add half of the beer and slightly raise the heat. Bring to a boil and let boil for 2 minutes. Add the canned cheese soup and mix to combine. Bring to a simmer and add the rest of the beer. Bring to a boil again then, if soup thickness is to your liking, just keep it on very low for another 5 minutes. But if you want your soup a little more thinner, add the 1/2 cup of beef broth. Bring to a boil again, then simmer on low for 5 minutes.
Serve with cheese crostini and a cold, home-brewed Stella beer (if you can find one) or a Stella Artois®.

Saturday, May 01, 2010

Zucchini Börek (Kabak Böreği)

I am secretly addicted to the show No Reservations with Anthony Bourdain. I say secretly because it usually comes on at 10pm at night--when I should be asleep--and I have to take advantage of every sleep opportunity with my very active, 7 month old daughter. But I digress. A couple of months ago the Travel Channel televised the Istanbul, Turkey episode. All the food in it looked amazing; the people seemed quite friendly and very family and food oriented; and it just seemed like a very fun and intriguing country to visit. 

Towards the end of this episode, Bourdain goes to a Turkish household and has dinner with the entire family. The mom made börek, which is her specialty. It is a pie made with zucchini and Turkish cheese and lots of dill. It looked amazing and I just had to try to make it. I couldn't find a recipe online or in my cookbooks that looked like the börek that was made in the show, but I did find this one on Almost Turkish Recipes. I made several modifications to the recipe because I wanted it to look like the one I saw on t.v., and yet, it was just delightfully yummy. I don't know if this is authentic zucchini börek, but I think I love this dish a lot more than spanakopita now.


INGREDIENTS
  • 20 sheets of phyllo dough, thawed
  • 1/2 cup melted butter for brushing phyllo
For the filling
  • 3 zucchinis, grated
  • 1 egg
  • 1/2 cup finely chopped dill
  • 1/3 cup finely chopped fresh mint
  • 1/2 cup crumbled Turkish white cheese or feta
  • 1 Tbsp paprika
  • 1 tsp spicy red pepper flakes
  • salt and pepper
DIRECTIONS
First off, let me start by saying I'm not from Turkey and I have never been to that lovely country, so I kind of made up this recipe while at the same time taking ideas and ingredient amounts from other recipes. So, this is what I did:
  1. Place the grated zuchinni in a muslin bag. Twist it as tight as you can and let it drip for an hour. Twist bag again and squeeze more water out and let it drip again another half hour. 
  2. Carefully remove the squeezed-dried zuchinni and place in large bowl. Add the egg, dill and mint. Next add the cheese, paprika, red pepper flakes and salt and pepper (I added 1/2 teaspoon salt and 1/4 teaspoon pepper) and mix to combine. Let sit for 15 minutes.
  3. After 15 minutes, the mixture will be juicy. Place another muslin bag over a colander and add the mixture and let it drip out some of the juice for 15 more minutes.


  4. Meanwhile, preheat oven to 350 degrees
  5. Take the zucchini mixture and blend it in a blender (you may have to do it in batches) for about 30 seconds. You don't want it smooth, just broken down a bit and with a little bit of texture to the mixture.
  6. Brush an 8x8x3 pyrex baking dish with some of the melted butter.
  7. Brush one sheet of phyllo with butter and place it in the baking dish (there will be overhang). Keep doing this with 9 more sheets.
  8. Pour the zuchini mixture and fold any of the over hang over the mixture.


  9. Next, brush another phyllo sheet with butter and place on top. Repeat with remaining 9 sheets. Tuck in any of the overhang into the sides or fold it over.
  10. Brush the top with more butter. Make several slits on top and sprinkle some water over over the phyllo.


  11. Bake for 45 to 55 minutes until golden brown.

Wednesday, April 21, 2010

Orecchiette with Mini Chicken Meatballs

I've really fallen in love with orecchiette pasta. I think it's because the pasta has more body and texture to it, and it's chewy yet firm. The only problem is that it's quite hard to find this pasta here in San Diego. On a recent trip to Mona Lisa deli , though, I saw they started selling fresh orecchiette pasta and I just had to buy it.

This recipe is from Giada, but as always I changed it up a bit. I actually read the comments from other users who made this recipe and mostly all said meatball mixture was too sticky and wet, so I modified the recipe by omitting the milk and ketchup and adding just a tablespoon of marinara instead. Additionally I increased the breadcrumbs just a bit. My husband and brother-in-law (and yes, he's living here with us for a bit) loved it! They both especially enjoyed the chicken meatballs because they sure were flavorful.

INGREDIENTS (serves 4)

  • 8 ounce package of fresh orecchiette pasta, if available. (If you're unable to find orecchiette, you can use mini shells).
  • 1/4 cup + 2 tablespoons plain bread crumbs
  • 2 tablespoons dried parsley flakes
  • 1 large eggs, lightly beaten
  • 1/2 cup your favorite marinara sauce
  • 1/2 cup grated Romano or parmesan
  • 1/4 cup grated mozzarella cheese
  • 3/4 teaspoon salt
  • 3/4 teaspoon freshly ground black pepper
  • 1 pound ground chicken
  • 1/4 cup olive oil
  • 1 1/4 cups low-sodium chicken stock, hot
  • 1 pint cherry tomatoes, halved
  • 1/2 teaspoon dried basil
  • 1/4 teaspoon red pepper flakes
  • 8 ounces bocconcini mozzarella, halved
  • 1 tablespoon chopped fresh basil leaves
DIRECTIONS

Bring a large pot of salted water to a boil over high heat. Add the pasta and cook according to package directions.

In a medium bowl, stir together the bread crumbs, dried parsley, egg, 1 tablespoon marinara sauce, Romano cheese, mozzarella cheese, and the salt and pepper. Add the chicken and gently stir to combine. (Use your hands, if you have to).

Using a melon baller (or a teaspoon measure), form the chicken mixture into 3/4-inch pieces. With damp hands, roll the chicken pieces into mini meatballs. (I don't have a melon baller, so I just used my hands to form the meatballs).

In a large (14-inch) skillet, heat the oil over medium-high heat. Working in batches, add the meatballs and cook without moving until brown on the bottom, about 2 minutes. Turn the meatballs over and brown the other side, about 2 minutes longer. Remove meatballs from pan and set aside. To the pan add the tomatoes and sear for one minute. Next add the hot chicken stock and bring to a boil. Using a wooden spoon, scrape up the brown bits that cling to the bottom of the pan. Add remaining marinara sauce, dried basil and pepper flakes. Reduce heat to low and simmer for 2 minutes. Now add back the meatballs to the sauce and keep simmering until meatballs are cooked through, about 10 minutes. Drain the pasta, reserving about 1 cup of the pasta water. Transfer pasta to a large serving bowl and add a little olive oil and toss to lightly coat orecchiette. If pasta seems to stick, add a little pasta water to loosen. Add the meatball mixture, mozzarella cheese and gently toss to combine. Garnish with the chopped basil.

Monday, April 19, 2010

Scampi Bake

I truly, truly love shrimp. Next to Ahi tuna, I think it's my favorite seafood, but I wanted to find a recipe that was a bit different and flavorful. I love making scampi, but for some reason it never comes out garlicky enough or buttery enough. So I found this recipe in Allrecipes.com, and I just modified it a little, but I have to say it was da bomb! Perhaps a tablespoon of garlic may have been a bit much, but we all love garlic in our family. You can cut it down to 1/2 tablespoon if you prefer. I served it with a side gremolata egg noodles, but a salad will be just a nice.

INGREDIENTS (serves 3 to 4)

  • 1/2 cup butter (that's one stick, people)
  • 1 tablespoons prepared Dijon-style mustard
  • 1 tablespoon fresh lemon juice
  • 1 tablespoon chopped garlic
  • 1 tablespoon chopped fresh parsley, divided
  • 1 pounds medium raw shrimp, shelled, deveined, with tails attached
DIRECTIONS

Preheat oven to 450 degrees F.

In a small saucepan over medium heat, combine the butter, mustard, lemon juice, garlic, and half of parsley. When the butter melts completely, remove from heat.

Arrange shrimp in a shallow baking dish. Pour the butter mixture over the shrimp. Bake in preheated oven for 15 minutes or until the shrimp are pink and opaque. After you remove shrimp from the oven, sprinkle the remaining parsley and let sit a couple of minutes before serving.

Saturday, April 17, 2010

Chili Con Carne

Photo from cookscountrytv.com
I am not a big fan of chili with beans. I'm not entirely sure why but it could be that I grew up eating beans for breakfast, lunch and dinner (pinto beans to be exact) and now I'm just not that into legumes. It's not just pintos, but even black beans, Navy beans and kidney beans. So when I saw this "chili" recipe sans beans, I just had to try it. I made it for my hubby and my brother-in-law. Although they both liked it, I think they were expecting the beans, but it was still very good and it has quite a TexMex flavor kick. This chili con carne tastes great served over steamed, white rice. I found that it tasted even better the next day.

INGREDIENTS (serves 6)

  • 1 (14-ounce) can diced tomatoes
  • 2 teaspoons minced chipotle chiles in adobo sauce
  • 4 slices bacon , chopped fine
  • 1 (3 1/2- to 4-pound) boneless beef chuck-eye roast , trimmed and cut into 1-inch pieces
  • Salt and pepper
  • 1 onion, chopped fine
  • 1 jalapeño chile , seeded and chopped fine
  • 3 tablespoons chili powder
  • 1 1/2 teaspoons ground cumin
  • 1/2 teaspoon dried oregano
  • 4 garlic cloves , minced
  • 4 cups water
  • 1 tablespoon brown sugar
  • 2 tablespoons yellow corn muffin mix, such as Jiffy Mix
DIRECTIONS
  1. Process tomatoes and chipotle in food processor until smooth. Cook bacon in Dutch oven over medium heat until crisp, about 8 minutes. Transfer bacon to paper towel-lined plate and reserve 3 tablespoons bacon fat.
  2. Pat beef dry with paper towels and season with salt and pepper. Heat 1 tablespoon reserved bacon fat in empty Dutch oven over medium-high heat until just smoking. Brown half of beef, about 8 minutes. Transfer to bowl and repeat with additional tablespoon bacon fat and remaining beef.
  3. Add remaining bacon fat, onion, and jalapeño to empty Dutch oven and cook until softened, about 5 minutes. Stir in chili powder, cumin, oregano, and garlic and cook until fragrant, about 30 seconds. Stir in water, pureed tomato mixture, bacon, browned beef, and sugar and bring to boil. Reduce heat to low and simmer, covered, for 1 hour. Skim fat and continue to simmer uncovered until meat is tender, 30 to 45 minutes.
  4. Ladle 1 cup chili liquid into medium bowl and stir in muffin mix; cover with plastic wrap. Microwave until mixture is thickened, about 1 minute. Slowly whisk mixture into chili and simmer until chili is slightly thickened, 5 to 10 minutes. Season with salt and pepper. Serve. (Chili can be refrigerated for up to 3 days.)

Monday, March 29, 2010

Pooh Sandwich

This is an actual cook book. Go ahead, Google it or look it up on Amazon. Who ever thought about the title probably didn't think that grown-ups would cringe at that though of cooking with poo. Euwwww. Anyhoo, this is an actual recipe from the book. Sorry this posting is lame but my life has been turned upside down by a 16+ pound baby and the only cooking I'm doing lately involves baby formula and purees of sweet potatoes and apple sauce.

INGREDIENTS (one serving)

  • 2 bread slices
  • Creamy peanut butter
  • Mini marshmallows
DIRECTIONS

Spread each slice of bread with a thin layer of peanut butter. Sprinkle some mini marshmallows onto the peanut-buttered slices. Put the two slices together, and enjoy.

Wednesday, March 03, 2010

Spicy Jalapeno and Sausage Pasta Sauce

Well, the honeymoon is over. I went back to work on Monday after being on maternity leave for 5 months. And yes, it was hard not being with my baby. This past weekend I tried to do a lot of stuff with my baby like going to the zoo, hanging out at the park and I also cooked for myself because it seems that I barely cook anymore. I still love to cook, but being a single mom (while daddy is out to sea) with a baby that barely naps doesn't really give me the luxury to cook every day like I used to do.

I was perusing the web in search for an easy yet different pasta sauce and I found this recipe from Michael Chiarello--who I don't mind watching on TV once in-a-while. This is a pretty good sauce if you like spicy foods. I left the seed on one jalapeno and took out the seeds and ribs from the second one and it was still fiery, yet delicious. Also, I think any pasta will be great with this, but I sort of like penne rigatte with this sauce.

INGREDIENTS (8 servings)

  • 2 tablespoons extra-virgin olive oil
  • 1 pound spicy Italian sausage links
  • 1 tablespoon thinly sliced garlic
  • 2 jalapeno chiles, thinly sliced with seeds and ribs (remove the seeds and ribs if you don't want it spicy)
  • 1 cup lightly packed, torn fresh basil leaves
  • 1 (28-ounce) whole tomatoes, pureed with their juices
  • kosher salt
  • Freshly ground black pepper
DIRECTIONS

Heat the oil in a large saucepan over high heat. Add the sausages and enough water to come about half way up the sausages. Cover, reduce the heat to medium low, and cook until done, about 10 minutes. Remove the lid and allow the water to evaporate. The sausages will then fry in their oil when water evaporates. Remove the sausages from the saucepan and drain them on paper towels. Remove all but 2 tablespoons of fat from the saucepan.

Add the sliced garlic and chiles and cook until the garlic begins to brown, about 1 minute, stirring occasionally. Add the basil and cook for 15 seconds, then add the tomato puree. Simmer the mixture for 15 to 20 minutes, stirring occasionally. Taste and adjust seasoning with salt and pepper.

Cut the sausage links in half lengthwise, then crosswise into 1/4-inch pieces, creating half-moons. Return the sausages to the saucepan and heat through. Serve over your favorite pasta.

Thursday, February 18, 2010

Wild Rice Salad with Honey-Mustard Vinaigrette

Last Thanksgiving I had this side dish at my in-laws house in Minnesota and I was dumbfounded when I ate it. First of all, I loved it, but I couldn't figure out why. I loved the taste of the roasted root vegetables, and the dressing was just right, but there was a flavor in it that I couldn't figure out what it was that just made this dish seem like crack to me--and I got addicted to it.

After my father-in-law sent the me recipe, I made it and then, EUREKA! it hit me. It was the pepitas that I loved. I used to eat pepitas in Mexico all the time and I think it just reminded me of my childhood.

I've made this dish a couple of times since Thanksgiving and I've played around a little with it. First, when I make it I cut the recipe in half because the original recipe below makes a lot of wild rice salad. I use salted pepitas this way I don't have to use much salt after I combine it all, and I also omit the scallions. As for dressing, I cut it by 1/4 because again, the recipe below makes a lot, and the original one had fresh sage in it, but I omitted that, too.

This is a very satisfying side dish and it could also be a meal for a vegetarian or even a dish you can serve for lent since there is no meat involved.

INGREDIENTS (serves 8)

  • 4 cups cooked wild rice 

  • 4 small parsnips, cubed 

  • 4 small carrots, cubed 

  • 1 medium squash, cubed 

  • 6 scallions, diced 

  • ½ cup pepitas 
(Mexican prepared pumpkin seeds)
  • Olive oil
  • salt and pepper
DIRECTIONS

Pre-heat oven to 400 degrees.

Put the root vegetables into a large bowl. Toss to lightly coat with olive oil and sprinkle with salt and pepper. 
Place veggies in a large roasting pan and roast until soft and slightly brown on the outside, about 15 to 20 minutes. Remove from oven and let cool.

In a heavy sauté pan heat about 2 teaspoons olive oil over medium heat. Add the pepitas and cook, stirring and shaking the pan, until the pepitas start to "pop" and get golden brown. Remove from heat and cool.

Toss everything together with 1/4 cup of the vinaigrette (recipe below). Taste for seasoning and add more vinaigrette, if needed. Serve room temperature or cold.

Honey-Mustard Vinaigrette

INGREDIENTS (makes about 2 cups of vinaigrette)

  • 
¼ cup apple cider vinegar 

  • 1 tablespoon smooth Dijon mustard 

  • ¾ cup vegetable oil
  • ¼ cup olive oil 
2 Tbl. honey 

  • 1 chopped shallot 

  • Salt and pepper
DIRECTIONS


Combine all ingredients in a blender and blend until dressing gets combined. Taste and adjust seasoning. You can also use this vinaigrette as a dressing for any salad. It's pretty good.

Friday, February 12, 2010

Irish Soda Bread (with currants)

As you all know, I am not a baker let alone a bread maker. I leave that job for my husband. But since he is away and I was having a craving for soda bread, I had to make it myself. I was very close to buying a ready made bread mix at the store; all I had to do was add water, but when I saw Ina Garten make this bread on her show, I figured I would give it a try. I used butter instead of shortening in my recipe but the outcome was still good. What I really like about this recipe is that in less than an hour you can have freshly baked soda bread for your family.

INGREDIENTS (makes one loaf)

  • 2 cups flour
  • 1 teaspoon baking soda
  • 1/2 teaspoon salt
  • 1/2 teaspoon ground nutmeg
  • 1 1/2 tablespoons sugar
  • 6 tablespoons solid shortening such as Crisco (I used unsalted butter)
  • 2/3 cup currants mixed with 1 tablespoon of flour
  • 2 teaspoons caraway seeds
  • 1 cup buttermilk
DIRECTIONS

Preheat oven to 375 degrees F.

In a large bowl sift together the flour, baking soda, salt, nutmeg, and sugar. Using a pastry blender or fingertips, work the shortening into the flour until the consistency is the same as that of small peas. Stir in the raisins and caraway and mix to distribute evenly. Gradually stir in the buttermilk, 1/4 cup at a time, using only enough to allow the dough to come together. Knead the dough for 1 to 2 minutes. Shape the dough into a round loaf and place on a greased baking sheet. Cut an X on the top and over the sides of the loaf. Bake for 45 minutes or until the bread sounds hollow when tapped. Cool on a rack.

Wednesday, February 03, 2010

Cinnamon Pecan Buns

This recipe is an ode to my husband, and Stella's daddy, Matt. He made these pecan buns before he was sent out to sea and they were spectacular. The pecan buns were so soft and gooey, and so very delicious. These are specially good with a hot cup of coffee. If you make these, make sure you have a lot of people around to help you eat them. The buns are so much better eaten warm, right after you bake them. We miss you and we love you, Matt. Come home soon!

INGREDIENTS (makes about 15 buns)
  • 4 tablespoons unsalted butter, melted and cooled
  • 3/4 cup pecans
  • 1/2 cup light brown sugar
  • 1 teaspoon cinnamon
  • 1/4 teaspoon kosher salt
  • 1 cup cottage cheese
  • 1/2 cup buttermilk
  • 1 egg yolk
  • 1/3 cup granulated sugar
  • 1 teaspoon pure vanilla extract
  • 2 teaspoons finely grated orange zest (optional)
  • 2 1/4 cups all-purpose flour, plus more for dusting
  • 1 tablespoon baking powder
  • 1/4 teaspoon baking soda
  • 1/2 teaspoon fine salt
DIRECTIONS
  1. Preheat the oven to 350°. Brush the bottom and side of a 10-inch springform pan with half of the melted butter.
  2. In a food processor, combine the pecans with the brown sugar, cinnamon and kosher salt; pulse until the nuts are almost finely ground. Transfer the mixture to a bowl and sprinkle a scant 3/4 cup over the bottom of the prepared pan. Wipe out the food processor.
  3. Add the cottage cheese, buttermilk, egg yolk, granulated sugar, vanilla and orange zest to the processor and puree until smooth. In a medium bowl, combine the 2 1/4 cups of flour with the baking powder, baking soda and fine salt; whisk to mix. Add the flour mixture to the processor and pulse just until the dough comes together; it will be quite soft and sticky.
  4. Turn the dough out onto a lightly floured work surface and gather it into a smooth ball. Roll out the dough to an 11-by-16-inch rectangle, flouring the work surface as necessary. Brush the dough with the remaining melted butter, leaving a 1/2-inch border all around. Sprinkle on the remaining pecan-sugar mixture.
  5. Working from a long side, roll the dough into a tight cylinder and cut it into 1-inch slices. Arrange the slices cut side up in the prepared pan. Bake the buns in the middle of the oven for about 25 minutes, until lightly browned on top and slightly firm to the touch. Transfer the pan to a rack and let cool for 5 minutes. Run a knife around the inside of the pan to loosen the buns. Remove the springform ring. Invert the buns onto a plate and carefully remove the bottom of the pan. If any of the pecan mixture sticks to the pan, simply scrape it onto the buns. Serve warm.

Tuesday, February 02, 2010

Very Easy Chicken Piccata

Not only is chicken piccata very flavorful but it is also quite easy to make and really, really fast. So if you're in a pinch for time, definitely give this recipe a try. I particularly love the briney, salty flavor of the capers, so don't skimp on them. I like to serve my chicken piccata with a side of noodles and crispy, steamed broccoli. I'm getting hungry just writing this!

INGREDIENTS (serves 4)

  • 2 skinless and boneless chicken breasts, butterflied and then cut in half
  • coarse salt and freshly ground black pepper
  • All-purpose flour, for dredging
  • 6 tablespoons unsalted butter
  • 5 tablespoons extra-virgin olive oil
  • 1/3 cup fresh lemon juice
  • 1/2 cup chicken stock
  • 1/4 cup brined capers, rinsed
  • 1/3 cup fresh parsley, chopped
DIRECTIONS

Season chicken with salt and pepper. Dredge chicken in flour and shake off excess.

In a large skillet over medium high heat, melt 2 tablespoons of butter with 3 tablespoons olive oil. When butter and oil start to sizzle, add 2 pieces of chicken and cook for 3 minutes. When chicken is browned, flip and cook other side for 3 minutes. Remove and transfer to plate. Melt 2 more tablespoons butter and add another 2 tablespoons olive oil. When butter and oil start to sizzle, add the other 2 pieces of chicken and brown both sides in same manner. Remove pan from heat and add chicken to the plate.

Into the pan add the lemon juice, stock and capers. Return to stove and bring to boil, scraping up brown bits from the pan for extra flavor. Check for seasoning. Return all the chicken to the pan and slices of lemon, if using, and simmer for 5 minutes. Remove chicken and sliced lemons to platter. Add remaining 2 tablespoons butter to sauce and whisk vigorously. Pour sauce over chicken and garnish with parsley.

Monday, February 01, 2010

Pasta Cacio e Pepe

This is what you eat when you haven't shopped in three weeks, you have a baby that doesn't take naps and your paid maternity leave has ended. Cacio e pepe simply means cheese and pepper in Italian. I used egg noodles because that's what I had in my pantry, but spaghetti or even capellini will work with this recipe. Don't forget to reserve some of the pasta cooking water to make a sauce for the pasta. Manga!

INGREDIENTS (serves 4)

  • 1 pound spaghetti
  • 3 tablespoons butter, cut into small pieces
  • extra virgin olive oil
  • 2 teaspoons coarse black pepper
  • 1 cup grated Pecorino Romano cheese, 3 rounded handfuls
  • 2 tablespoons of chopped parsley, optional
DIRECTIONS

Bring a large pot of water to a boil for the pasta and salt it. Add the pasta and cook to al dente. Make sure to save some of the cooking water (about 1/4 cup) for the sauce right before you drain the pasta.

Place a large skillet over low heat with the butter, 1 tablespoon of the olive oil, and pepper. Let it hang out until the pasta is done.

When the pasta is ready, take a ladle of the starchy cooking water and add it to the butter-pepper mixture. Drain the pasta and toss it in the pan with the sauce. Turn off the heat. Add the cheese in small handfuls, then toss the pasta with tongs, until all the cheese is incorporated into the creamy sauce. Add another ladle of cooking water if needed, then season the pasta to taste with salt and drizzzle with 2 tablespoons of extra virgin olive oil and sprinkle a little chopped parsley, if desired.

Wednesday, January 20, 2010

Tuna and White Bean Pasta with Gremolata Bread Crumbs

We have had crappy weather all this week and worse is yet to come. It's been raining (yes, raining in San Diego), it's cold and we've had very high winds. And since I have a little baby I was a bit scared to go out driving in this rainy weather to go food shopping. Instead, I found this recipe (and yes, it's from Rachael Ray) and believe it or not, I had most of the ingredients in my pantry. A few modifications are: I halved the recipe and used 1 can of tuna; instead of breadcrumbs I used Panko breadcrumbs; I omitted the rosemary but used a little oregano instead; I didn't have any chicken broth so I used the starchy water of the pasta and lastly I used canned tomato sauce because I didn't have any fresh tomatoes. All in all, it was quite hearty, very filling and I finally found a reason to use my can of anchovies!!!!

INGREDIENTS (serves 6)

  • 6 tablespoons olive oil
  • 6 flat filet anchovies, optional
  • 6 cloves garlic, finely chopped
  • 1 cup breadcrumbs, toast and grind stale bread or store bought
  • 2 lemons
  • 1/2 cup flat leaf parsley, finely chopped
  • 1/2 teaspoon crushed red pepper flakes, optional
  • 1 pound penne or ziti rigate
  • 4 ribs celery, finely chopped
  • 1 red onion, finely chopped
  • 1 (15-ounce) can white beans, rinsed and drained
  • 2 sprigs fresh rosemary, finely chopped
  • 1/2 cup white wine, white vermouth or chicken broth
  • 1 large tomato, seeded and chopped or 1 can 15 ounces can diced tomatoes, drained, optional
DIRECTIONS

Heat 4 tablespoons olive oil in small pan over medium-low heat with anchovies, if using. Melt anchovies into oil until they dissolve then add garlic and stir 2 minutes then add breadcrumbs and stir and cook until deeply golden in color. Stir in zest of 2 lemons and parsley and crushed red pepper flakes. Turn off heat and transfer to a bowl.

Heat a large pot of water to a boil for pasta.

Heat a large skillet over medium heat with 2 tablespoons olive oil. Add celery, onions and 2 cloves garlic to the pan and cook until just tender, 5 minutes. Add white beans and rosemary and heat through 2 to 3 minutes more. Add wine, vermouth or broth, flakes tuna and tomato, if using. Stir 2 minutes then turn off heat.

Just before draining the pasta, add a ladle of starchy cooking water to pan along with the drained pasta, toss to combine. Serve in shallow bowls with lots of breadcrumbs and a drizzle of oil on top.

Saturday, January 09, 2010

Swiss Chard en Crema

After my fridge finally got fixed and started working again, thanks to my pops, I went shopping and I found a lovely bunch of Swiss chard at the farmer's market. I wanted to make a healthy meal because all I had been eating while my fridge was out-of-order were canned foods and it wasn't very good or healthy. So this recipe is basically the same as the "chiles en crema" but I used Swiss chard instead. My father-in-law showed me this recipe and here is my version. I used a splash of Marsala wine but you can use vegetable stock or chicken stock instead.

INGREDIENTS (serves 2 as main course, 4 as side dish)

  • 1 tablespoon olive oil
  • 1 bunch of Swiss chard
  • 1 large fresh Poblano pepper, charred and peeled and seeded
  • 1 white onion, cut into half moons
  • 1/8 tsp. ground nutmeg
  • a splash of Marsala wine
  • 2/3 cup crema (you can find crema Mexicana in most grocery stores in the refrigerated section)
  • 2/3 cup grated Romano-Parmesan cheese blend + more for sprinkling
  • salt and pepper
DIRECTIONS

Char the pepper over your stove top or under your broiler or on your grill. Once it is nicely charred, place it in a plastic bag and seal it. Wait 10 minutes, and then peel off charred skin. Remove stem and seeds and dice the pepper. Set aside. Meanwhile, cut off the tough, woody stems from Swiss chard. Chop the chard into 1" pieces and set aside.

In a skillet heat the tablespoon of olive oil on medium heat. Add the onions and 1/4 teaspoon salt and 1/8 teaspoon black pepper and sweat for about 5 minutes. Raise temperature to medium-high and sauté another 2 minutes. Add the chopped Swiss chard, ground nutmeg and sauté about 10 minutes, or until chard has wilted down and the onions will take on a reddish color. Add the chopped poblano pepper and gently combine and saute another minute or so. Add a splash (about 2 tablespoons) of Marsala wine or vegetable stock. Cook down another minute.

Lower heat to medium again and add the crema and cheese. With a spatula, fold in all the ingredients until it all gets nicely mixed. Let it come to a light simmer (but don't boil) and simmer for 5 minutes. Season to taste, if needed. You can serve immediately, or sprinkle a little more Romano-Parmesan grated cheese on top and place the skillet (it has to be oven proof) under the broiler and let it broil for 5 to 8 minutes or until top gets bubbly and toasty. Serve over white Jasmine rice.

Will Work for Fridge

Dear readers:

This past week I have been living out of a Coleman cooler. You see, my fridge was on the fritz. Last Sunday I woke up to a non-working fridge and all the food in the freezer was warm and mushy. Sadly, I had to throw everything away because I didn't know how long the freezer had been kaputz. And then the refrigerator also stopped working, and hence, I have not been cooking at all this past week. Instead, I've been eating all the stuff from our pantry from canned tuna fish to canned garbanzo beans, mandarins, and dare I say, Chunky soup (ewww!). Perhaps I could have gone to the drive-thru, but since it's the new year my resolution was to not eat from fast food joints and to limit my "going-out" to restaurants. Believe me, it was hard because I was tempted almost every day to order out pizza.

Long story short, my dad fixed the fridge and saved us like $800 because we didn't have to buy a new one. The capacitor (flux capacitor? LOL) broke and he just had to replace it. Anyway, this morning I woke up to a nice and chilly fridge, but completely empty (except for a pint of half-and-half, I need that for my coffee). So Stella and I will be doing some major shopping at Albertson's today, and we'll be hitting the farmer's market, too. I'm not sure what I'll be making tonight, but let me tell you there will be no tuna, garbanzo beans or any type of canned soup involved!