Tuesday, May 26, 2009

Last Minute Brownies

What do you do when you're invited to a dinner party a couple of hours before it starts and you don't have a dessert to bring? Brownies, of course. It probably would have been just as easy to go buy already baked brownies or desserts, but I had all these ingredients and why waste my gas and money when I could make perfectly awesome brownies at home. I found this recipe from the Hershey.com website. These brownies are more cakey than fudgey and although I didn't frost them (I didn't have powdered sugar) I'm sure they would have been even better.

INGREDIENTS (makes 16 brownies)

  • 1/2 cup (1 stick) butter or margarine, melted
  • 1 cup sugar
  • 1 teaspoon vanilla extract
  • 2 eggs
  • 1/2 cup all-purpose flour
  • 1/3 cup HERSHEY'S Cocoa
  • 1/4 teaspoon baking powder
  • 1/4 teaspoon salt
  • 1/2 cup chopped pecans (optional)
  • CREAMY BROWNIE FROSTING (recipe follows; I didn't put any frosting on my brownies because I didn't have any powdered sugar, but they are just as good!)
DIRECTIONS

Heat oven to 350°F. Grease 9-inch square baking pan.

Stir together butter, sugar and vanilla in bowl. Add eggs; beat well with spoon. In another bowl stir together flour, cocoa, baking powder and salt; gradually add to egg mixture, beating until well blended. Stir in nuts, if using. Spread batter evenly in prepared pan. Bake 20 to 25 minutes or until brownies begin to pull away from sides of pan. Cool completely in pan on wire rack. Prepare CREAMY BROWNIE FROSTING; spread over brownies. Cut into squares. About 16 brownies.

CREAMY BROWNIE FROSTING

INGREDIENTS

  • 3 tablespoons butter or margarine, softened
  • 3 tablespoons HERSHEY'S Cocoa
  • 1 tablespoon light corn syrup or honey
  • 1/2 teaspoon vanilla extract
  • 1 cup powdered sugar
  • 1 to 2 tablespoons milk
DIRECTIONS

Beat butter, cocoa, corn syrup and vanilla in small bowl until blended. Add powdered sugar and milk; beat to spreading consistency. About 1 cup frosting.

Sunday, May 24, 2009

Shrimp Risotto

Once you've mastered a basic risotto recipe, you can start making up your kind of risotto flavors, which is what I did with this shrimp risotto. I was craving shrimp and I had 5 jumbo shrimps in the fridge so I came up with this recipe. I also used tomatoes from my garden and all the herbs were from the garden, too. If you have a garden and have a lot of herbs or veggies, risotto is a great way to use them up and flavor your stocks, too!

INGREDIENTS (serves 1 pregnant lady or 2 non-pregos)

  • 1/2 cup arborio rice
  • 1 shallot, peeled and diced
  • 1 tablespoon olive oil
  • 1 Roma tomato, diced (I used tomatoes from my garden)
  • 1/4 cup white wine such as Pinot Grigio or Sauvignon Blanc
  • 3 1/2 cups chicken broth, warmed
  • 2 fresh sage leaves, chopped
  • 2 tablespoons fresh parsley, chopped and divided
  • 1 small sprig of fresh thyme
  • Pinch of red pepper flakes (optional)
  • 5 Jumbo shrimp, with shell on and deveined
  • 1/4 tsp. lemon zest
  • 1/2 cup freshly grated Parmigiano-Reggiano, plus more for passing
  • 2 tablespoons butter
  • Coarse salt and black pepper
DIRECTIONS

In a sauce pan heat the olive oil on medium-high heat. Add the shallots and saute for 4 minutes. Add the rice and keep sauteing 2 more minutes, until all granules are coated and lightly toasted. Add a small pinch of coarse salt and some fresh ground black pepper.

Add the wine and stir from time to time, with a wooden spoon, until almost all of wine is absorbed. Next lower heat to medium and add one ladle full of the warmed chicken stock (you want enough stock to just barely cover the rice). Then add the chopped tomatoes, sage, 1 tablespoon of parsley, the thyme sprig and the red pepper flakes, if using. Keep stirring from time to time until stock gets absorbed. Repeat the process of adding a ladle full of stock and keep stirring (I find that after 3 ladle fulls, your rice is al dente and pretty much done--this may take 20 to 30 minutes). Taste the rice for seasoning and add salt, if needed.

While your rice is cooking, bring a pot of water to a boil. Add the shrimp and cook for 2 minutes. Remove immediately and shock in cold water. Peel off the shells and remove tails and roughly chop the shrimp. Set aside. In a small sauce pan melt the 2 tablespoons of butter on low heat. Add the shrimp to the butter once it's melted and remove from heat.

By now you should have added that third ladle of stock and your rice should be al dente and quite creamy. Add 1/4 teaspoon zest of lemon and the cheese and stir in. Lastly add the shrimp with the melted butter and the remaining tablespoon of parsley. Remove risotto from heat and let stand for a couple of minutes before serving.

Serve in a large bowl with more grated Parmesan and parsley. Dont' forget to serve along with the white wine you used.

Friday, May 22, 2009

Tomato Jam

My hubby got us The Encyclopedia of Country Living and it's a wonderful and useful book, even if you don't live out in the country. It has great gardening tips, advise on how to gut livestock and really interesting country recipes. I was looking for an idea of what to do with all the tomatoes our plants are producing. I've been eating them and using them in savory recipes, but it was getting to be too many tomatoes. I figured perhaps the country living encyclopedia may have suggestions on what to do with an abundance of tomatoes, and that's where I got the idea of tomato jam or preserves. The jam came out really, really good. I kind of made it up as I went along, but the encyclopedia gave me a good idea on how to get my jam started.

INGREDIENTS

  • 3 1/2 cups peeled and quartered tomatoes
  • 1/2 cup stemed and quartered strawberries
  • 3 cups sugar
  • 1/2 lemon, sliced thinly and seeded + the juice of the other half of the lemon
  • 1 dash cinnamon
  • 1 dash nutmeg
  • 2 tablespoons butter
DIRECTIONS (makes about 26 ounces of jam)

Put peeled and cut tomatoes, strawberries, sugar, sliced lemon, cinnamon and nutmeg in large, heavy pot and bring to slow boil over medium-high heat, stirring occasionally. When foam rises to surface, add butter and continue stirring and simmering until preserves thicken, about 45 minutes to an hour and a half (mine took about 90 minutes because the tomatoes were very juicy). Add the juice from the lemon and stir. To test, stick a fork into preserves. When preserves cling to tines of fork, it should be thick enough to can.

Pour preserves into sterilized jars (I used a 1 pound 10oz jar, but 3 half pint jars will work, too), seal and process in hot water bath for 15 minutes.

Monday, May 18, 2009

Homemade Turkey Breakfast Sausage Patties

I'm blaming my father-in-law, Jim, for my love of making sausage. I just find it really cool that I can make all sorts of sausages, use different spices and come up with my own combination. These turkey patties were completely something I made up and I have to tell you, they were a success at the Mother's Day brunch I had. Every single patty was gone! I went back and forth with how much salt to use, but finally decided to use the ratio of 1 tablespoon per every 2.5 of ground turkey. I also used water to try to make the patties juicier since turkey is a pretty lean meat. Next time, I may use apple sauce instead.


INGREDIENTS (makes 24 patties)

  • 2.5 pounds ground turkey
  • 1 tablespoon coarse salt
  • 3 tsp. fennel seeds
  • 1/2 tsp. caraway seeds
  • 2 tsp. ground black pepper
  • 1 tablespoon dried parsley flakes
  • 3 garlic cloves, finely minced
  • 1 to 2 tsp. red pepper flakes, depending on how how you want it
  • 2 tablespoons maple syrup (I used Minnesota maple syrup)
  • 1/2 cup water
DIRECTIONS

In a small skillet, add the fennel and caraway seeds. Heat on med-low and toast until fragrant, about 5 minutes. Then place seeds in grinder or mortar and pestle, and give it a grind. It's OK if you still have a few whole seeds.

In a large bowl add the turkey, ground fennel and caraway seeds, salt, black pepper, parsley flakes, minced garlic, red pepper flakes and maple syrup. Using your hands, mix the sausage mixture pretty well until well combined. Let it sit 15 minutes. Then add the water and using your hands again, mix to combine. Place sausage mixture in a container with a tightly fitting lid or in a freezer bag and let it rest in the fridge overnight.

Next morning, form 24 balls and flatten each into 3" patties in diameter. Make a small impression in the middle of each patty. Fry in a large skillet with a bit of oil over medium high heat for 3 to 4 minutes aside, or until done.

If you're not going to use up all the sausage mixture, you can form the patties and freeze them flat. After they are frozen, put them in a freezer bag and can be frozen up to 2 months.

Friday, May 15, 2009

Roasted Asparagus with Scrambled Eggs

Ina Garten has done it again! This was everyone's favorite dish at my Mother's Day brunch and I, of course, got the recipe from Ina's cookbook, Parties! I was amazed how delicious these eggs were and how well the roasted asparagus complemented them. If you're not an asparagus fan, you can totally omit them, but I have to tell you these were the greatest scrambled eggs ever....and I think it has to do with the half and half. The key to these perfect eggs is gentle cooking, and use a large, non-stick pan with high sides.

INGREDIENTS (serves 8)

  • 2 pounds fresh asparagus
  • olive oil
  • 1 1/4 teaspoons coarse salt
  • Fresh ground black pepper
  • 1/2 cup freshly grated Parmesan cheese
  • 16 extra-large eggs
  • 1 1/4 cups half-and-half
  • 4 tablespoon unsalted butter (1/2 stick)
DIRECTIONS

Preheat oven to 400 degrees.

Break off the tough ends of the asparagus. Place the asparagus on a baking sheet, drizzle with olive oil then toss to coat. Spread the asparagus in a single layer and sprinkle liberally with salt and pepper. Roast for 15 to 20 minutes, until tender but still crisp. Sprinkle with the Parmesan cheese and return to the oven for 5 minutes or until the cheese melts.

While the asparagus are roasting, whisk the eggs in a large bowl with the half-and-half, salt and pepper to taste. Melt 2 tablespoons of butter in a large skillet. Cook the eggs on the lowest heat, stirring constantly with a wooden spoon, to the desired doneness. Remove from the heat, add 2 more tablespoons of butter, and still until it melts. Check for salt and pepper and serve with the roasted asparagus.

Tuesday, May 12, 2009

Tilapia with Tomato and Chickpeas

I have a suspicion that this baby I'm carrying is a vegetarian. Meats and some poultry makes me gag, and if I could, I would probably live off fruit or veggie salads. The only other foods I can handle are non-fishy smelling seafood, and fresh Tilapia is a good example of this. I bought a pound and brought it home and had no idea what to do with it. So I came up with this somewhat Mediterranean inspired recipe. It was pretty good and the chickpeas gave it a very nice texture to the dish...and the baby like it, too!

INGREDIENTS (serves 2 to 3)

  • 1 lb. Fresh Tilapia fillets
  • Flour
  • Olive oil and butter
  • 1 cup of cherry tomatoes, halved
  • 1 shallot, finely chopped
  • 1 Tbs. pitted olives, preferably Greek, chopped
  • 1 teaspoon tomato paste
  • 1 sprig fresh oregano
  • 4 leaves fresh mint
  • 1/8 tsp. cumin
  • 1/8 tsp. coriander
  • 1/8 tsp. cayenne pepper
  • 2/3 cup garbanzo bean (chickpeas)
  • 2/3 cup water
  • Coarse salt and pepper
  • Lemon wedges, for serving
DIRECTIONS

Run fillets over cold water and pat dry with paper towels. Sprinkle a little salt only on one side of each fillet then lightly dredge in flour.

Heat about 1 teaspoon olive oil in a large skillet on medium-high. Working in batches, fry the fillets one minute per side and set aside on a plate. You may need to add more olive oil on the second batch. Fish will not be complete cooked through yet.

In the same skillet (don't clean it), add 1 tablespoon butter. When melted add the halved tomatoes, chopped shallots, olives, mint leaves, sprig of oregano, all the spices, garbanzo beans and 2/3 cup water. Season with salt and pepper. Bring to a boil, then lower to a simmer.

Place fish fillets on top of garbanzo-tomato sauce and cover. Simmer on very low for 10 minutes.

Before serving, remove the oregano sprig and mint leaves. Serve fillets over some rice and pour some the garbanzo-tomato over that.

Monday, May 11, 2009

Date Nut Spice Bread

I was all Ina'd out this Mother's Day. Not only did I host a brunch at Chateau Blaha, but I also made all the food...and three of my recipes were directly from the Barefoot Contessa herself. I find that Ina Garten's recipes are quite exact and they usually turn out very good. On the menu I had scrabbled eggs with roasted asparagus, turkey breakfast patties, a lovely platter of bagels and lox, fruit salad that my sister-in-law made, and this date nut bread with orange zest cream cheese. I'll post the rest of the recipes throughout the week, but below is Ina's date nut bread, which was delish, indulgent and I only have a small slice left at the house.

INGREDIENTS (makes 1 loaf)

  • 2 cups coarsely chopped dates (10 ounces pitted)
  • 1/3 cup orange liqueur (recommended: Cointreau or Triple Sec)
  • 4 tablespoons (1/2 stick) unsalted butter, at room temperature
  • 3/4 cup light brown sugar, lightly packed
  • 1 extra-large egg
  • 1 teaspoon pure vanilla extract
  • 1 tablespoon grated orange zest (2 oranges)
  • 2 cups all-purpose flour
  • 2 teaspoons baking powder
  • 1/2 teaspoon baking soda
  • 1 teaspoon ground cinnamon
  • 1 teaspoon ground nutmeg
  • 1/4 teaspoon ground cloves (I forgot to buy ground cloves, so I used Allspice instead)
  • 1 teaspoon kosher salt
  • 3/4 cup freshly squeezed orange juice (3 oranges)
  • 3/4 cup coarsely chopped pecans (3 ounces)
For the cream cheese spread:
  • 6 ounces cream cheese, at room temperature
  • 1/3 cup granulated sugar
  • 1 tablespoon grated orange zest
DIRECTIONS

Preheat the oven to 350 degrees F. Butter the bottom of an 8 1/2 by 4 1/2 by 2 1/2-inch loaf pan. Line the bottom with parchment paper, then butter and flour the pan.

Combine the dates and orange liqueur in a small bowl and set aside for 30 minutes. Stir occasionally.

In the bowl of an electric mixer fitted with the paddle attachment, beat the butter and brown sugar together on medium speed for 1 minute. Scrape down the bowl. With the mixer on low, add the egg, vanilla, and orange zest. Sift together the flour, baking powder, baking soda, cinnamon, nutmeg, cloves, and salt. With the mixer still on low, add the flour mixture alternately with the orange juice to the creamed mixture, beating only until combined. By hand, stir in the dates with their liquid, and the pecans. Pour the batter into the prepared loaf pan and smooth the top. Bake for 50 to 60 minutes, until a toothpick comes out clean. Cool in the pan for 10 minutes, then turn out onto a wire rack and cool completely.

Meanwhile, in the bowl of an electric mixer fitted with the paddle attachment, cream the cream cheese, sugar, and orange zest on medium speed until just combined.

Slice the bread and serve with the orange cream cheese on the side for spreading. Yummers!

This is all that was left for me!

Tuesday, May 05, 2009

Wine Making at Home, Part I: Primary Fermentation

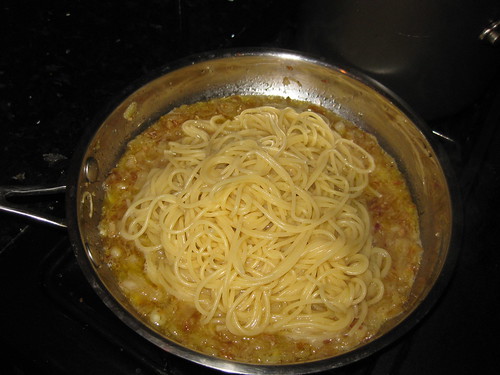
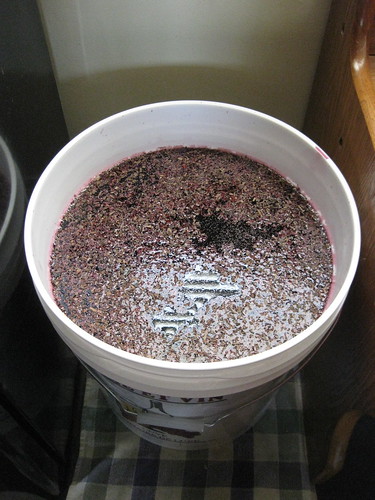
On Sunday, May 3rd, I began my wine making journey. Since my husband and I both dream of one day owning a winery and make our own wine, I figured I better learn the process. I've decided to start by using a wine making kit that came with the juice and additives. Eventually I will move on to using my own grape juice that I crushed, but before I get ahead of myself I wanted to start at the very beginning.

I bought this kit from Midwest Homebrewing and Wine Making Supplies in St. Louis Park, MN. They had the best price for the kit that came with everything: primary fermenter, carboy, hydrometer, floor corker, wine kit and 24 wine bottles and a few other necessary items. Additionally, the Vintner's Reserve Merlot wine kit that came with my purchase only takes 14 days to ferment and the wine can be ready to drink by 28 days (but they recommend aging for 3 to 6 months). So I figured, in 5 months my baby will be born so what a great way to celebrate by giving out wine instead of cigars!

The steps below are directly from the Vintner's Reserve instructions. One of the main things that they keep telling any novice or expert wine maker is sanitize, sanitize, sanitize. By making sure all your equipment is sanitized, your wine will come out great and there is less chance of your wine spoiling.

After I cleaned and sanitized the primary fermenter, the lid, spoon, hydrometer and test jar, thermometer and wine thief, I added 2 liters of hot water (all the water used is spring water) to the bottom of the primary fermenter along with a packet of bentonite and stirred well so that there were no clumps.

Then I added the grape juice that came with the kit. I added 2 additional liters of warm water to the empty wine juice bag to rinse it out and poured that into the fermenter. Then I topped the fermenter with additional cool, spring water to reach the 23 liter mark (6 gallons).

I took a sample of the juice and used my hydrometer and test jar to test the specific gravity. The gravity measures the sugar level and it's a way to figure out when your wine is fermented and ready to bottle. Mine read 1.070, which I is good because I was looking for 1.070 to 1.085.

Then I sprinkled the oak chips and stirred them to just under the surface of the liquid.

By now, the wine juice cooled down a little and I needed it to be between 18 to 24 Celsius. I had to wait about an hour to let it cool a little because mine was at 25 Celsius.

Lastly, I sprinkled the package of yeast that also came with the kit, but I didn't stir. I just let it float on the surface. I tightly covered the primary fermenter with the lid and fermentation should begin within 24 to 48 hours. I will start my secondary fermentation in 5 to 7 days! Wish me luck.
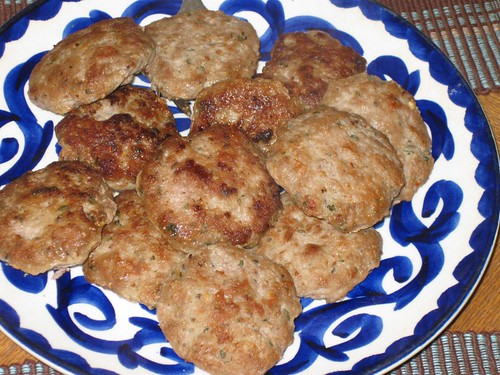
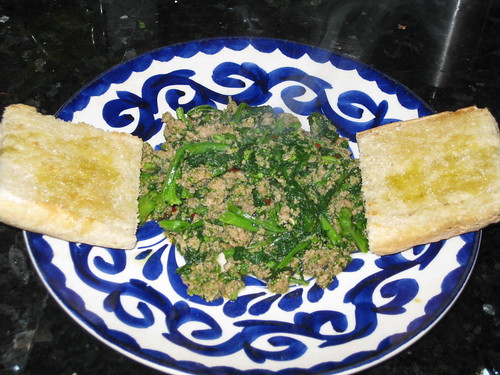
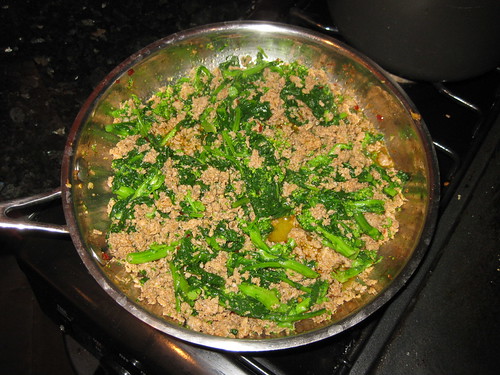
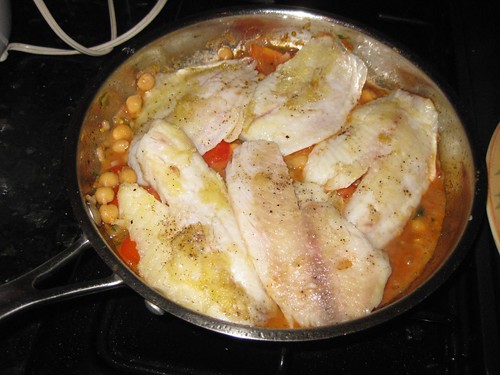
Monday, May 04, 2009

Pan Fried Chilean Sea Bass with Seared Tomatoes

I picked up a nice fresh fillet of Chilean sea bass at the farmer's market on Sunday and I wanted to cook it simply...and also use up some of the tomatoes from our garden. I came up with this recipe and the best part is you only need a few ingredients! I served up the sea bass with some leftover gnocchi I had in the freezer and a simple salad. If I was drinking vino, I would have paired this with a non-oaky Chardonnay or a floral, dry Riesling.

INGREDIENTS (serves 1)

  • .5 to .75 lb. Chilean sea bass fillet, skinless, bones removed and about 1/4" thick
  • Coarse salt and fresh ground pepper
  • 2 Tablespoon flour
  • Olive oil and butter
  • 6 to 8 cherry or grape tomatoes, halved (preferably from your garden)
  • 1 teaspoon finely minced green onion (white and light green part)
  • Lemon wedge, for serving
DIRECTIONS

Lightly salt and pepper both sides of fillet. Sprinkle flour on both sides of fish to dredge and remove any excess flour. Meanwhile, heat 1 teaspoon olive oil and a pat of butter in a skillet on medium-high heat. When pan is hot, add the fillet. Cook for 3 to 5 minutes. Turn fish over and cook another 3 to 5 minutes or until the fish feels firm to the touch. Remove from pan set aside; cover with foil.

To the same pan add the halved tomatoes and the minced green onion and a pinch of salt. And quickly sear for a minute or two over medium-high heat. Some juices from the tomatoes will release and it will make a sauce. To serve, place sea bass on plate and pour the seared tomatoes and the sauce in the pan all over the fish. Serve with a wedge of lemon and enjoy!

Sunday, May 03, 2009

Simple Organic Salad

This was my lunch today, and I have to tell you, it was awesome. I went to the Hillcrest farmer's market today and I bought organic, farm fresh mesclun mix (the lettuces that Matt planted are not ready yet) and I made this simple salad today. I guess I was also inspired by Chef Alice Waters because she is a strong advocate for farmer's markets and for sound and sustainable agriculture and I just LOVED her food at Chez Panisse when I was lucky enough to visit last November. The tomatoes are from our garden and they were vine-ripe, and I used one of my fav cheeses, Winey Goat, because this cheese has a rich but smooth goat flavor and an aromatic nose of wine. Wow, I never knew sustainable agriculture would be so good.

INGREDIENTS (1 serving)

  • 1 teaspoon red vine vinegar
  • 1 tablespoon good extra virgin olive oil
  • A nice handful of organic mesclun mix or your favorite lettuces
  • 6 cherry tomatoes, preferably from your garden
  • a few shavings of Winey Goat cheese or Parmigiano-Reggiano
  • Coarse salt and freshly ground pepper
DIRECTIONS

In a bowl add the vinegar and a pinch of salt and whisk a little. Add the olive oil and keep whisking to combine. Add the mesclun mix, the tomatoes and a few grinds of fresh ground pepper (I added another tiny pinch of salt, too) and gently toss to coat the salad with the vinaigrette. Place on serving plate then top with cheese shavings and enjoy. This tastes great with a lightly grilled (or toasted) piece of crusty French bread.

Saturday, May 02, 2009

Southern Egg Salad

Although I'm in my second trimester, my morning sickness came back. I was hoping that it would be over and done with, but I've been reading that some women can have the nausea throughout their entire pregnancy. So why am I telling you this? Because almost every type of protein makes me sick to look at, smell or even think about. Mainly chicken and beef right now, but I can tolerate mild, non-smelly white fish or shrimp. The only protein I'm able to handle right now are soy and eggs. So, at least my baby is getting some good nutrition.

I was craving an egg salad sandwich and I realized that I had never made one. I always buy them at the deli or my mom makes them for me. I don't like egg (or tuna or chicken) salad sandwiches to be too complicated. I like them simple and with just enough mayo. I saw this recipe on PBS and it was quite good. Very simple, very easy, and I bet you have everything in your pantry and fridge right now. I served them with a couple of fresh sherry tomatoes from our garden and it was just the perfect lunch. And the baby liked it very much, too!

INGREDIENTS (serves 1 pregnant lady)

  • 2 large eggs
  • 2 tablespoons light mayonnaise
  • 1/2 teaspoon shallot, minced
  • 2 teaspoons sweet pickle relish, or chopped pickle
  • 1/8 teaspoon Old Bay Seasoning (I used paprika)
  • Coarse salt and ground pepper
  • 2 slices dark bread, such as multi-grain or pumpernickel
DIRECTIONS
  1. Place eggs in a small saucepan, and cover with water by 1 inch. Bring water to a boil and boil 2 minutes. Immediately remove from heat, and cover. Let stand 12 minutes. Drain and rinse under cold running water.
  2. Meanwhile, in a medium bowl, combine mayonnaise, shallot, relish, and Old Bay Seasoning or paprika. Peel eggs; coarsely chop, and fold into mayonnaise mixture. Season with salt and pepper. Cover and let it rest in the fridge for 30 minutes up to 1 day.
  3. Top one slice of bread with egg salad and remaining slice of bread and serve with a side of sliced tomatoes or more pickles. YUMMY!

Wednesday, April 29, 2009

Hermit Bars

I made these hermit bars for Matthew. I sent them to him in a care package because apparently these bars hold up pretty well when mailing them to far away places. I had never heard of these bars until one day Matt told me about them. I guess these are very popular in care packages sent to the military. These bars are very easy to make and quite flavorful, too. They are a combination of a soft cookie, a fig newton and gingerbread. Usually packages that I send out to Matt tend to get there in a month, so once he gets them we'll see how they hold up and I hope he likes them!

INGREDIENTS (makes 16 bars)

  • 1 cup all-purpose flour
  • 1/3 cup packed dark brown sugar
  • 1/2 teaspoon baking powder
  • 1/2 teaspoon ginger
  • 1/2 teaspoon cinnamon
  • 1/4 teaspoon salt
  • 1/4 cup mild molasses
  • 3 tablespoons melted unsalted butter
  • 1 teaspoon vanilla
  • 1 egg white (large)
  • 1/3 cup pecans, toasted and chopped
  • 1/3 cup raisins, plumped and dried (I used 50% raising and 50% currants)
DIRECTIONS

Preheat oven to 350 degrees F. Line cookie sheet with parchment (I used foil and greased it with butter).

Thoroughly stir flour, brown sugar, baking powder, ginger, cinnamon and salt together in a medium size mixing bowl. Make a well in center of flour mixture.

In a small bowl, stir together molasses, butter, vanilla and egg white. Pour mixture into well; stir until well mixed. Stir in toasted pecans and raisins.

Divide mixture in half and shape each half into a 10×2 inch rectangle (approximately). Make sure the rectangles are spaced about 4 inches apart or more on cookie sheet.

Bake for 15-20 minutes or until edges seem browned and bars appear set and aromatic. Remove from oven and slide parchment onto a large cutting board. Slice each rectangle cross-wise into 1 ½ inch bars. Let cool completely. Recipe from CookieMadness.net

Tuesday, April 28, 2009

French Bread

I do not know what it is, but I'm in a homemade kick right now. Perhaps it's the pregnancy hormones; maybe it's my motherly love coming out; or I'm just bored. What ever it is, I've decided to start making more homemade foods, such as bread. I even made homemade sausage last week. So, depending on how my experiments come out, I may just start doing more "from scratch" cooking.

I found the French bread recipe in Suite101.com and basically, it's simple, it's easy and you only need 5 ingredients. The only hard part (if you want to call it hard) is the waiting and the kneading. This recipe is for 2 large loaves, but I made three medium loaves instead. This recipe makes a lot of bread, so just be warned. Next time, I may just make a lot of demi breads and give out as gifts.

INGREDIENTS (makes 2 large loaves)

  • 2 packages dry yeast
  • 2-1/2 cups warm water
  • 1 tsp. sugar
  • 6 cups all purpose flour
  • 1-1/2 tsp. kosher salt + more for sprinkling
DIRECTIONS

Make sure water temperature is 110 to 115 degrees F. Place water in a large bowl and sprinkle with yeast and sugar. Let stand for 5 minutes until yeast dissolves and starts to bubble. Stir in 2 cups flour and salt. Cover and let rise for 1/2 hour.

Then gradually stir in enough of the remaining flour to make a soft dough. Turn the dough out onto a floured surface and knead for 10 minutes. (Knead by pressing on the dough, then folding over and pressing with the heel of your hand.) Then clean the large mixing bowl, spray with oil (I used olive oil), and place the dough in the bowl. Turn it in the bowl so the dough is greased (this prevents the top from cracking as it rises).

Cover the dough and let rise at room temperature for about 2-1/2 hours, until doubled in bulk. With your fist, punch down the dough. Divide in half and place one half on a lightly floured surface.

Using a rolling pin, roll dough to a 12x6" rectangle. Starting with the 12" side, roll up tightly. Seal seams and edges by pinching. Repeat with remaining dough.

Grease a cookie sheet and sprinkle with cornmeal. Place loaves on prepared sheet. Cover and let rise at room temperature until doubled, about 1 hour.

Preheat oven to 425 degrees F. Spray the loaves with a bit of water, then using a blade, made a few slashes across the top of each loaf. Sprinkle a little bit of salt over each loaf. Bake at 425 degrees F for 25-30 minutes until loaves are golden brown. Remove from cookie sheet and let cool on wire rack.

Sunday, April 26, 2009

Sausage and Broccoli Rabe

I made this super easy meal using my homemade Italian sausage. It's ridiculously easy and the broccoli rabe adds a nice mild bitter flavor that marries well with the sausage. You can use your favorite bulk sausage with this recipe; and don't forget to serve nice crusty bread on the side to sop it all up.

INGREDIENTS (serves 4)

  • 1 large bundle broccoli rabe, about 1 1/4-1 1/2 pounds
  • Salt
  • 2 tablespoons extra virgin olive oil
  • 1 pound bulk Italian hot or sweet sausage
DIRECTIONS

Trim ends of the broccoli rabe and cut into 3-inch pieces. Bring 2 inches water to a boil in a high sided skillet. Salt the water. Add the broccoli rabe and simmer 10 minutes, drain. Return skillet to the stove and heat olive oil over medium-high heat. Add sausage, brown and crumble 6-7 minutes. Add the broccoli rabe and stir to combine.

Thursday, April 23, 2009

Homemade Sweet Italian Sausage

I have been getting spoiled by my husband lately. Maybe it's because I'm carrying his child; perhaps because I'm very emotional right now; or it could be that he's just an Amazon.com addict and he loves to buy stuff from there. Anyway, he got me the food grinder attachment to my awesome Kitchenaid stand mixer and, of course, I just had to use it immediately. I decided to go the easy route and make homemade sausage, this time sober! The recipe below is a tweak between Alton Brown's recipe and a recipe by John D. Lee on HubPages.com. You can omit the paprika, but I like it because it gives the sausage a slight reddish hue.

INGREDIENTS

  • 2 pounds lean pork butt (2-1/2 pounds with bone), diced into 1/4-inch pieces
  • 1-1/2 tsp. salt
  • 1-1/2 tsp. fennel seed (up to 1 Tbsp. depending on how much fennel seed you like in your sausage. I used 1 tablespoon.)
  • 1 tsp. sweet paprika
  • 2 cloves finely minced fresh garlic
  • 1/2 tsp. sugar
  • 1-1/2 tsp black pepper
  • 1 Tbsp. chopped parsley leaves
DIRECTIONS

Using your food grinder, grind the pork. Set aside.

Toast fennel seed in medium sized, heavy saute pan over medium heat, constantly moving seeds around in pan until they start to turn light brown, about 5 minutes. Set aside to cool. Once cool, grind seeds and combine with salt, pepper, paprika, sugar, garlic and chopped parsley in medium mixing bowl. Add pork and blend thoroughly. Refrigerate for 1 hour.

Use this Italian sausage in your favorite spaghetti sauce, or instead of ground beef in lasagna. I used this sausage for broccoli rabe and sausage. Truly delish! I'll post recipe soon.

This can be stuffed inside sausage casings and grilled as well. Sausage casings can be found at most Italian grocery stores. Get a little funnel and shove the meat into the tubes; but don't push too hard, as it can be frustrating to rupture the casings as you get close to a finished sausage. When your sausage is the length that you want, twist off the ends and tie them in knots. Store in refrigerator for use within 2 to 3 days or freeze for up to 3 months.

Tuesday, April 21, 2009

Spaghetti with Caramelized Shallots

I haven't been watching much Rachael Ray on Food Network lately only because she had begun to annoy me (just like Paula Deen). I truly don't know what it is about these ladies that annoy me, perhaps it's that they use the same catch phrases all the time. But anyway, I digress.

What caught my eye about this recipe from Rachael Ray is that the spaghetti just looked too easy to make and it only had a few ingredients. The recipe below is for 4 people; naturally I halved it since it's just 1 and 3/8th's right now. And since I ran out of Parmigiano I used the leftover Mizithra, but next time I will definitely add the fresh Parmigiano.

INGREDIENTS

  • 1/4 cup extra virgin olive oil
  • 2 cloves garlic, finely chopped
  • 10 shallots, halved, then thinly sliced
  • Salt and black pepper
  • 1 pound whole wheat spaghetti
  • A generous handful of flat leaf parsley, chopped
  • 1 cup grated Parmigiano Reggiano cheese
DIRECTIONS

Heat the olive oil over medium-low heat in a high-sided skillet. Add garlic and shallots. Season with salt and pepper, then gently cook to caramelize them, 20 minutes, stirring occasionally. Meanwhile, heat a large pot of water to boil for pasta, salt the water very liberally, then add spaghetti to rolling boil. Cook to al dente.

Add three ladles of starchy pasta water, about 1 1/4 cups, to the shallots and stir.

Drain pasta and add to shallots. Add the parsley and cheese and more black pepper, to taste. Toss 1-2 minutes for liquid to absorb and serve.

Sunday, April 19, 2009

Mac n' Cheese

In Chef Melissa Mayer's cooking class that I attended last week, she briefly talked about the competition she was in with the Food Network. I believe it was call "Food Network Challenge: Mac and Cheese." She didn't win, but she told us the experience was quite incredible and all the chef's were very competitive. I guess you have to be if you want to win the grand prize of $10,000.

I was inspired by the chef to try to make mac and cheese again, but I went for a more traditional one this time (no goat cheese on this one). I got the idea of adding the spinach from Lindsey, my sister in law, because she makes a delish baked ziti that she puts fresh spinach in. This mac and cheese is definitely more of a grown-up dish, and that nutmeg gives it a great, yet subtle flavor in the background. You don't have to add the spinach like I did if you want your kids to eat it!

INGREDIENTS

  • 2 ½ c (9 ounces) macaroni pasta (I used short penne riggate)
  • 2 ½ c whole milk
  • half of a small shallot, peeled
  • 1 bay leaf
  • 10 whole black peppercorns
  • 4 T unsalted butter
  • ¼ c all-purpose flour
  • Salt and freshly ground black pepper
  • 8 oz sharp cheddar cheese, grated (about 2 ½ cups)
  • 3 oz fontina cheese, grated (about 1 cup)--I used mozzarella
  • 3 oz Gruyère cheese, grated (about 1 cup)
  • 1/4 tsp. fresh nutmeg
  • ½ c fresh bread crumbs
DIRECTIONS
  1. Preheat the oven to 350°F. Generously butter a 2-quart baking dish.
  2. Bring a large pot of salted water to a boil. Stir in the pasta and boil until it is about half-cooked, tender on the surface with a distinct bite still in the center, about 5 minutes. Drain well, rinse with cold water and set aside, tossing from time to time as it cools to avoid sticking.
  3. Put the milk in a small saucepan with the half shallot, bay leaf and peppercorns. Bring just to a low boil over medium heat, then take the pan from the heat and let sit to infuse for 10 to 15 minutes.
  4. Melt the butter in a large saucepan over medium heat. Whisk in the flour and cook, whisking constantly, until it foams up and has a very slight toasty smell (it should not brown), 1 to 2 minutes.
  5. Strain the warm milk into the pan and whisk to blend. Continue to cook the sauce, whisking often, until it thickens, about 5 minutes. Turn off the heat and gradually whisk in the cheeses until fully melted.
  6. Season the sauce to taste with salt and pepper, add the nutmeg, then add the pasta and stir to fully coat all the pasta with the cheese sauce (you can add fresh spinach or other veggies at this point).
  7. Pour the mixture into the prepared dish and sprinkle the bread crumbs evenly over.
  8. Set the dish on the oven rack and lay a piece of foil on the rack below to catch any drips. Bake until the macaroni and cheese is bubbling hot and the top is nicely browned, about 40 minutes. Let sit for about 15 minutes before serving.