Monday, September 29, 2008

Rancho La Puerta's Huevos Rancheros

Healthy Huevos Rancheros
On Friday our company took me and a few of my co-workers to Rancho La Puerta in Tecate, Mexico. It is a fabulous spa and cooking school where my friend and chef Michel Stroot, used to work but he has now retired--although he does "guest appearance" classes at the school. If you're interested in the cooking school, it's called La Cocina Que Canta and they have excellent chefs. Our chef that taught us this class was chef Deborah Schneider.

This was the very first time I've been to this spa and it was fabulous. Generally, guests stay there for 7 days but we were able to get a special one-day package. Needless to say, the cooking school was excellent and the recipe below is what I made for our team builder.

These are not your typical huevos rancheros. This dish is healthy and what I found amazing about this recipe is that all the ingredients (except the cheese), came from the ranch. They grow everything there and they have a large chicken coop, too, and I am proud to say this is the first farm-to-table meal I've cooked! The huevos were so yummy and it was even better with the homemade tortillas another one of my co-workers made. This was probably one of the best team-builders I've ever been to!

INGREDIENTS (seves 8 to 10)

  • 8 large tomatoes
  • 1 large white onion, chopped into small pieces
  • 1 garlic clove, finely minced
  • 1 large red bell pepper, chopped into small dice
  • 1 large green or yellow bell pepper, chopped into small dice
  • 2 jalapeño peppers, seeded and finely diced
  • 1 to 2 cups chicken or vegetable stock (low sodium)
  • 10 eggs
  • 2 tablespoons chopped cilantro
  • 1/3 cup crumbled cotija cheese
  • 2 avocados, seeded and chopped (you do this last, when the eggs are ready)
  • Kosher salt and fresh ground black pepper
DIRECTIONS

Preheat oven to 375. Have a large pot of boiling water ready. Also, you will need a large bowl with ice (ice-bath) ready.

Cut a small "x" at bottom of each tomato and drop them into a large pot of boiling water. Simmer for about 10 minutes. Immediately remove and place them in the ice-bath to cool and stop the cooking. Once you can handle the tomatoes, peel the skins. Cut tomatoes in half around the circumference and gently squeeze out seeds (or use your fingers or spoon to take out). Chop tomatoes into medium size pieces.

Heat a large, heavy pan on medium-high and add two tablespoons olive oil. Add the onions, garlic, red and green or yellow pepper, and jalapeños. Add a good pinch of salt and sauté until onions become lightly transparent. About 6 to 8 minutes. Add the chopped tomatoes and cook for another 10 to 15 minutes. Taste and add more salt, if needed. At this point, sauce will be slightly chunky. Add 1 cup stock and simmer a few more minutes. You don't want the sauce to be too watery. This is where you're going to have to eyeball it and add more stock, if needed (I only used 1 cup because tomatoes were a bit juicy already). Lastly, add 1/2 tsp. ground black pepper. Remove from stove and set aside.

In a large clay pot or 9x13 glass baking dish or casserole, add the tomato sauce. With the back of a small ladle, make an indentation in the sauce. Immediately crack one egg and slide it into the well you just made. You can also use a large spoon if you don't have a ladle. Continue doing this all over the sauce until you have all 10 eggs (we used 1 large clay pot and one smaller one to fit all 1o eggs). If you want, you can lightly sprinkle a little salt and pepper over each egg. Place in the oven and cook for 15 minutes, or until your eggs reach your desired doneness.

Remove baking dish from oven and sprinkle cotija cheese over each egg, then sprinkle with chopped cilantro and chopped avocado and serve, family style!

Chef Deborah Schneider

Monday, September 22, 2008

Easy Chilaquiles con Queso

Chilaquiles are fried tortillas with a tangy tomato sauce and smothered in cheese. In our family, we like to eat chilaquiles with eggs and a side or refried beans.

There are many chilaquiles recipes out there. Some suggest you make your own tomato sauce, while others tell you to bake the chilaquiles. Truthfully, we've never baked our chilaquiles and we always use canned tomato sauce. El Pato tomato sauce is good, but you can also use Las Palmas red enchilada sauce. Now, if you're really, really tired and don't want to bother with the frying of the tortillas, go to your local carniceria or ethnic grocery store and buy good homemade tortilla chips and use those instead (then there's no need to fry!). These are just little tricks I learned from my mom.

INGREDIENTS (serves 4)

  • 8 corn tortillas, stale and torn in pieces
  • 1/3 cup olive oil
  • 1 can (7-3/4 oz.) El Pato tomato sauce (yellow can with duck, can use more if needed)
  • 1/2 cup grated Monterrey Jack cheese
  • 1/2 red onion, sliced thin
  • 1/4 cup cilantro, chopped
  • salt
DIRECTIONS

Heat olive oil in large skillet. Oil is ready when small piece of tortilla thrown in bubbles. Fry tortillas in batches, until crisp and golden. Remove and drain on paper towels. Drain oil, reserving enough to leave a nice residue in pan.

Add tomato sauce to pan and stir over medium heat until warm. Add tortillas and stir together until warm. Add salt to your liking. Top with cheese. Take off heat. Once cheese melts, add onions, then top with cilantro. Serve with eggs, refried beans, or with breakfast potatoes.

Thursday, September 18, 2008

Turkey Albondigas

My brother and sister-in-law just had their first baby 10 days ago. She is a beautiful little girl with so much hair; she's going to need a haircut pretty soon! So, both my mom and step-mom made food for them and stored it in their freezer this way Lindsey and Tom didn't have to worry about cooking for the first few weeks while they got used to their new bundle of joy. One of the dishes my mom made for them is her albondigas soup. To me, this is probably one of the best Mexican comfort foods, and it's really good to eat when you're sick, too (I guess it's the Mexican version of Matzo Ball Soup).

Now, in just about all the albondigas recipes they tell you to use ground beef, which you can substitute, but my mom got us used to ground turkey (or even ground chicken) because there is less fat and the soup is not greasy at all. Also, if there are no zucchinis available, you can add summer squash, or you can just omit it if you want. Anyway, my mom made extra soup and I also got a nice pot of it at home.

INGREDIENTS (serves 6)

  • 2 (14 ounce) cans chicken broth
  • 2 (14 ounce) cans diced tomatoes
  • 2 (6 ounce) cans tomato sauce
  • 3 cups water
  • 1/2 yellow onion, diced
  • 2 carrots, peeled and diced
  • 2 stalks celery, diced
  • 2 medium potatoes, diced
  • 2 zucchinis, sliced
  • 1 1/2 lbs ground turkey
  • 1/2 cup rice, uncooked
  • 1/2 cup cilantro, chopped
  • 2-3 garlic cloves, minced
  • 1/2 teaspoon pepper
  • 1/2 teaspoon seasoning salt
  • 1 egg
  • 2 tablespoons ice water
DIRECTIONS

In a large pot combine broth, tomatoes, tomato sauce and water. Add the onion, carrots, celery and potatoes (do not add the zucchini just yet).

Bring to a boil and simmer.

Meanwhile, in a bowl combine the ground turkey, uncooked rice, cilantro, garlic, pepper, seasosing salt, egg and ice water. Mix thoroughly, but do not overwork the mixture.

Form into small meatballs (you can form bigger meatballs if you prefer, but meatballs may have to cook a little longer).

Add carefully to soup. Cook for 15 minutes, then add the zucchini. Cook an additional 15 to 20 minutes, until meatballs are cooked through and the rice in the meatballs look nice and plump.

Laddle the albondigas and broth in soup bowls and don't forget to serve warm corn tortillas and butter on the side. Que bueno!

Wednesday, September 17, 2008

Vegetarian Chili for a Funeral

Photo by dipdewdog
It's been quite a scary week so far.

Stock market is down.

The global economy is getting shaken up.

My husband is somewhere in the middle of the Atlantic God knows doing what for Uncle Sam.

Obama's lead is just one point now.

And David Foster Wallace killed himself last Friday.

So, yeah, it's been quite ominous to say the least. But, as always, I'm thinking about food and I pondered: what would David Foster Wallace (DFW) want to be served at his funeral? What would this great writer, who particularly didn't like using periods1 but loved commas—and loved using footnotes—would want his guests to eat while they reminisced, and cried, and laughed, about his great, yet short life? DFW was born in Ithaca, grew up in central Illinois, got his Master's in Arizona and died in California...hmmm, WWDFWE?

But of course, vegetarian chili!2

INGREDIENTS (serves 8)

  • 1 tablespoon olive oil
  • 1/2 medium onion, chopped
  • 2 bay leaves
  • 1 teaspoon ground cumin
  • 2 tablespoons dried oregano
  • 1 tablespoon salt
  • 2 stalks celery, chopped
  • 2 green bell peppers, chopped
  • 2 jalapeno peppers, chopped
  • 3 cloves garlic, chopped
  • 2 (4 ounce) cans chopped green chile peppers, drained
  • 2 (12 ounce) packages vegetarian burger crumbles
  • 3 (28 ounce) cans whole peeled tomatoes, crushed
  • 1/4 cup chili powder
  • 1 tablespoon ground black pepper
  • 1 (15 ounce) can kidney beans, drained
  • 1 (15 ounce) can garbanzo beans, drained
  • 1 (15 ounce) can black beans
  • 1 (15 ounce) can whole kernel corn
DIRECTIONS
  1. Heat the olive oil in a large pot over medium heat. Stir in the onion, and season with bay leaves, cumin, oregano, and salt. Cook and stir until onion is tender, then mix in the celery, green bell peppers, jalapeno peppers, garlic, and green chile peppers. When vegetables are heated through, mix in the vegetarian burger crumbles. Reduce heat to low, cover pot, and simmer 5 minutes.
  2. Mix the tomatoes into the pot. Season chili with chili powder and pepper. Stir in the kidney beans, garbanzo beans, and black beans. Bring to a boil, reduce heat to low, and simmer 45 minutes. Stir in the corn, and continue cooking 5 minutes before serving.
  3. Remeber to have grated chedder cheese, chopped onions, jalapenos, sour cream, and any of your favorite toppings on the side for the chili. Enjoy!
1 For example, in his book Brief Interviews with Hideous Men, DFW's chapter called "Death Is Not the End"—which I just realized it's eerily weird that that's the first thing that came to mind when I wrote this—he writes for two and-a-half pages without using a period. My goodness, man, I had to take a deep breath once the period finally appeared!

2 I know you're probably thinking maybe it should have been lobster, or lobster rolls, but that would have been too easy, don't you think?

R.I.P. DFW

Saturday, September 13, 2008

Chicken Pad Thai

Not too long ago I found a Thai restaurant near my work called Thai Chadda. The restaurant is in the food court where a lot of us from work go to eat, and they make the food quite fast. It's not one of the best Thai places, but their chicken pad Thai is quite good. It's tangy, spicy and lightly sweet. So, after searching for recipes for this great dish, I finally decided on this one I found on About.com, because it was actually the less difficult one. Anyway, my pad Thai came out fabulous and almost as good as restaurant quality.

INGREDIENTS (serves 2-3)

  • 8-10 oz. thin Thai-style rice noodles - look for linguini-size rice noodles (made in Thailand) at Asian/Chinese stores
  • 1 to 1 1/2 cups raw chicken breast or thigh meat, sliced
  • 2 tsp. cornstarch dissolved in 2 Tbsp. soy sauce
  • 4 cloves garlic, minced
  • 3 cups fresh bean sprouts
  • 3 spring (green) onions, sliced
  • 1 cup fresh cilantro
  • 1/3 cup crushed or roughly chopped peanuts
  • 1/2 cup chicken stock
  • 1/4 tsp. freshly ground black pepper
  • Lime or orange wedges for serving
  • oil for stir-frying
PAD THAI SAUCE:
  • 3/4 Tbsp. tamarind paste dissolved in 1/4 cup warm water (look for tamarind at Asian/Chinese or Indian food stores)
  • 2 Tbsp. fish sauce
  • 1-3 tsp. chili sauce (depending how spicy you want it)
  • 3 Tbsp. brown sugar (not packed)
DIRECTIONS
  1. Place noodles in a pot of water and place on the stove. Bring to near a boil, then remove from heat. Allow to sit while you prepare the other ingredients (about 10 minutes).
  2. Make the Pad Thai Sauce by combining the sauce ingredients together in a cup. Stir well to dissolve both the tamarind paste and the brown sugar. Set sauce aside.
  3. Place chicken slices in a small bowl. Pour the marinade (2 tsp. cornstarch dissolved in 2 Tbsp. soy sauce) over the chicken. Stir well and set aside.
  4. Check the noodles. Note that you will be frying the noodles later, so you don't want to over-soften them at this point. Noodles are ready when they are soft enough to be eaten, but are still firm and chewy. Drain and rinse through with cold water. Set aside.
  5. Warm up a wok or large frying pan over medium-high heat. When the wok/pan is hot, add 1-2 Tbsp. oil plus garlic. Stir-fry until fragrant (30 seconds).
  6. Add the chicken (together with the marinade). Stir-fry until the wok or pan becomes dry (30 seconds to 1 minute).
  7. Now begin adding some of the chicken stock. Add only a few Tbsp. at a time, enough to keep the chicken frying nicely. Continue until all the chicken stock has been added and chicken pieces/strips are cooked (about 5-8 minutes).
  8. Add the noodles, and pour the Pad Thai sauce over the noodles. Using two spatulas, wooden spoons, or other utensils, quickly stir-fry the noodles. Use a "lift and turn" method (almost as though you were tossing a salad) instead of the usual stir-frying motion, or the noodles with break apart.
  9. Fry the noodles in this way for 1-2 minutes. If you find your wok/frying pan too dry, push noodles aside and add a little more oil to the bottom (but no more broth, or the noodles will become soggy).
  10. Add the bean sprouts and sprinkle over the ground black pepper. Continue "tossing" for 1 more minute, or until noodles are cooked. Noodles are done to perfection when they are no longer "hard" or transulcent. They should be opaque and chewy-sticky wonderful!
  11. Taste-test the noodles for seasoning, adding more fish sauce as needed (I usually end up adding up to 1 more Tbsp. fish sauce, as I like mine on the salty side). Toss well to incorporate.
  12. To serve, lift the noodles onto a serving plate. Top with generous amounts of fresh coriander, spring onion (green onion), and crushed or chopped nuts. Add fresh orange slices or lime wedges (lime is great squeezed overtop), and serve with a bottle of Thai chili sauce on the side, for those who like it extra spicy. ENJOY!

Friday, September 05, 2008

Arañitas

Arañitas are a variation of the tostones recipe. In Spanish, arañitas means little spiders and the recipe gets its name from the shredded plantain, which looks like spider legs when fried. Yeah, I know that doesn't sound appetizing, but these little fried plantains are delish. Serve arañitas instead of bread or as a side to your chicken and rice dish.

INGREDIENTS (makes about 12 arañitas)

  • 1 large green plantain
  • 1 large garlic clove (minced)
  • salt and pepper to taste
  • Olive or vegetable oil for frying
DIRECTIONS
  1. Peel the plantain and shred with a coarse grater.
  2. Place the grated plantain in salted water and let soak for about 10 minutes.
  3. Drain the grated plantain and dry with paper towels to soak up excess water.
  4. Mix the grated plantain with the garlic, and salt and pepper to taste.
  5. Heat the oil in a frying pan over medium high heat.
  6. Fry the shredded mix by the spoonful in clumps until golden, about 2 to 3 minutes per side.
  7. Drain on paper towels, lightly salt while still hot and serve immediately.

Monday, September 01, 2008

The Best Flourless Chocolate Cake Ever!

Hi friends and family. I apologize I have not updated my food blog, but I have been without a kitchen for a couple of weeks. As you may know, my hubby and I bought a house and we're currently remodeling. So, here's and oldie but goodie recipe that I really like. This is a wonderful treat for any chocoholic out there, and if you're watching your carbs, this is lower carb cake than a regular chocolate cake. Anyway, we're getting the granite countertops installed tomorrow and I hope to have a brand new recipe posted here soon!

xoxo, Armida

I made this cake for Easter Sunday and it was incredible; I'm not just saying that...it was really good! The mixture of bittersweet chocolate and unsweetened chocolate gives this cake a superb cocoa taste and the sugar adds just the right balance. I placed my cake in the refrigerator before I served it although it tastes great a room temperature, too. Fresh raspberries or strawberries compliment this cake so well. We had a late harvest Zinfandel with the cake and it was just pure heaven. If you make this cake for your family they will worship you!!!

INGREDIENTS (about 8 servings)

  • 6 ounces bittersweet chocolate, finely chopped
  • 6 1/2 ounces unsweetened chocolate, finely chopped
  • 3/4 cup plus 3 1/2 tablespoons sugar (6 ounces)
  • 2/3 cup water (5 ounces)
  • 6 ounces softened butter
  • 6 eggs, room temperature
  • 1/2 cup plus 1 1/2 teaspoons sugar (3 ounces)
  • 1 pint fresh raspberries
Preheat the oven to 350 degrees F.

Coat a 10-inch cake pan with vegetable cooking spray. Line the bottom of the pan with a 10-inch parchment paper circle. Coat the top of the parchment paper circle with vegetable cooking spray.

Place both chopped chocolates in a bowl and melt over a double boiler. Combine the sugar and water in a 1-quart saucepan and place over medium-high heat. Bring to a boil until all of the sugar is dissolved. Pour the hot syrup into the bowl of melted chocolate. Whisk until the mixture is homogenous. Add the butter and whisk until well mixed. Set aside for a moment.

Using an electric mixer, beat the eggs and sugar until well blended. Using a rubber spatula, fold this mixture into the chocolate mixture. Be careful to mix gently.

Pour the batter into the prepared cake pan. Place a baking sheet with 1-inch sides in the oven. Place the filled cake pan on the baking sheet. Fill the baking sheet with water so the water covers the bottom inch of the cake pan. Bake until the cake surface appears dull and taut when pressed in the middle, about 40 minutes.

Remove the cake pan from the oven and allow it to cool on a wire rack. Turn off the oven and let the baking sheet and water cool before you attempt to remove them.

The cake will be moist and dense but not overly sweet. Serve with a side of whipped cream and fresh raspberries.

Recipe courtesy Jacques Torres

Friday, August 15, 2008

Armida's Pasta with Sassy Clam Sauce

Dear all, Sorry I've been neglecting the blog. I'm in the process of moving to our new house (YAY!) while my hubby is out to sea, so you can imagine all I've been doing is packing and eating out at fast-food restaurants (yuck!). Today, I decided to make something good and carbo-loaded for myself because I needed energy. And all I had were canned clams, pasta and half of a Roma tomato. So, I came up with the easiest spaghetti with clams ever. Give this a try...and any non-oaky white wine goes excellent with this dish. OK, back to packing...

INGREDIENTS (Serves 2)

  • Half a pound spaghetti or angel hair pasta
  • 1 tsp. Olive oil
  • 1 Tbsp. butter
  • 1 Tsp. flour
  • 1 small garlic clove, minced (or 1/4 tsp. garlic powder if you're feeling lazy)
  • 1/4 to 1/2 tsp. red pepper flakes
  • 1 can of clams, drained but RESERVE THE JUICE
  • 1/4 cup good white wine
  • Half of a tomato, or a small Roma tomato, seeded and diced
  • Salt and pepper
  • 1 tsp. fresh parsley (or 1/4 tsp. if you're still lazy)
DIRECTIONS

Cook pasta according to package directions (you want al dente pasta). Don't forget to salt the water.

Meanwhile, in a large skillet over medium-high heat add oil and butter and let butter melt. Then add flour. Keep stirring (or whisking) for about one minute. Add the minced garlic and red pepper flakes and let whisk again for 30 seconds, then add the reserved clam juice and white wine. Bring to a simmer and keep on low for 4 minutes. Add the clams and keep cooking another 2 minutes until clams are heated through. Lastly, add the tomatoes to the sauce. NOTE: if your sauce starts to get too thick, add a little of the pasta water a few tablespoonfuls at a time. Taste sauce for salt and pepper and adjust seasoning.

By now, your pasta should be ready. Drain the pasta and immediately add it to the skillet with the clams sauce. Mix it to combine, turn off the heat and add the parsley. Serve and enjoy!

Tuesday, August 05, 2008

Paella

For my sister-in-law's baby shower, we had paella as the main dish. We hired my friend’s dad to come over and cook this very flavorful and fragrant rice dish in a huge paellera. Anyway, a few secrets we learned from watching him cook it outside were: he used Uncle Ben's rice and he also used Goya Sazon con Azafran instead of pure saffron. This is definitely not an authentic Spanish paella recipe, but it's so tasty. I bet you can probably feed up to 10 people with this recipe; I would suggest you use a very large paellera or skillet to cook it in. The trick to paella is you want everything to cook evenly and in an even layer. Maja!

INGREDIENTS

  • ¼ cup of extra virgin olive oil
  • 1/2 lb. of pork shoulder or butt, cut into bite-sized pieces, and seasoned with salt & pepper
  • 2 medium-sized boneless and skinless chicken breasts, cut into bite-sized pieces, and seasoned with salt & pepper
  • 1 medium-sized links of hot or sweet Italian sausage or chorizo (remove casings and slice into bite-sized pieces)
  • 8 large raw shrimp (deveined and peeled)
  • 8 large raw clams (scrubbed)
  • 8 large raw muscles (scrubbed and de-bearded)
  • 1 large onion diced
  • 12 cloves of garlic finely chopped (you can half this if 12 cloves is too much for you)
  • 1 can (14 oz) diced tomatoes
  • ¾ cup of frozen sweet peas
  • 2 cups of hot water
  • 2 cups low-sodium chicken broth
  • 2 cups UNCLE BEN’S® ORIGINAL CONVERTED® Brand Rice
  • salt (Kosher or sea salt preferable)
  • 2 packets of Goya Brand Sazon Con Azafran (found in most large supermarkets with ethnic sections or Mexican grocery stores)
  • 1 large green or red pepper cut into thin strips
  • 8 lemon wedges (for serving garnish after cooking)
DIRECTIONS

Add olive oil to paellera or large skillet and warm over medium-high heat.

Add chicken and pork pieces and cook until browned all over, but not completely cooked through (about 4 minutes total). Remove chicken and pork to a separate platter. Add the sausage and cook and brown evenly until about ¾ done – remove from skillet and place on same platter; leave poultry, pork and sausage drippings in the skillet along with the olive oil.

Reduce heat to medium. Add onions and sauté for 3-4 minutes stirring occasionally – then add garlic and sauté mixture for 2 additional minutes. In the meantime, mix the Goya Brand Sazon Con Azafran packets in 2 cups of hot water.

Add back to the skillet partially cooked chicken, pork and sausage, UNCLE BEN’S® rice, canned tomatoes, frozen peas, water with Sazon and low-sodium chicken broth. Reduce heat to low. Cover and cook for 20 minutes. If you're using a paellera, cover with a lot of foil.

After 20 minutes, check rice. Depending on the humidity, Homeland Security threat level and the alignment of stars, your rice may be still be slightly al-dente. If so, add 1/4 cup water and keep heat on low until desired doneness is achieved.

Taste for seasoning and adjust, if necessary. During last 5 to 10 minutes of cooking, gently toss in shrimp and peppers, and top with mussels and clams. Let stand covered until all liquid is absorbed and clams and muscles open up, about 5 more minutes. Remove from heat and garnish with lemon wedges and serve your guests! Don't forget the sangria.

Sunday, July 27, 2008

Green Eggs and Toast

I've been rowing on the weekends and when I get home after my 2 hour rowing sessions, I am starving Marvin! Today I was particularly hungry for protein, and I was happy I found this recipe on Food Network. It's a really good breakfast, and it's visually impressive, too. It's got protein from egg, iron and riboflavin from the spinach, and just enough carbs from the bread.

SPINACH PESTO

  • 2 cups baby spinach
  • 1/2 cup walnuts
  • 1 clove garlic, smashed
  • 3 1/2 ounces Asiago cheese, cut into chunks
  • 1/2 cup extra-virgin olive oil
  • Freshly ground black pepper
DIRECTIONS

In a food processor, pulse to blend, spinach, walnuts, garlic and cheese. Scrape down the sides of the bowl. While machine is running, drizzle in oil until the mixture forms a loose paste. Season, to taste, with pepper.

SCRAMBLED EGGS (serves 4)

  • 8 large eggs
  • 1/4 cup heavy cream
  • 2 tablespoons shallot, finely chopped
  • Salt and freshly ground black pepper
  • 4 thick slices of toast
DIRECTIONS

In a medium bowl, whisk together eggs, cream, and shallot. In a nonstick skillet over low heat, melt remaining butter. Cook egg mixture over low heat, whisking the entire time so the eggs form little loose curds. Serve eggs over toast and dollop top with Spinach Pesto.

Friday, July 11, 2008

Fruit Salad in Watermelon

On the 4th of July holiday, we were invited to a BBQ in Downtown San Diego near the harbor. It was at a condo with a spectacular view of San Diego Bay. Since it was quite hot that day, I made this simple, yet so refreshing salad for the bbq. I didn't add bananas only because they tend to turn brown and it's not quite appetizing. Also, depending on how sweet your fruit is, you may not need to add the watermelon sauce, but it's up to you. Enjoy!

INGREDIENTS
  • 1 Watermelon
  • 1 Cantaloupe or Afghani Melon
  • Strawberries
  • Blueberries
  • 1 can of pineapple chunks, drained
  • 1 can of fruit salad cocktail, drained
DIRECTIONS

Cut a large watermelon in half lengthwise, scallop edges if you want it to look pretty. Scoop out watermelon with a melon baller. Return balls to hollow shell. Add cantaloupe balls, strawberries, blueberries, pineapple chunks, and fruit cocktail. Pour sauce over fruits and mix well. Chill, covered. This is great for barbecues.

WATERMELON SAUCE

  • 2 tbsp. fresh lemon juice
  • 2 tbsp. fresh orange juice
  • 4 tbsp. honey
DIRECTIONS

Mix together ingredients together and pour over fruit salad.

    Tuesday, July 08, 2008

    Shrimp-Gazpacho Shooters

    I'm in a Spanish food kick right now. Probably because my parents are in Spain for a month (yes, they are spending our inheritance) and they've been having the time of their lives with the people and the food there. And in a few weeks we're having a baby shower for my sister-in-law and the food theme will be Spanish tapas. I created these little morsels to test out (a food rehearsal, if you will) and they were quite good. I got the recipe from Cuisine at Home and I used spicy tomato juice instead of regular. Try these on a hot summer day!

    INGREDIENTS (makes 16 shooters)

    • 1 cup tomato juice (spicy OK)
    • 1 Tbsp. olive oil
    • 1 Tbsp. fresh lime juice
    • 1 tsp. Worcestershire sauce
    • 1/2 tsp. tabasco
    • 1/2 tsp. paprika
    • 1 cup tomatoes, finely diced
    • 3/4 cup cucumber, peeled, seeded and finely diced
    • 3/4 cup celery, finely diced
    • 1/4 cup red onion, finely diced
    • 1/4 cup finely chopped fresh cilantro
    • 1 large garlic clove, finely minced
    • Salt and pepper to taste
    • 6 cups water
    • 1/4 kosher salt
    • 3 Tbsp. fresh lemon juice
    • 3 bay leaves
    • 3 fresh sprigs of parsley
    • 3 fresh sprigs of cilantro
    • 3 to 4 lemon slices
    • 16 large shrimp, peeled, deveined, tails left on
    • Thinly sliced limes for decoration
    DIRECTIONS

    In a bowl, combine first 6 ingredients; cover and chill for 15 minutes.

    To the bowl add the finely diced tomatoes, cucumber, celery, red onioin, cilantro, and garlic. Add salt and pepper to taste; cover and chill well.

    In a large pot, heat water, kosher salt, lemon juice and lemon slices, bay leaves, parsley and cilantro sprigs and bring to a slight boil. 
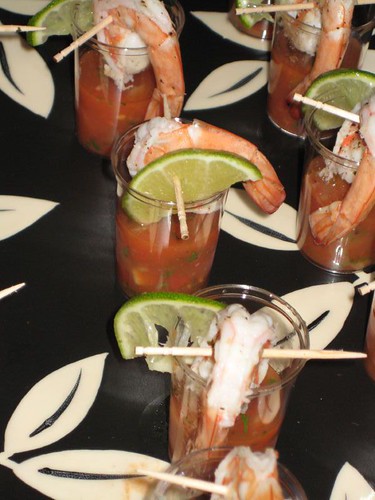
Add shrimp and poach for 2 to 3 minutes just until pink. Drain and add shrimp to a ziploc bag. Add a pinch of kosher salt and a good pinch of black pepper to shrimp and distribute well; chill until ready to serve.

    To serve: fill shot glasses halfway with gazpacho (about 3 tablespoons), hang a shrimp on the rim, and garnish with a lime. You can run a toothpick through the shrimp to stabablize it, if you prefer.

    Sunday, July 06, 2008

    Watermelon Tapas with Pomegranate Vinaigrette

    I got the vinaigrette recipe from the Urban Solace restaurant here in San Diego, but the tapa was totally my concoction. It's basically a take on Jose Andre's take on Ferran Adrià's tomato and watermelon skewers. Since I didn't have the patience to dissect the tomatoes and make "fillets" as it's required for his recipe, I took a short cut and created this tapa instead.

    INGREDIENTS

    • 10 cherry tomatoes cut in half
    • Seedless watermelon, cut into 2" cubes (about 20)
    • 1/4" thick cubes of queso panela
    • toothpicks
    • Pomegranate vinaigrette (recipe below)
    DIRECTIONS

    Skewer together 1 piece each of watermelon, tomato and cheese with a toothpick and arrange in a platter. Drizzle the pomegranate vinaigrette over the tapas. Serve with some vinaigrette on the side. You can also use the vinaigrette in any salad and it also tastes great in the gorgonzola, pear and pecan salad.

    Pomegranate Vinaigrette

    • 1 Tbs minced shallots
    • 1 Tbs Dijon mustard
    • 2 Tbs Sherry Vinegar
    • 2 Tbs lemon juice (fresh squeezed)
    • 2 Tbs lime juice (fresh squeezed)
    • 1 Tbs honey
    • 2 Tbs pomegranate molasses (available at specialty stores or middle eastern markets)
    • 1 tsp ground coriander seed
    • 1 tsp kosher or sea salt
    • 1 pinch fresh ground black pepper
    • 1 cup canola oil
    DIRECTIONS

    Place all ingredients except oil in a blender and puree. Slowly add the oil to make a smooth vinaigrette. Great on salads, chicken, grilled lamb or as a dipping sauce for a great summer veggie platter.

    Sunday, June 15, 2008

    Gorgonzola, Pecan and Pear Salad

    This may not be the best salad ever, but it's darn close! This salad is like a good movie: it's got drama (the gorgonzola cheese), it's a tear-jerker (the red onions), it's got action (the caramelized pecans) and, of course, it's got laughter (the dried cranberries). I highly suggest you buy all the ingredients at Henry's Marketplace (or at a Whole Foods or co-op grocery) because it's cheaper to buy the pecans and dried cranberries in bulk there. Also, I assume that in any normal household this salad would feed 6 people, but in my world, we ate the entire thing up between 4 people. Go figure!

    INGREDIENTS

    • 1 bag of Spring Mix salad mix
    • 3 oz. crumbled gorgonzola cheese (or more, depending on your taste)
    • 6 to 8 thin red onion slices
    • 1 Anjou or Bosc pear
    • A good handful of dried cranberries (about 1/4 cup)
    • 1/2 cup of whole pecan
    • 1 tablespoon packed brown sugar
    • 1 tablespoon butter
    • Bottle of Henry's Raspberry vinaigrette or your favorite raspberry vinaigrette
    DIRECTIONS

    In a large salad bowl, add the entire bag of spring mix. Place rings of red onion over the salad, then sprinkle the gorgonzola cheese over it. Cut the pear in slices, lengthwise, and add to salad, then add the cranberries on top of that. Set aside.

    In a small non-stick skillet, add the pecans and heat on low. Keep toasting pecans on low for about 5 to 7 minutes. Raise heat to medium and add the brown sugar and butter to pecans. 
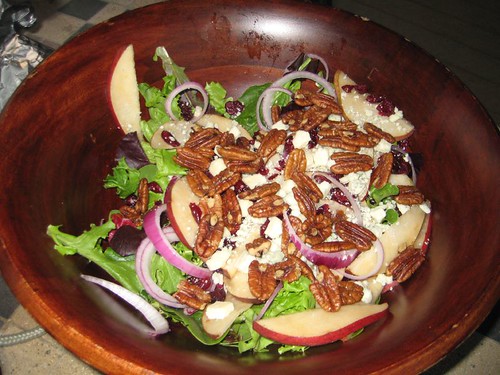
Let it all melt and keep toasting and cooking until all sugar is melted, about 5 more minutes. Remove from heat and let it cool slightly, then add the pecans over the entire salad and serve with the vinaigrette on the side.

    Thursday, June 12, 2008

    Mushroom Quiche

    I wanted to make Thomas Keller's Over-the-Top Mushroom Quiche but it was just too much for one person. It had almost two pounds of mushrooms! Instead, I made a simple, yet very delicious mushroom quiche (and I added a few leftover zucchini pieces I had). I used a frozen pastry shell instead of making my own crust, but that was just for a time saver. If you're not a mushroom lover, you can use other veggies such as cut up pieces of sauteed broccoli, or sauteed spinach, or even roasted asparagus pieces. Try a French Rose with this quiche.

    INGREDIENTS (serves 6 - 8 people)

    • One 9" frozen pie shell **
    • 2 tablespoons olive oil
    • 1 medium onion, thinly sliced
    • 1 pound baby bella mushrooms, sliced
    • 1 zucchini, sliced (OPTIONAL)
    • Salt and freshly ground pepper
    • 1/2 cup milk
    • 1/2 cup heavy cream
    • 3 large eggs
    • Pinch nutmeg
    • 1 cup Gruyère cheese, grated
    • 1/4 cup good Parmesan cheese, grated
    DIRECTIONS

    1. Pre-heat oven to 350°F.
    2. Line pie shell with parchment paper, wax paper, or aluminum foil. Place baking weights, or rice or uncooked beans on top of pastry. Blind bake the pie shell for 10 minutes. Let cool and remove the rice or beans afterwards.
    3. In a large skillet add the olive oil and heat to medium-high. Add the onion and cook for one minute. Add the mushrooms and season with salt and pepper.
    4. Keep cooking for another 8 minutes until mushrooms are a dark golden color.
    5. Add the zucchini, if using, and cook another 2 minutes. Remove from heat.
    6. Spread half of Gruyère cheese at bottom of pastry shell. Add the mushroom mixture on top and top with remaining Gruyère cheese.
    7. In a bowl, beat together eggs, milk, cream, nutmeg and season with a bit more salt and pepper. Pour egg mixture carefully over ingredients in pastry shell.
    8. Top with remaining Parmesan cheese.
    9. Bake at 350°F for 35-40 minutes or until set. Serve hot or cold.
      ** Side note: I forgot to blind bake my pastry shell; the quiche still came out good, but the bottom of crust was just a tiny bit soggy.

      Tuesday, June 10, 2008

      Eggs Benedict, part deux

      gorgeous eggs Benedict served with a side of blue-corn grits
      This recipe is straight out of the Lady's Home Journal magazine. YES, you heard me. Come on, I'm sure your mom or tia or grandma probably has one or two in their possession. And I know you've peeked at one at the check out counter at the Safeway. Anyhoo, this is probably the closest "original" eggs Benedict recipe out there. This one is a bit more labor intensive than my original eggs benedict post, but it is an awesome recipe to learn by heart because you never know when you'll have unexpected guests arrive at your house on a Sunday morning. PS: try "pompagne" instead of mimosas if you serve this for brunch. Pompagne is basically 2/3 champagne and 1/3 pomegranate juice. YUMMY!

      INGREDIENTS (serves 4)

      Poached eggs

      • 1 tablespoon distilled white vinegar
      • 1 teaspoon salt
      • 8 large eggs
      Hollandaise sauce

      • 3/4 cup butter (no substitutions), cut up
      • 3 large egg yolks
      • 2 tablespoons fresh lemon juice
      • 1/4 teaspoon salt
      • Pinch ground red pepper
      Other ingredients

      • 2 tablespoons butter, divided (no substitutions)
      • 8 slices Canadian bacon
      • 4 English muffins, split and toasted
      • 1 tablespoon water
      • Chopped fresh chives, for garnish
      DIRECTIONS

      Make poached eggs: Fill a large, deep skillet with water. Add vinegar and salt; cover and bring to a gentle boil over medium heat.

      Break one egg into a small cup. Carefully slip egg into gently boiling water. Repeat with remaining eggs, working in a clockwise direction. Reduce heat; simmer eggs 2 to 3 minutes, until whites are firm near the yolk. Remove with slotted spoon in same order and place in a pan of ice water. Set aside.

      Make hollandaise sauce: Place butter in a 2-cup glass measure. Cover with plastic wrap, turning back one section to vent. Microwave on High 1 to 1 1/2 minutes, until melted. In top of double boiler set above, not in, simmering water, whisk egg yolks and lemon juice until slightly thickened, 1 to 2 minutes. Remove top only of double boiler from water. Whisking constantly, slowly drizzle a few tablespoons melted butter into yolks in a thin, steady stream. Return top of double boiler to simmering water; continue to slowly add butter, whisking constantly, until sauce thickens. Whisk in salt and red pepper. Cover and remove pan from heat. (Can be made ahead. Let stand up to 1 hour over hot water.)

      Heat oven to 200 degrees F. Heat 1 tablespoon butter in large skillet. Add bacon and cook 2 minutes per side, until lightly browned.

      Divide and spread toasted English muffin halves with remaining butter. Place halves on a cookie sheet and keep warm in oven. Return double boiler to stovetop. Whisk 1 tablespoon water into hollandaise sauce. Cover and keep sauce warm over low heat.

      To reheat poached eggs, bring same skillet filled with fresh water to a boil. Reduce heat to a simmer. Add eggs with slotted spoon and simmer until heated through, about 1 minute.

      Arrange 2 muffin halves on each of four serving plates. Top each half with a slice of bacon. Remove eggs from simmering water with a slotted spoon, gently shaking off excess water. Place one egg over bacon; divide and spoon hollandaise sauce over each serving. Sprinkle with chives. Don't forget the pompagne!!!

      my friend Mary drinking pompagne with me in Ithaca, NY

      Saturday, June 07, 2008

      Chicken Paprikash

      Now that Matthew is back on a ship, he tends to do a lot of online shopping during his free time. During the last month I've gotten a few cooking books that he's ordered for me--all of them, of course, are Czech cooking recipe books. Although I'm still testing out the dumpling recipes, this chicken paprika recipe came out pretty good on my first try. It is absolutely essential that you use sweet Hungarian paprika and stay away from smoked paprika for this recipe. And yes, I know chicken paprika is a Hungarian dish, but it is immensely popular in the Czech Republic as well.

      INGREDIENTS (serves 4)

      • 6 chicken pieces, thighs and legs, on the bone, with skin on
      • 1 Tablespoon butter
      • 1 teaspoon olive oil
      • 1 large yellow or white onion, very thinly sliced
      • 1/4 cup sweet Hungarian paprika (absolute must. Whole Foods market or Trader Joe's has it available) .
      • 2 Tbsp all-purpose flour
      • 2 cups low-sodium chicken stock (I used Wolfgang Pucks free-range chicken natural broth)
      • 1 garlic clove, minced
      • 1 large bay leaf
      • 1 to 1-1/2 cup creme fraiche or Mexican crema (use sour cream if creme fraiche not available)
      • Kosher salt & pepper
      • Fresh parsley for garnish (optional)
      DIRECTIONS

      Rinse and pat dry the chicken. Season generously with salt & ground black pepper.

      In a wide heavy skillet with high sides, heat the butter and olive oil over a medium high heat. Add a few of the chicken pieces, skin side down first, to the skillet and cook until golden brown on both sides, about 5 minutes per side. Cook remaining chicken this way then remove from pan and set aside.

      Add the onions to the pan and reduce heat to medium. Cook, stirring often, until the onions just begin to color, about 8 minutes. Sprinkle the paprika, flour, bay leaf and garlic over the onions.

      Cook, stirring continuously, for one minute. Add in the chicken stock to the mixture and bring to a boil, stirring continuously. Return the chicken with all accumulated juices to the pan.

      Reduce the heat to a simmer. Cover the pan and cook, turning the chicken once or twice, until the juices run clear, about 30 to 35 minutes.

      Remove the chicken to a new clean plate and pick out the bay leaf and toss it away.

      Bring sauce to a boil for 10 minutes while stirring from time to time. 
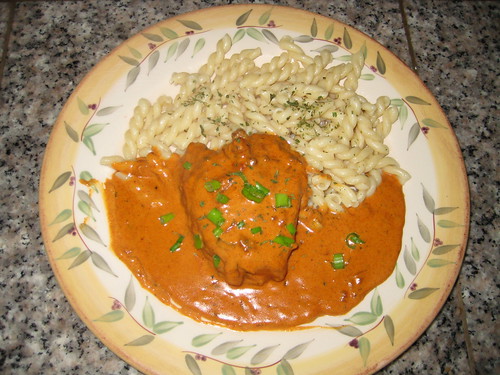
Turn off heat and let the sauce settle for about 5 to 10 minutes more, then skim the fat off the surface with a spoon, if any. Stir in the creme fraiche. Then return the chicken into the pan. Heat on medium-low and bring to a simmer until chicken is heated thoroughly.

      Serve chicken paprika with dumplings, or buttered noodles or spaetzle.