Monday, October 30, 2006

Irish Coffee

Authentic Irish Coffee
We had incredible weather during our travels to Ireland earlier this month. Most days were in the low 60's farenheit and it rarely rained. But, on our last couple of days in the Emerald Isle, it finally did rain and it got cooler...so what do you drink when it's raining outside? Irish coffee, of course. And yes, you have to use authentic Irish whiskey for this. Jameson is probably the best one; however you can also use Irish Mist--which I prefer. Make sure the coffee is strong and hot (like my husband, hee hee) and that you use real fresh whipped cream, not the canned type. Cheers!

INGREDIENTS (makes 1 delicious serving)

  • 1 oz. Irish whiskey or 1-1/2 oz. Irish Mist liqueur
  • 3 sugar cubes
  • 1 cup black coffee, strong and very hot
  • Fresh Whipped Cream
  • 1 heat-proof glass mug or Irish Coffee mug, pre-warmed
DIRECTIONS

Using a pre-warmed heat proof glass mug, add the measure of whiskey together with the sugar cubes. Stir in the hot coffee to about 3/4 of the way up the glass. Float a couple of heaping tablespoons of the whipped cream on top. Don't stir the coffee, just serve and drink immediately. If you want to be even more authentic, you can buy Waterford Crystal Irish Coffee mugs.

Friday, October 27, 2006

Tomato Chutney

Slogar's Tomato Chutney The tomato season is almost over here in Southern California and an excellent way to keep that summer taste during the winter is to jar your tomatoes, or make this delightful tomato chutney. My sister-in-law gave me a jar of Slogar's famous tomato chutney from Crested Butte, Colorado and it was delicious. The malted vinegar gives it an extra kick. You can flavor up your chicken or even pork, with tomato chutney. However the way I was told to eat it was with cottage cheese. You can also make extra delicious bruschetta with this tomato chutney. Yummers!

INGREDIENTS (makes about 4 cups)

  • 1 Tablespoon vegetable oil
  • 4 lb ripe tomatoes clean and chopped
  • 1 cup Onions, chopped
  • 6 oz Sugar
  • 4 oz Malt Vinegar, divided
  • 1 Tablespoon kosher salt
  • 1 teaspoon Paprika
  • 1/8 teaspoon Cayenne Pepper

Place one tablespoon of vegetable oil into a heavy bottomed saucepan. Add the tomatoes and onions and cook gently on medium-low to release the tomato juices. Simmer for 20 - 30 minutes until tender.

Add the salt, paprika, cayenne and half of the vinegar. Simmer for another 45 minutes or until chutney begins to thicken.

Add the sugar and remaining vinegar, stirring until the sugar is fully dissolved. Continue simmering until the mixture becomes thick, stirring occasionally.

Once chutney is done, let it cool completely. Pour into warmed sterilized jars, cover and label. Leave for 3 - 5 weeks to allow the flavor to mature.

Thursday, October 26, 2006

French Brie Sandwich

Brie Sandwich
On our recent trip to Paris, my husband and I were in total awe of the beauty of the City of Light. We had no idea how enormous and inspiring the Louvre was, and I think we both had epiphanies’ after our Notre Dame visit. However one of our most memorable moments in Paris was this brie sandwich we had at a little corner pastry shop near place des Pyramides. Mom @ the French patisserie shop in ParisThis sandwich is so simple, yet it was all we could talk about after we ate it. It was the most delicious thing we've ever had...of course the authentic French baguette, and fresh brie and the fact that we were in Paris also added to our delight. Try this at home and you'll momentarily be transported to Paris.

INGREDIENTS (serves 4)

  • 1/2 lb. Brillat-Savarin Petit or Brie de Nangis (or your favorite French or domestic brie), cut into 1/8" slices
  • 1 baguette (thin, and about 2 feet long), cut 3/4 of the way through lengthwise
Place the brie slices, slightly overlapping, inside the baguette. Cut the baguette into four 6" sandwiches. You can wrap each sami in parchment paper and serve them or slightly warm them up in your oven for a few minutes. Either way, a light Côtes du Rhône wine goes wonderfully with this simple dish.

Tuesday, October 24, 2006

Fish and Chips

authentic fish and chips
I am back from my European Vacation! Sorry I didn't update my blog while I was away, but I was having so much fun in London, Paris and in Ireland that I did neglect my blog for the last two weeks. But do not despair since I did have lots of great food on my trip. And one of my favorite was fish and chips in London. This is England's most famous dish, and don't forget a good ale to go with it. Make sure you use malted vinegar for the chips to get that authentic British taste! Cheers.

INGREDIENTS (serves 4)

  • 1/2 cup flour
  • 1/2 cup cornmeal
  • 4 - 6 ounces ale
  • 1/4 teaspoon salt
  • 4 cups vegetable oil for frying
  • 4 large russet potatoes
  • 2 pounds fish fillets, cut in half, crosswise
DIRECTIONS

Preheat oven to 250° F. Prepare batter: Mix flour, cornmeal and salt together. Add ale and mix well. Batter should be thin.

Cut potatoes in even, finger-sized pieces.

Heat oil in deep fryer. DO NOT FILL TO TOP. The potatoes and the fish will cause the oil to bubble. Allow room for the oil to rise.

Cook 1/3 of the potatoes until golden brown, about five minutes. Drain on paper towels. Place in warmed oven. Repeat process until potatoes are done and sprinkle potatoes with a little salt. Note: Do not put in too many potatoes at a time. It will cool the oil too much.

Dip fish in batter, allowing excess to drip off. Fry in batches until golden brown, about 5 to 8 minutes. Drain on paper towels. Keep warm in oven until all fish are cooked.

Serve with a sprinkling of malt vinegar.

Wednesday, October 04, 2006

Chicken Curry Roti

Chicken Roti

In the 
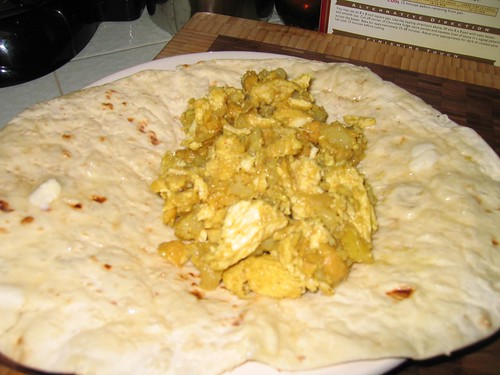
West Indies, it is common to eat Roti for breakfast or lunch. It is their version of burritos, I guess. Basically roti is this fabulous Indian flat bread that sort of looks like a large flour tortilla, but it tastes more like naan bread. Spicy chicken curry is then wrapped in the roti, and you eat it just a like a burrito. You can usually buy roti at your favorite Indian restaurant (or you can try to make it); if you can't find roti, you can use large flour tortillas or even lavash for this dish.

INGREDIENTS (4 to 6 servings)

  • 6 boneless skinless chicken thighs
  • 1 onion, chopped
  • 3 cloves of garlic, chopped
  • 4 bay leaves
  • 5 cloves
  • 1 teaspoon ground ginger
  • 1/2 teaspoon cumin
  • 1 heaping tablespoon curry powder + 1 teaspoon curry powder
  • 1 teaspoon salt
  • 1 dried red chile pepper (optional)
  • 1 cup low-sodium chicken stock
  • 3 potatoes, peeled and diced
  • Vegetable oil
  • 2 tablespoons butter
  • 2 tablespoons flour
  • 4 to6 roti wraps
DIRECTIONS

Cut the chicken into 1-1/2 inch cubes and place cubes in a large bowl. Add garlic and mix into chicken. Then add 1 heaping tablespoon of curry powder; make sure that chicken is well coated. Add ground ginger, cumin, salt, and mix again. Set aside.

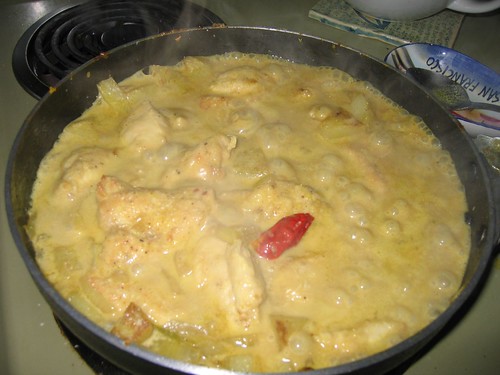
In a large skillet with high sides or Dutch oven, add just enough vegetable oil to cover the bottom, about 2 tablespoons. Place 4 bay leaves, cloves and red chili pepper (if using) into the pot and warm oil on medium for a couple minutes. Add the onions and sauté for 5 minutes.

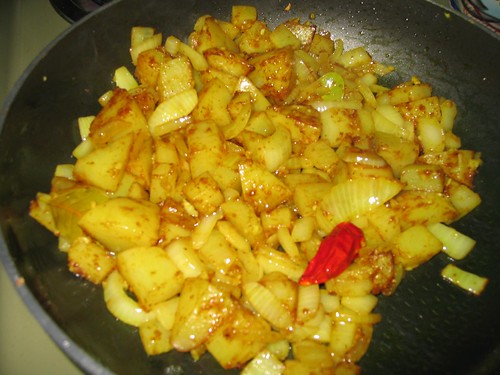
Turn heat to high and add chicken. Stir it around and let it cook for a few minutes on high and reduce back to medium heat stirring frequently, for about 8 to 10 minutes. Remove chicken, onions, pepper, bay leaves and cloves with tongs or a slotted spoon onto a plate and set aside.

In the same skillet, add 2 tablespoons of butter, 2 tablespoons of flour and the remaining 1 teaspoon of curry powder. Cook on medium-high for about a minute. Whisk in one cup of chicken stock until smooth. Carefully add the potatoes and bring to a boil. Simmer for 5 minutes, and then add the chicken, onions, bay leaves, and red chili pepper back into the pot, along with any juices that may have come out of the chicken. (If curry looks like it needs more liquid, add more stock or water--you want the consistency of thick stew).

Keep simmering the curry, uncovered, for another 10 to 15 minutes. Remove from heat and let it cool a little--remoe the bay leaves. Meanwhile, heat up the roti in the oven or over a griddle. Place about 3/4 to 1 cup of chicken curry in the middle of the roti, then fold it as you would fold a burrito or a wrap. Eat immediately!

Tuesday, October 03, 2006

Grilled BBQ Tofu and Israeli Couscous Salad

BBQ Tofu and Israeli Couscous salad

Israeli couscous is fast becoming one of my favorite pastas. Yes, it is pasta, not a grain. Basically, this type of couscous is pasta dough shaped into a pearl--sort of like a tapioca pearls--then toasted and dried, which gives it a very chewy and buttery flavor after it's cooked. You do not just add boiling water to Israeli couscous and let it sit like you would with regular couscous....you actually have to cook it longer. Just follow the package directions and I bet you'll enjoy this great pasta.

INGREDIENTS (Serves 4)

  • 2 packages firm tofu
  • 2 cups Asian BBQ sauce or your favorite Teriaky sauce
  • 1 large yellow zucchini, split lengthwise
  • 1 large green zucchini, split lengthwise
  • 2 Japanese eggplant, split lengthwise
  • 1 bunch scallions
  • 3 cups cooked Israeli couscous (just follow the package directions)
  • 2 tablespoons extra virgin olive oil
  • Juice of 1 lemon
  • 2 tablespoons fresh parsley, finely chopped
  • kosher salt and freshly cracked black pepper
  • Cooking spray
DIRECTIONS

Marinate the tofu in 1-1/2 cups of the Asian BBQ sauce overnight or at least 4 hours.

Prepare a hot, cleaned grill, sprayed with a lot of cooking spray. Grill the tofu until well caramelized on both sides. With the remaining BBQ sauce, season and coat the yellow and green zucchini, eggplant, and scallions and grill them until they are cooked through. Transfer the vegetables to a board and cut the zucchini and eggplant into a ½-inch dice and the scallions into ½-inch slices.

In a large bowl, mix the vegetables with the Israeli couscous, parsley and add olive oil and lemon juice. Season with kosher salt and freshly ground black pepper and check for flavor. Slice tofu and plate over couscous salad and enjoy.

Friday, September 29, 2006

Roast Beef Sandwiches

Roast Beef Sandwiches

There is nothing like perfectly cooked roast beef. My favorite kind is the roast beef that is medium rare, yet it's not dripping any pink juices. This type of roast beef is very difficult to come by. But the other day while we were at Henry's Marketplace, I saw the most perfect roast beef in the deli counter. Immediately we bought a half pound and Matthew made these absolutely delicious sandwiches.

INGREDIENTS (makes 2 sandwiches)

  • 1-10 to 12" sourdough roll
  • 1/2 lb. thinly sliced roast beef (the pinker, the better, me thinks)
  • 4 slices medium cheddar
  • Sliced tomatoes
  • Lettuce
  • Dijon mustard
  • Mayo
DIRECTIONS

First, toast the sourdough bread in the oven or toaster oven until golden brown on all sides (Matthew burnt ours a little bit, but it was still good). Then cut the bread in half, and slice each half lengthwise. Be careful because bread will be hot.

Workings quickly, spread mayo on the bottom two slices of bread, then place a slice of cheese, sliced tomato and lettuce. Divide roast beef between the slices; slather with as much, or as little, Dijon mustard (believe me, you want mustard on this baby). Finally, add last slice of cheese, then add the top bread slice.

Serve with a side of kosher dill pickles or cornishons. Delicioso!

Wednesday, September 27, 2006

Pasta Fra Diavolo, Diva Style

fasta pasta fra diavolo

I know I've been slacking with my recipes lately. You see, Mateus and I are getting ready to travel to Europe in 9 days...yes, nueve dias. So, I haven't been cooking a lot since our fridge is kind of empty now--plus we haven't shopped for groceries in over a week. But, I know that my readers (all two of you!) probably check for new recipes once in a while. Below is this pasta I created from thin spaghetti I had in the cupboard, tuna and frozen mussels, and a half empty jar of Prego sauce. Authentic fra diavolo has shrimp and all sorts of seafood in it and you can definitely add it to this tasty pasta, however if you're in a hurry, you'll totally like this spicy version. Oh, and yes, Lindsey, I had ALL of these ingredients in my kitchen. Enjoy.

INGREDIENTS (about 4 servings)

  • 1/2 pound (or half the box) of thin Spaghetti or Fettuccini
  • 1 package of frozen mussels in garlic and butter (you can find it at Vons or Trader Joe's) cooked to package directions. Remove the meat from each mussel and set aside--DO NOT discard the garlic/butter liquid it will give off, but do discard the shells.
  • 1 package StarKist® Tuna Fillets, Teriyaki flavor
  • 1 tablespoon olive oil
  • 1 tablespoon of butter
  • 1 tomato, diced
  • 1 cup diced onion
  • 2 whole dried red chili peppers
  • 1 teaspoon red pepper flakes
  • 2/3 cup Prego® Traditional pasta sauce
  • Black pepper
  • 2 tablespoon Kraft®Parmesan cheese (yes, the blue stuff)
  • 1 tablespoon finely chopped parsley
DIRECTIONS

In a large pot of boiling water that is well salted, add your spaghetti or fettuccini and cook to package directions.

In a large sauté skillet on medium-high add the olive oil and butter. Add two whole, dried red chili peppers and sauté for 1 minute. Then add the onions and sauté until soft, about 3 to 5 minutes. Add the diced tomato and cook for 2 more minutes. Add the tuna fillets and break apart with your spatula; also add the mussels, 1/2 cup of the mussel liquid, 2/3 cup of the pasta sauce, two tablespoons of parmesan cheese, 1/2 teaspoons black pepper, and one teaspoon of red pepper flakes. Let the sauce come to a boil, then lower heat to medium and simmer for 5 minutes more.

Drain your pasta well and add it into the skillet with the seafood sauce, or fra diavolo. Toss to combine. Then add the finely chopped parsley and serve while still hot. You can top it off with additional parmesan cheese.

Friday, September 22, 2006

Key Lime Pie Martini

yummy keylime pie martini
Sometimes after dinner I'd rather have a digestif than a heavy dessert. Usually Matt and I like to drink a fine port or his favorite tequila liquor, but for those of you who want the taste of a dessert but not the heaviness, you'll love this cocktail. It tastes just like a wedge of Key Lime Pie, but it's in a martini form. How fabulous is that?

INGREDIENTS (makes 1 martini)

  • 3 tablespoons Licor 43 vanilla liqueur
  • 1 tablespoon lemon-flavored vodka
  • 2 tablespoons key lime juice or fresh lime juice
  • 2 tablespoons heavy cream
  • 1 lime wedge for garnish
  • 1/8 teaspoon finely crushed cinnamon graham cracker crumbs, for the rim
DIRECTIONS

Chill the martini glass.In a shaker filled with ice combine Liquor 43, vodka, key-lime juice& heavy cream. Shake till shaker is icy cold to hold. Rub rim of chilled martini glass with lime wedge then dip into graham; strain drink into martini glass and enjoy, my friend.

Monday, September 18, 2006

ChocoFlan

Matthew's ChocoFlan

This cake pretty much has it all. I mean, how can you go wrong with a layer of flan and then a layer of chocolate cake smothered in caramel? Heck no! ChocoFlan is a very popular cake for birthday parties in Mexico, so definitely make this for a special occasion. TIP: Even though the flan is poured on top of the cake batter, it will sink to the bottom of the pan as it cooks. Once you take the cake out of the pan, the flan will be on top. Scrumptious!

INGREDIENTS (yields about 12 slices)

  • 1 box of your favorite Devils Food Cake Mix
  • 3 eggs, room temperature
  • 1 (14 oz) can sweetened condensed milk
  • 1 (12 oz) can evaporated milk
  • 1 (8 oz) pkg cream cheese, softened
  • 1 teaspoon vanilla
  • 1 can caramel spread
  • Pecans
DIRECTIONS

CAKE: Preheat oven to 375 degrees. Prepare cake batter according to instructions on package. Do not bake, set aside.

FLAN: In a blender, mix eggs, condensed milk, evaporated milk, cream cheese and vanilla until smooth. Grease the Bundt pan very well; pour the chocolate cake batter and on top carefully spoon the flan batter. Don't worry if the surface of the chocolate mix gets disturbed a little bit. Cover with aluminum foil and cook in a water bath for 1 hour to 1 hour and 10 min at 375 F. Check the cake with a knife or bamboo skewer until it comes clean to make sure is cooked.

Remove cake and cool for 30 minutes to 1 hour and then flip it onto your serving dish. Refrigerate the cake overnight so that the flan sets.

TOPPING: Pour caramel spread on top and garnish with desired amounts of pecans and whipped cream. ChocoFlan

Apple and Pecan Cheesecake

apple pecan cheesecake

My husband, Mateus, is in a cheesecake kick this week. After my mom tasted his Oreo Cheesecake he made last weekend, she was so impressed by it that she nominated him to make her birthday cake for next weekend. Below is the recipe he'll be trying out. If you don't have a 9" springform pan, you can also make this cheesecake on a 13"x9" rectangular pan.

INGREDIENTS

  • 1 cup HONEY MAID Graham Cracker Crumbs
  • 3/4 cup finely chopped PLANTERS Pecans, divided
  • 3 Tbsp. sugar
  • 1 tsp. ground cinnamon, divided
  • 1/4 cup (1/2 stick) butter or margarine, melted
  • 2 pkg. (8 oz. each) PHILADELPHIA Cream Cheese, softened
  • 1/2 cup sugar
  • 1/2 tsp. vanilla
  • 2 eggs
  • 1/3 cup sugar
  • 4 cups thin peeled apple slices
DIRECTIONS

PREHEAT oven to 325°F if using a silver 9-inch springform pan (or to 300°F if using a dark nonstick 9-inch springform pan). Mix crumbs, 1/2 cup of the pecans, 3 Tbsp. sugar, 1/2 tsp. of the cinnamon and butter; press firmly onto bottom of pan. Bake 10 minutes.

BEAT cream cheese, 1/2 cup sugar and vanilla with electric mixer on medium speed until well blended. Add eggs, 1 at a time, beating on low speed after each addition just until blended. Pour over crust. Mix 1/3 cup sugar and remaining 1/2 tsp. cinnamon in large bowl. Add apples; toss to coat. Spoon over cream cheese layer; sprinkle with remaining 1/4 cup pecans.

BAKE 1 hour and 10 minutes to 1 hour and 15 minutes or until center is almost set. Run knife or metal spatula around rim of pan to loosen cake; cool before removing rim of pan. Refrigerate 4 hours or overnight. Store leftover cheesecake in refrigerator.

Friday, September 15, 2006

The Most Evil Cheesecake Ever

I truly love cheesecake. It's probably one of the worst things anyone could eat, but how can you say no to cream cheese? I especially love this OREO® Cheesecake. I think the macadamia nut cheesecake is probably the second evilest (is that even a word?). Anyhoo, I was tempted to buy the Oreo Cheesecake at the Cheesecake Factory but it was $23.95 for a 7" cake!!! So, after some calculation (and I was lazy to go buy it) I figured out that it's actually cheaper to buy the stuff and bake the darn cheesecake yourself.

INGREDIENTS (about 16 slices)

  • 1 pkg. (1 lb. 2 oz.) OREO Chocolate Sandwich Cookies, divided
  • 1/3 cup butter or margarine, melted
  • 3 pkg. (8 oz. each) Philadelphia Cream Cheese, softened
  • 3/4 cup sugar
  • 1 cup Sour Cream
  • 1 tsp. vanilla
  • 4 eggs
DIRECTIONS

PREHEAT oven to 350°F if using a 9-inch silver springform pan (or to 325°F if using a dark nonstick 9-inch springform pan). Finely crush 30 of the cookies. Mix crushed cookies with butter. Press firmly onto bottom and 2 inches up side of pan; set aside.

Coarsely chop remaining 15 cookies; set aside.

BEAT cream cheese and sugar in large bowl with electric mixer on medium speed until well blended. Add sour cream and vanilla; mix well. Add eggs, 1 at a time, mixing on low speed after each addition just until blended. Gently stir in chopped cookies. Spread into prepared crust.

BAKE 55 minutes to 1 hour or until set. (If necessary to prevent top from overbrowning, tent with foil during last 15 to 20 minutes of baking time.) Cool completely on wire rack.

REFRIGERATE at least 4 hours or overnight. Run knife or metal spatula around side of pan to loosen cake; remove side of pan before serving. Decorate with additional Oreo cookies or whipped cream. Incredibly yummy!

Monday, September 11, 2006

Minnesota State Fair On A Stick

YUMMY! Who doesn't love food-on-a-stick?

Friday, September 08, 2006

Cheddar-Stuffed Burgers

cheddar-stuffed burger

Can you believe summertime is almost gone? It has been so hot and humid here in San Diego lately that it seemed like summer would last forever, but last night the winds changed it's definitely getting cooler now (yes, that's like 70 degrees for us!!!). As a last hurrah, make these cheddar-stuffed burgers to remind you of summer and get you ready for the fall.

Grilling Method: Direct/Medium

INGREDIENTS (makes 6 burgers)

  • 1 pound ground sirloin
  • 1 pound ground chuck
  • 1 tablespoon Worcestershire sauce
  • 1 teaspoon Coleman's dry mustard
  • Kosher salt
  • Coarse black pepper, freshly ground (about ¼ cup)
  • 6 - 2 inch cubes of sharp cheddar cheese
  • 6 hamburger buns
  • 6 crisp lettuce leaves (optional)
  • 6 slices ripe tomato (optional)
  • Ketchup (optional)
  • Mustard (optional)
  • Mayonnaise (optional)
DIRECTIONS

Being careful not to over-work the meat, mix the sirloin and chuck, add the Worcestershire sauce, mustard and salt until just combined. Portion the meat into 6 equal pieces and shape each patty around one cube of cheese and set aside.

Meanwhile, put peppers on a shallow plate and roll the rim of each burger in the pepper until it is coated in a "stripe" of pepper. (The burgers can be made up to this point one day earlier and kept refrigerated.)

When ready to grill, place burgers on the cooking grate and grill until the meat is no longer pink, 8 to 10 minutes, turning once halfway through grilling time. Meanwhile grill the buns over Direct heat until lightly toasted, if desired.

Serve immediately on the buttered rolls with a lettuce leaf and tomato if desired. Serve with traditional condiments on the side.

Recipe from Girlsatthegrill.com

Friday, September 01, 2006

Gorgeous Foods

Kobe Beef Sushi Roll

From the mind of Executive Chef, Jeff Thruston, comes this delectable sushi roll. It's a roll with asparagus and braised hijiki and topped with seared Kobe beef. You can only find this at The Prado Restaurant in San Diego, CA.Kobe Beef Sushi Roll

T-Bone Steak Dinner & Panna Cotta

We had this fabulous dinner at the Wine Vault and Bistro in San Diego, CA.

T-bone steak

panna cotta

Thursday, August 31, 2006

Individual Molten Center Chocolate Cakes

Molten Chox Cake

I saw this recipe on another fellow bloggers site, bakinsheet.blogspot.com, and I had to give it a try. I am freakishly addicted to chocolate and this recipe especially caught my eye because it uses bittersweet chocolate. This is a perfect recipe for a dinner party or if you want to impress your family, or that special someone.

INGREDIENTS (makes 6 individual cakes)

  • 6 oz. bittersweet chocolate, chopped and divided
  • 1 tablespoon heavy cream
  • 3 tablespoons unsalted butter, very soft
  • 2 large eggs, room temperature
  • 1/4 cup sugar
  • 1 teaspoon vanilla extract
  • 1/8 teaspoon salt
  • 1 tablespoon all-purpose flour
DIRECTIONS

Preheat oven to 400F.

Butter a 6-cup muffin tin and dust each well with cocoa powder. Set aside.

In a small bowl, melt together 2 ounces bittersweet chocolate and 1 tablespoon heavy cream, either in the microwave in very small intervals, or over a small double boiler. Once it becomes smooth and shiny, chill for about 10 to 15 minutes. This is the ganache.

In another small bowl, melt together the remaining 4 ounces of bittersweet chocolate and the butter. Set aside to cool for about 10 minutes at room temperature.

In a large bowl, combine the eggs, sugar, vanilla and salt. Beat with an electric mixer until the mixture triples in volume and is very thick (about 5-7 minutes). Sift flour over egg mixture and fold in. Add cooled chocolate/butter mixture and fold in until batter is uniform. Pour into prepared muffin tins.

Form ganache into 6 teaspoon-sized balls and place one in each cake, pressing gently to cover with batter. (If there is a little left over, that's ok.)

Bake at 400F for 9-11 minutes, until the tops are set. Let cakes cool in pan for 5 minutes before turning out onto a wire rack and serving on individual plates. Cakes can be served right side up or still inverted. Serve immediately, with lightly sweetened whipped cream or vanilla ice cream.

Wednesday, August 30, 2006

Hot Dogs, Mexican Style

hot dog street vendor in L.A.In Mexico, bacon-wrapped hot dogs are a staple street food that you can find in almost any busy corner, especially during the mmmm, bacon...evenings. Nowadays, you can also find these hot dog vendors in Southern California. There are a few vendors in San Diego that sell these doggies and, boy are they good. If you're a bacon lover, which I know you are, you'll enjoy these perros calientes. Mmmmm, bacon....

INGREDIENTS (makes 8 hot dogs)

  • 8 hot dogs
  • 8 hotdog buns
  • 8 slices bacon
  • Mayonnaise, as needed
  • Ketchup, as needed
  • Mustard, as needed
  • 1 medium tomato, diced
  • 1 medium onion, diced
  • 1 jalapeño pepper (optional), seeded and finely diced
DIRECTIONS

In a bowl, combine the chopped tomatoes, onion and jalapeño pepper and set aside.

Wrap bacon around each hot dog. If needed, you can insert toothpicks to hold the bacon in place, but usually it will stick to the hot dog by itself. Place the hot dogs on a pre-heated skillet and cook on medium until the bacon is done.

Warm the hot dog buns and spread mayonnaise on them.

Place one bacon wrapped hot dog on each bun (remove toothpicks, if used), and add your favorite condiments such as ketchup and mustard.

Finally, spread some of the salsa over the hot dog, about one to two tablespoons and enjoy!

bacon wrapped hot dog...yummy!

Monday, August 28, 2006

PB&B: Peanut Butter and Banana Sandwich

PB&BThis sandwich is insane. If you love peanut butter like I do, you will love this sandwich. It's a grilled sami smothered in peanut butter, topped with sliced bananas and grilled to perfection. As some of you may know, my husband hates bananas. Don't ask me why, but he does. So I made the recipe below for him sans bananas. It still tasted pretty good.

INGREDIENTS (makes 2 sandwiches)

  • 1/2 cup chunky peanut butter
  • 2 tablespoons honey
  • 1 teaspoon cinnamon
  • 2 small bananas or one huge one...hee hee
  • 4 slices of white bread, a good variety or your favorite sandwich bread
  • Spreadable butter such as ICBINB
  • 1/4 cup sugar
  • 1/2 teaspoon cinnamon
DIRECTIONS
  1. Mix the first three ingredients in a small bowl. peanut butter mix
  2. Spread equal amounts of peanut butter on each slice of bread. spread PB on slices
  3. Slice the banana and place the slices on two pieces of bread. Top with another piece of bread.
  4. Place a non-stick pan on medium-high. Butter each side of the sandwich and grill for about 1 minute per side, or until it's nicely grilled. In the meantime, combine the sugar and cinnamon in a plate. Once your PB&B is grilled on both sides, immediately pass it through the cinnamon sugar.
Cut sandwich on the diagonal and serve immediate. YUMMY-TUMMY!

Thursday, August 24, 2006

P.E.I. Mussels

We live near the Kensington Grill restaurant in San Diego, CA. The restaurant is a casual shi-shi joint with a very unique American menu. One of my favorite items in their menu is their p.e.i mussels (Prince Edward Island). The mussels are steamed to perfection in a white wine broth, and then they are served with a tarragon sauce. If you check this place out, I suggest you just order from their appetizer menu since it's cheaper and I think the appetizers are better tasting than the entrees.

INGREDIENTS (about 3 to 4 servings as an appetizer)

  • 2 pounds mussels
  • 1 cup dry white wine, such as Pinot Gris or Blanc de Blanc
  • 1 large shallot, chopped
  • 1 bay leaf
  • 1 thyme sprig
  • 2 tablespoons extra-virgin olive oil
  • 1 tablespoon Dijon mustard
  • 2 tablespoons chopped fresh tarragon
  • Salt
  • Freshly ground black pepper
DIRECTIONS

Discard any mussels that have cracked or are damaged. Remove beards from mussels, and scrub each mussel under cold water. Rinse until water runs clear.

Combine the wine, shallots, bay leaf, and thyme in a very large pot and bring to a slow simmer over medium heat.

Add the mussels to pot, cover, and turn heat up to high. When steam starts to escape from cover, reduce heat to medium. Shake pot to redistribute mussels, and cook for 5 to 10 minutes, or until mussels have opened. Remove from heat. Remove mussels from liquid and discard any unopened mussels.

Remove the bay leaf. Add the shallot liquid into another saucepan. Reduce liquid on high heat for 2 minutes. Remove from heat, and with a hand held blender add the olive oil, Dijon, and tarragon to emulsify. Season with salt and pepper and spoon over mussels. Serve nice pieces of crusty, French bread to sop up all the juices.

Monday, August 21, 2006

Farfalle in a Pignoli Cream Sauce

There are times when I wake up craving pasta. It doesn't happen too often, but when it does, I always try to create something new rather than just making the old standard spaghetti or lasagna. Since I had pine nuts in the house, I came up with this recipe. If you don't have pine nuts or don't like them, you can use toasted, unsalted walnuts instead.

INGREDIENTS (makes about 1-1/2 cups of sauce)

  • 3 tablespoons butter
  • 3 tablespoons flour
  • 8 ounces heavy whipping cream
  • salt to taste
  • 1 pinch ground nutmeg
  • 1/4 cup grated Parmesan cheese
  • 1/4 cup grated Romano cheese
  • 1/4 cup ground pignoli (pine nuts)**
  • Bowtie pasta (or your favorite short pasta) cooked according to package directions
  • A few more pine nuts for garnish
DIRECTIONS

Melt butter in a saucepan over medium heat. Add the flour and cook it, stirring constantly for about 1 minute. 
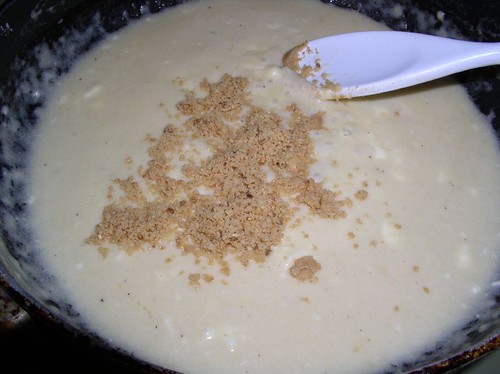
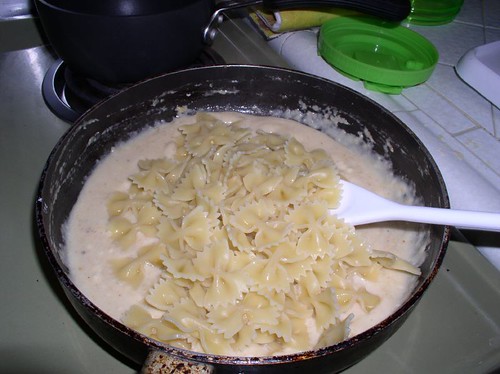
Add heavy cream, stirring constantly. Stir in salt, nutmeg, grated Parmesan cheese, grated Romano cheese, and ground pignolis. Simmer over medium low heat for 5 to 8 minutes.

Add the sauce to your cooked pasta and serve immediately.

Garnish with additional grated Parmesan cheese, and roasted pignolis, if desired.

**Before you use the store bought pine nuts, toast them in a 325° oven, stirring occasionally, until they're slightly golden, about five minutes.